WONLINK WL-NE3501
WONLINK WiFi Range Extender User Manual
Model: WL-NE3501
1. Introduktion
The WONLINK WiFi Range Extender is designed to expand your existing wireless network coverage, eliminate Wi-Fi dead zones, and provide a strong, stable internet connection throughout your home or office. With dual-band technology and multiple operation modes, it offers versatile solutions for various networking needs.

Billede: Forside view of the WONLINK WiFi Range Extender with four antennas, showing blue light indicators and the WONLINK logo.

Image: Diagram illustrating how the WiFi extender expands coverage from a router to eliminate dead zones in a house.
2. Nøglefunktioner
- Udvidet dækning: Expands existing Wi-Fi coverage up to 8000 sq.ft, penetrating floors and walls to reach every corner.
- Højhastighedsydelse: Dual-band technology (5GHz up to 867Mbps & 2.4GHz up to 300Mbps) provides a total network speed of up to 1200Mbps for smooth streaming and gaming.
- Flere driftstilstande: Supports Repeater, AP, and Router modes to meet diverse networking requirements.
- Nem opsætning: Features WPS function for quick setup (within 30 seconds) and web browser configuration for detailed settings.
- Bred kompatibilitet: Compatible with any standard router, access point, and supports up to 35 devices simultaneously.
- Forbedret sikkerhed: Supports WEP/WPA/WPA2 wireless security protocols to protect your network and data.
- Effektiv varmeafledning: Designed with double-sided cooling holes to ensure stable operation and extend product lifespan.

Image: Graphic illustrating the high performance dual-band WiFi, showing 5.8GHz up to 867Mbps and 2.4GHz up to 300Mbps.

Billede: Gennemsigtig view of the WiFi extender, highlighting its powerful internal chip and multi-function capabilities.

Image: Visual representation of various devices (laptops, smartphones, tablets, game consoles, smart appliances) connected to the WiFi extender, emphasizing stable signal transmission.
3. Pakkens indhold
Tjek venligst pakken for følgende varer:
- 1x WONLINK WiFi Extender Booster
- 1x brugermanual
- 1x RJ45 netværkskabel
4. Opsætningsvejledning
4.1. Tænder
Plug the WiFi Extender into a power outlet. Wait for the power indicator light to turn solid blue, indicating it is ready for setup.
4.2. WPS-metode (Wi-Fi Protected Setup)
This is the quickest way to set up your extender if your router supports WPS.
- Plug the WONLINK WiFi Extender into a power outlet near your main router.
- Vent på, at strømindikatorlampen på extenderen lyser stabilt.
- Tryk på WPS-knappen på din primære router.
- Within 2 minutes, press the WPS button on the WONLINK WiFi Extender.
- The extender's signal indicator light will flash and then turn solid blue, indicating a successful connection.
- You can now unplug the extender and move it to a location between your router and the Wi-Fi dead zone. Ensure the signal indicator remains solid blue for optimal performance.
4.3. Web Browser Setup Method
Use this method if your router does not have a WPS button or for more advanced configuration.
- Plug the WONLINK WiFi Extender into a power outlet.
- On your computer or smartphone, connect to the extender's default Wi-Fi network (e.g., "WONLINK_Extender" or similar, usually found on a sticker on the device). No password is required initially.
- Åbn a web browser (e.g., Chrome, Firefox, Safari) and enter
192.168.10.1i adresselinjen. - Log in using the default username and password (usually "admin" for both, check the device sticker or user manual for specifics).
- Follow the on-screen instructions to select your desired operation mode (Repeater, AP, or Router) and configure the network settings. For Repeater mode, select your home Wi-Fi network and enter its password.
- Once configured, the extender will restart. Reconnect your devices to the new extended Wi-Fi network.
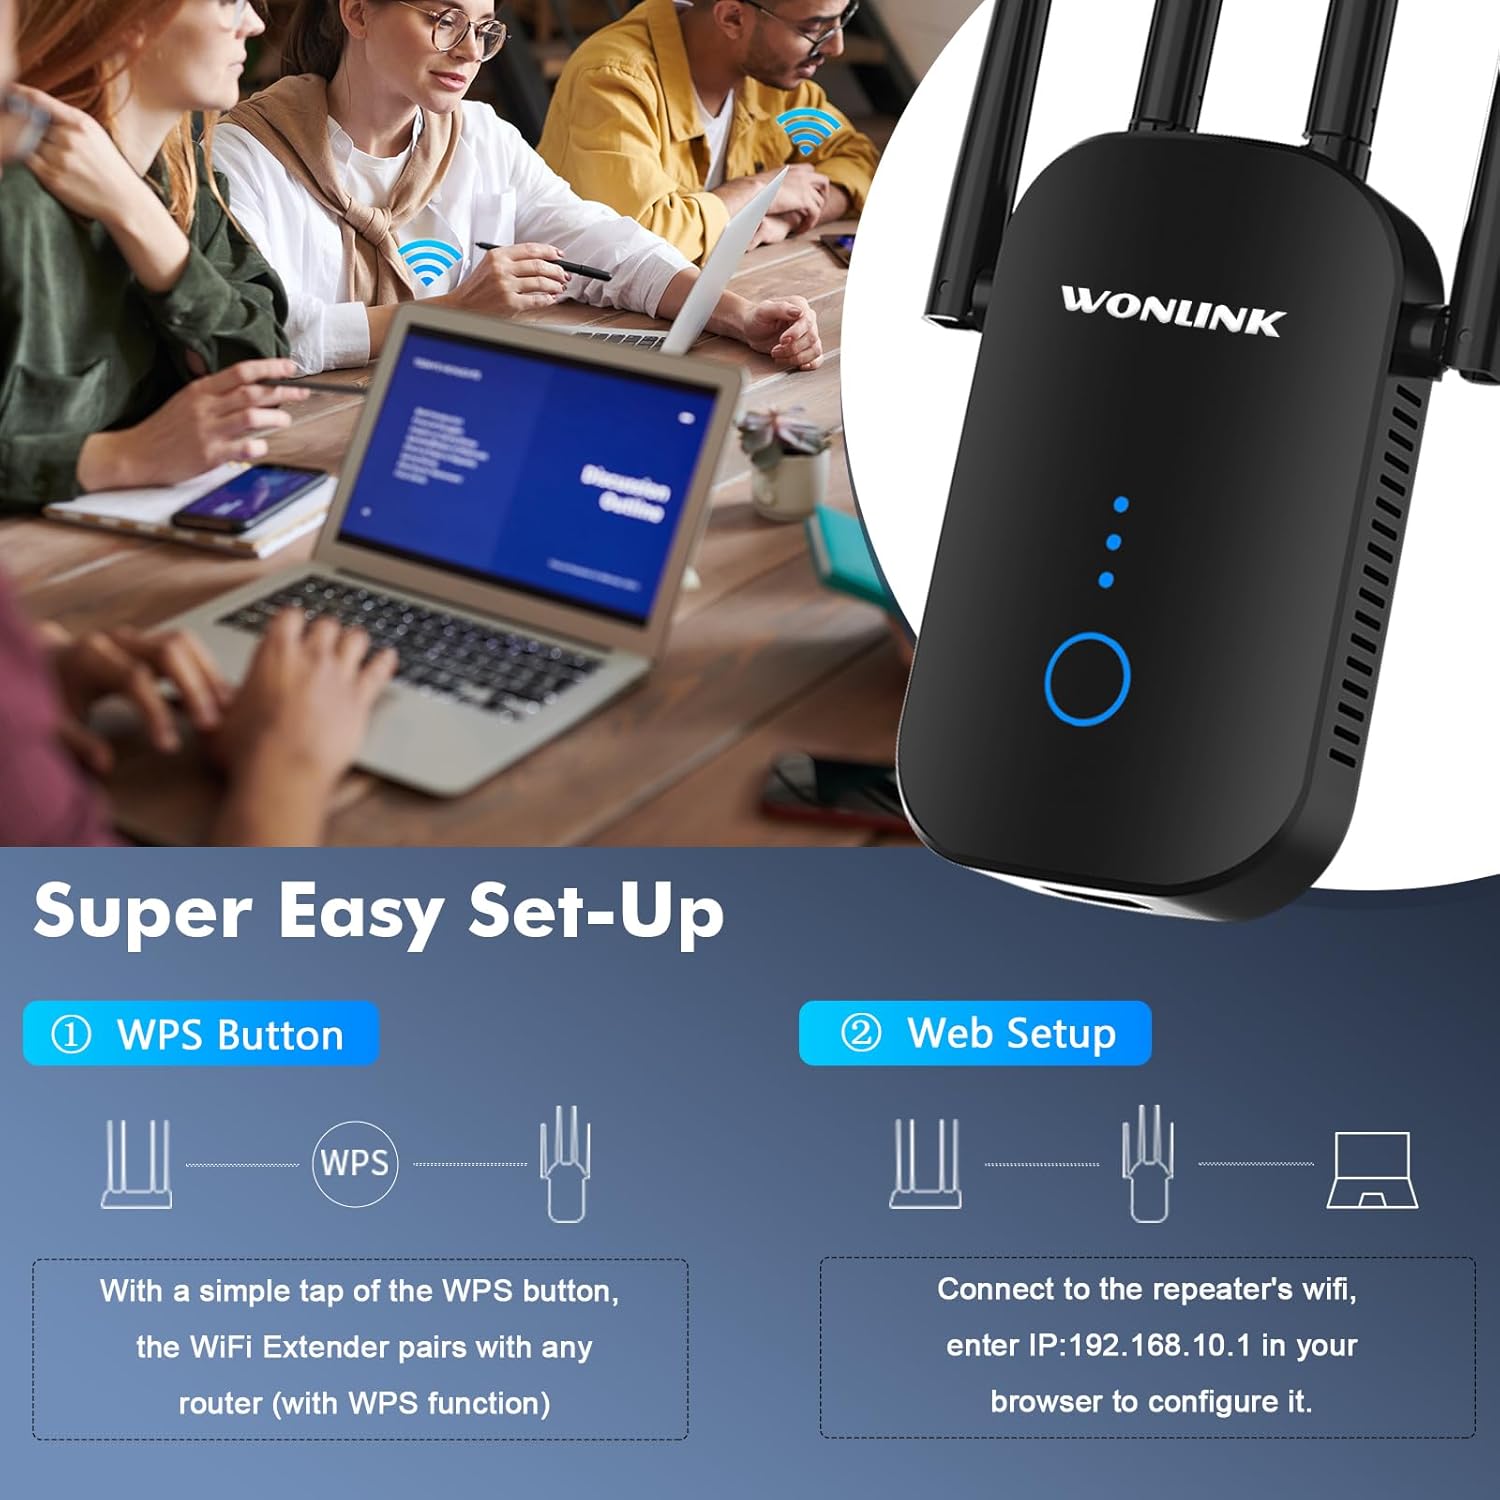
Image: Visual guide for the two easy setup methods: WPS button pairing and web browser configuration via IP address.
5. Driftstilstande
The WONLINK WiFi Range Extender supports multiple operation modes to suit different networking environments.
5.1. Repeater-tilstand
Extends the existing Wi-Fi coverage of your main router to a larger area, eliminating dead zones. This is the most common mode for home users.
- Connects wirelessly to your existing router.
- Broadcasts the extended Wi-Fi signal.
5.2. Routertilstand
Functions as a standalone wireless router, creating a new private network. Ideal for situations where you only have a modem and need a Wi-Fi network.
- Connects to a modem via an Ethernet cable.
- Creates a new Wi-Fi network for your devices.
5.3. AP (Adgangspunkt) Tilstand
Converts a wired internet connection into a wireless network. Useful for adding Wi-Fi capability to a wired-only network or extending a wired network wirelessly.
- Connects to your existing router or network switch via an Ethernet cable.
- Sender et nyt Wi-Fi-signal.

Image: Flowchart showing the three main application modes: Repeater Mode (extending existing WiFi), Router Mode (creating a new WiFi from modem), and AP Mode (converting wired to wireless).
6. Specifikationer
| Feature | Beskrivelse |
|---|---|
| Modelnummer | WL-NE3501 |
| Trådløs Standard | 802.11a/b/g/n, 802.11ac |
| Dataoverførselshastighed | Up to 1200 Mbps (867Mbps for 5GHz, 300Mbps for 2.4GHz) |
| Frekvensbånd | Dobbeltbånd (2.4 GHz og 5 GHz) |
| Sikkerhedsprotokoller | WEP, WPA, WPA2 |
| Havne | Fast Ethernet Port |
| Dimensioner | 8.27 x 3.9 x 3.03 tommer |
| Varens vægt | 5.6 ounce |
7. Vedligeholdelse og pleje
- Placering: For optimal performance, place the extender in a central location between your router and the area where you need improved Wi-Fi coverage. Avoid placing it near large metal objects, concrete walls, or other electronic devices that may cause interference.
- Rensning: Brug en blød, tør klud til at rengøre enhedens yderside. Brug ikke flydende rengøringsmidler eller aerosoler.
- Ventilation: Sørg for, at ventilationshullerne ikke er blokerede for at forhindre overophedning.
- Firmwareopdateringer: Kontroller jævnligt producentens webwebsted for firmwareopdateringer for at sikre optimal ydeevne og sikkerhed.

Image: Illustration demonstrating how the WiFi extender can make signals available everywhere in a home, showing placement in living room, bedroom, bathroom, office, and indoor garage.
8. Fejlfinding
- Ingen strøm: Sørg for, at forlængeren er korrekt tilsluttet en fungerende stikkontakt. Prøv en anden stikkontakt.
- Kan ikke få adgang Web Ledelsesside:
- Ensure your device is connected to the extender's Wi-Fi network (or via Ethernet cable if applicable).
- Verify that you have entered the correct IP address (
192.168.10.1) i din browser. - Ryd din browsers cache og cookies, eller prøv en anden browser.
- Deaktiver midlertidigt al VPN- eller firewallsoftware.
- Poor Signal Strength or Frequent Disconnections:
- Relocate the extender closer to your main router. The ideal location is halfway between the router and the dead zone.
- Ensure there are no major obstructions (thick walls, large metal objects) between the extender and your router/devices.
- Kontroller for interferens fra andre elektroniske enheder (mikrobølgeovne, trådløse telefoner).
- Ensure your main router's Wi-Fi signal is strong and stable.
- Extended Network Not Visible or Not Working:
- Perform a factory reset on the extender (usually by pressing and holding the reset button for 5-10 seconds with a paperclip) and reconfigure it.
- Verify that you entered the correct Wi-Fi password for your main router during setup.
- Ensure the extender is in the correct operation mode (e.g., Repeater mode if extending an existing network).
9. Garanti og support
For warranty information and technical support, please refer to the official WONLINK website or contact their customer service directly. You may also find additional resources and FAQs on their support pages.
En digital version af brugsanvisningen (IFU) er tilgængelig som PDF-dokument: Brugsanvisning (PDF)
Ask a question about this manual
Ask about setup, troubleshooting, compatibility, parts, safety, or missing instructions. Manuals+ will review the question and use this page’s manual context to help answer it.