
1. Vigtige sikkerhedsoplysninger
Please read all instructions carefully before using the EVTSCAN Projection Clock. Keep this manual for future reference.
- Udsæt ikke enheden for ekstreme temperaturer, direkte sollys eller høj luftfugtighed.
- Undgå at tabe uret eller udsætte det for hårde stød.
- Forsøg ikke selv at skille enheden ad eller reparere den. Kontakt kvalificeret servicepersonale.
- Use only the specified power adapter (DC 5.0V, 1.2A) or appropriate batteries (2xAAA, not included).
- Opbevares utilgængeligt for børn.
2. Produktet er slutview
The EVTSCAN Projection Clock is a versatile digital alarm clock featuring a 3-inch backlit LCD screen that displays time, date, day of the week, temperature, and humidity. It includes a projection function to display time and temperature on a wall or ceiling, dual alarms with snooze, and a USB port for charging mobile phones.
Nøglefunktioner:
- 12/24-hour time format display.
- Date and day of the week display (7 languages for week).
- Temperature detection (-9℃ to +50℃) and humidity detection (20% to 95%).
- Projection function with 180-degree rotation for time and temperature.
- Dual alarm clocks with slowly increasing volumen.
- 5-minutters snooze-funktion.
- USB charging port for mobile devices.
- Adjustable backlight with 4 levels (high, medium, low, off).

Figur 2.1: Front view of the EVTSCAN Projection Clock, showing the LCD display and projection lens.
3. Pakkens indhold
Ved udpakning skal du sørge for, at alle nedenstående varer er til stede og i god stand:
- 1 x EVTSCAN Projection Clock
- 1 x USB-kabel
- 1 x engelsk brugervejledning
Note: 2xAAA batteries are required for battery power and are not included in the package.
4. Opsætning
4.1 Strømforsyning til enheden
The EVTSCAN Projection Clock can be powered by either AAA batteries or via the included USB cable.
4.1.1 Batteriinstallation
- Find batteridækslet på bagsiden af uret.
- Slide open the cover.
- Isæt to (2) AAA-batterier, og sørg for at polerne vender korrekt (+/-).
- Luk batterirummets dæksel forsvarligt.
Note: When powered by batteries, the backlight will only light up for 8 seconds when activated to conserve power. The projection lamp will also light up for 8 seconds.
4.1.2 USB-strømtilslutning
- Connect the small end of the provided USB cable to the DC 5.0V 1.2A input port on the back of the clock.
- Tilslut den større ende af USB-kablet til en kompatibel USB-strømadapter (medfølger ikke) eller en USB-port med strømforsyning.
Note: When powered by USB, the backlight and projection lamp can remain continuously on, with adjustable brightness for the backlight.
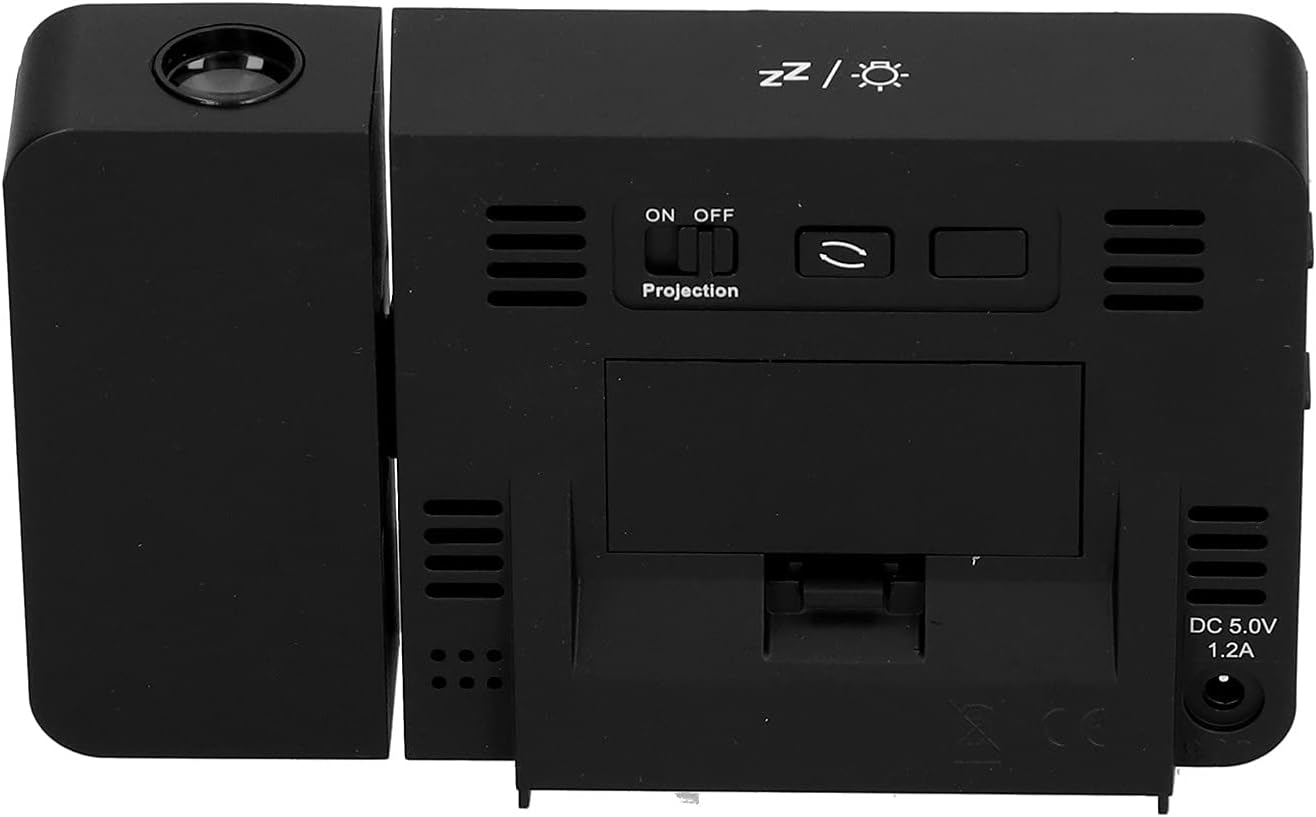
Figur 4.1: Bag view of the clock, indicating the battery compartment and DC 5.0V 1.2A power input.
5. Betjeningsvejledning
5.1 Knapfunktioner
Familiarize yourself with the control buttons located on the front and sides of the clock:
- TID: Går i tidsindstillingstilstand.
- ALARM: Går i alarmindstillingstilstand.
- +: Increases values, switches 12/24HR format, adjusts backlight.
- -: Decreases values, switches temperature units (℃/℉).
- Projection ON/OFF Switch: Activates or deactivates the projection. (Located on the back/side)
- Alarm 1 ON/OFF Switch: Activates or deactivates Alarm 1. (Located on the side)
- Alarm 2 ON/OFF Switch: Activates or deactivates Alarm 2. (Located on the side)
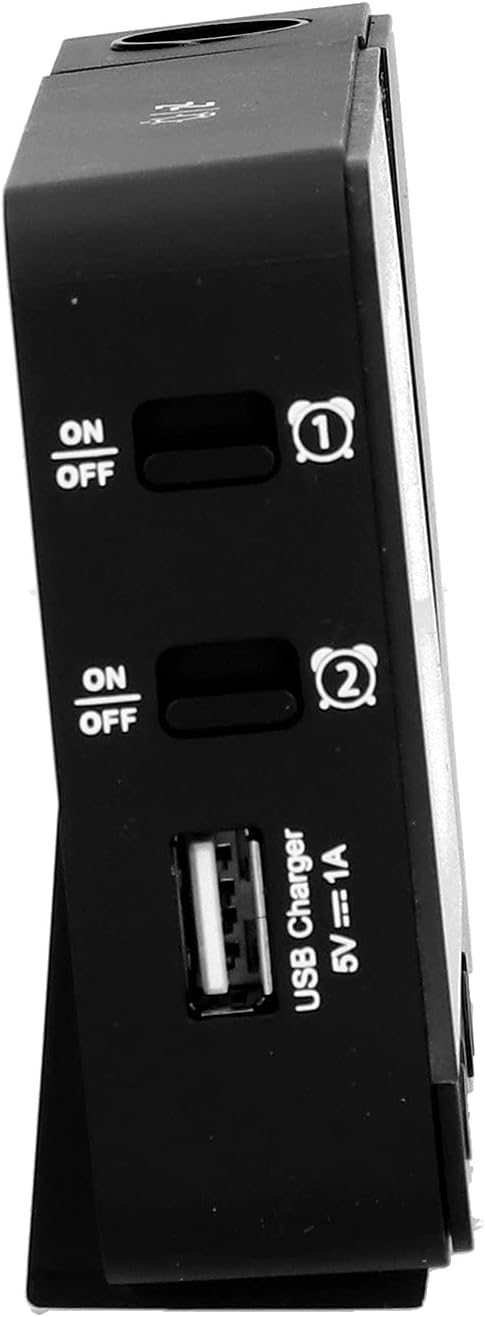
Figur 5.1: Side view showing Alarm 1 and Alarm 2 ON/OFF switches, and the USB charging port.
5.2 Indstilling af tid og dato
- Tryk og hold på TID button to enter time setting mode. The hour display will flash.
- Brug + or - knapper for at justere timen.
- Trykke TID igen for at bekræfte timeindstillingen og gå videre til minutindstillingen. Juster med + or -.
- Fortsæt med at trykke TID to cycle through setting year, month, and day. Adjust each with + or -.
- Når du har indstillet dagen, skal du trykke på TID en sidste gang for at afslutte indstillingstilstand.
- For at skifte mellem 12-timers og 24-timers format skal du trykke på + button during normal time display.
- To switch between Celsius (℃) and Fahrenheit (℉) for temperature, press the - button during normal time display.
5.3 Indstilling af alarmer
The clock features two independent alarms (Alarm 1 and Alarm 2).
- Tryk og hold på ALARM button to enter Alarm 1 setting mode. The Alarm 1 hour display will flash.
- Brug + or - knapper for at justere alarmtiden.
- Trykke ALARM again to confirm the hour and move to Alarm 1 minute setting. Adjust with + or -.
- Trykke ALARM again to move to Alarm 2 hour setting, and repeat the process for Alarm 2.
- After setting Alarm 2 minutes, press ALARM en sidste gang for at afslutte indstillingstilstand.
- To activate or deactivate an alarm, use the corresponding Alarm 1 TIL/FRA or Alarm 2 TIL/FRA switch on the side of the clock. An alarm icon will appear on the display when active.
5.3.1 Snooze -funktion
When an alarm sounds, press any button (except the alarm ON/OFF switch) to activate the 5-minute snooze function. The alarm will sound again after 5 minutes. To turn off the alarm completely, slide the corresponding alarm ON/OFF switch to OFF.
5.4 Projektionsfunktion
The clock can project the time and temperature onto a wall or ceiling.
- Find Projektion TIL/FRA switch on the back of the clock. Slide it to ON to activate the projection.
- Adjust the angle of the projection arm (the part with the lens) to direct the projection as desired. The arm can rotate nearly 180 degrees.
- The projection will display the current time and temperature in a soft red color.

Figur 5.2: Side view showing the projection arm extended and ready for use.

Figur 5.3: The clock projecting time and temperature onto a wall in a bedroom setting.
5.5 Justering af baggrundslys
When the clock is powered by USB, the backlight can be adjusted to four levels: high, medium, low, or off. Repeatedly press the + button during normal time display to cycle through the brightness levels.
When powered by batteries, the backlight will illuminate for 8 seconds when any button is pressed, then turn off to conserve power.
5.6 USB-opladningsport
The clock features a USB charging port (5V=1A) on its side. You can use this port to charge your mobile phone or other small electronic devices while the clock is connected to USB power.
Note: The USB charging port only functions when the clock is powered via the USB cable. It does not work when the clock is running on battery power.
6. Vedligeholdelse
6.1 Rengøring
- Tør urets overflade af med en blød, tør klud.
- Do not use abrasive cleaners, solvents, or chemical sprays, as these may damage the finish or electronic components.
- Keep the projection lens clean for clear projection. Use a soft, lint-free cloth.
6.2 Udskiftning af batteri
When the display becomes dim or the clock functions erratically while on battery power, it's time to replace the AAA batteries. Refer to Section 4.1.1 for battery installation instructions. Always replace both batteries at the same time with new ones.
7. Fejlfinding
| Problem | Mulig årsag | Løsning |
|---|---|---|
| Urdisplayet er tomt eller svagt. | No power, low batteries, or USB cable not connected. | Check battery installation and replace if necessary. Ensure USB cable is securely connected to a power source. |
| Projection is unclear or not visible. | Projection switch is OFF, lens is dirty, or projection distance is too far/close. | Ensure Projection switch is ON. Clean the projection lens. Adjust the clock's distance from the projection surface. |
| Alarmen lyder ikke. | Alarmen er ikke indstillet eller deaktiveret. | Verify alarm time is set correctly. Ensure the corresponding Alarm ON/OFF switch is in the ON position. |
| USB-opladeporten virker ikke. | Clock is running on battery power, or USB cable is not connected to a power source. | Ensure the clock is powered via the USB cable and connected to a functional power adapter. |
| Forkert tidspunkt/dato. | Tid/dato ikke indstillet korrekt. | Se afsnit 5.2 for at nulstille tid og dato. |
8. Specifikationer
| Model: | B0CLGDFCGX |
| Mærke: | EVTSCAN |
| Materiale: | ABS (Acrylonitril Butadien Styren) |
| Produktdimensioner: | Ca. 13.5 x 8 x 2.5 cm (5.3 x 3.1 x 1.0 tommer) |
| Vægt: | Ca. 242 g (8.5 oz) |
| Skærmtype: | Digital LCD med baggrundsbelysning |
| Strømkilde: | 2xAAA batteries (not included) or DC 5.0V 1.2A via USB cable |
| USB-opladningsoutput: | 5V=1A |
| Temperaturdetektionsområde: | -9℃ to +50℃ (1℃ resolution) |
| Fugtighedsregistreringsområde: | 20% til 95% (1% opløsning) |
| Temperature/Humidity Calibration Time: | 30 sekunder |
| Baggrundslysniveauer: | 4 levels (High, Medium, Low, Off) when USB powered; 8s illumination when battery powered. |
| Projektion Lamp: | Always on when USB powered; 8s illumination when battery powered. |

Figur 8.1: Product dimensions: 5.3 inches wide by 3.1 inches high.
9. Garanti og support
EVTSCAN products are manufactured to high quality standards. For specific warranty information, please refer to the warranty card included with your purchase or contact your retailer.
If you encounter any issues or have questions regarding your EVTSCAN Projection Clock, please contact the seller or EVTSCAN customer support for assistance. Please have your model number (B0CLGDFCGX) ready when contacting support.
For yderligere hjælp kan du besøge EVTSCAN Store on Amazon.