
BONTEC CT101+V02
BONTEC Tilting and Swiveling TV Ceiling Mount
Model: CT101+V02
For 26-65 Inch TVs, Max 50kg, VESA 75x75mm to 400x400mm
1. Introduktion
Thank you for choosing the BONTEC Tilting and Swiveling TV Ceiling Mount. This manual provides essential information for the safe and proper installation, operation, and maintenance of your new TV mount. Please read these instructions carefully before beginning installation and retain them for future reference.
This ceiling mount is designed to securely hold most 26-65 inch flat-panel televisions, with a maximum weight capacity of 50kg (110 lbs). It supports VESA mounting patterns ranging from 75x75mm to 400x400mm, offering flexibility for various TV models. Its adjustable height, tilt, and swivel features ensure an optimal viewing experience in diverse settings.
2. Sikkerhedsoplysninger
WARNING: Failure to read and follow all instructions may result in personal injury, property damage, or voiding of warranty. If you have any questions, please contact your retailer or the manufacturer.
- Do not install this product on drywall alone. It must be mounted to a solid wood stud, concrete wall, or brick wall.
- Sørg for, at monteringsfladen sikkert kan bære den samlede vægt af beslaget og fjernsynet.
- Overskrid ikke den maksimale vægtkapacitet på 50 kg (110 lbs).
- Verify your TV's VESA pattern is compatible with the mount (75x75mm to 400x400mm) before purchase and installation.
- Use all provided hardware. If any parts are missing or defective, contact customer support immediately.
- Professionel installation anbefales for optimal sikkerhed og ydeevne.
- Hold børn og kæledyr væk under installationen.
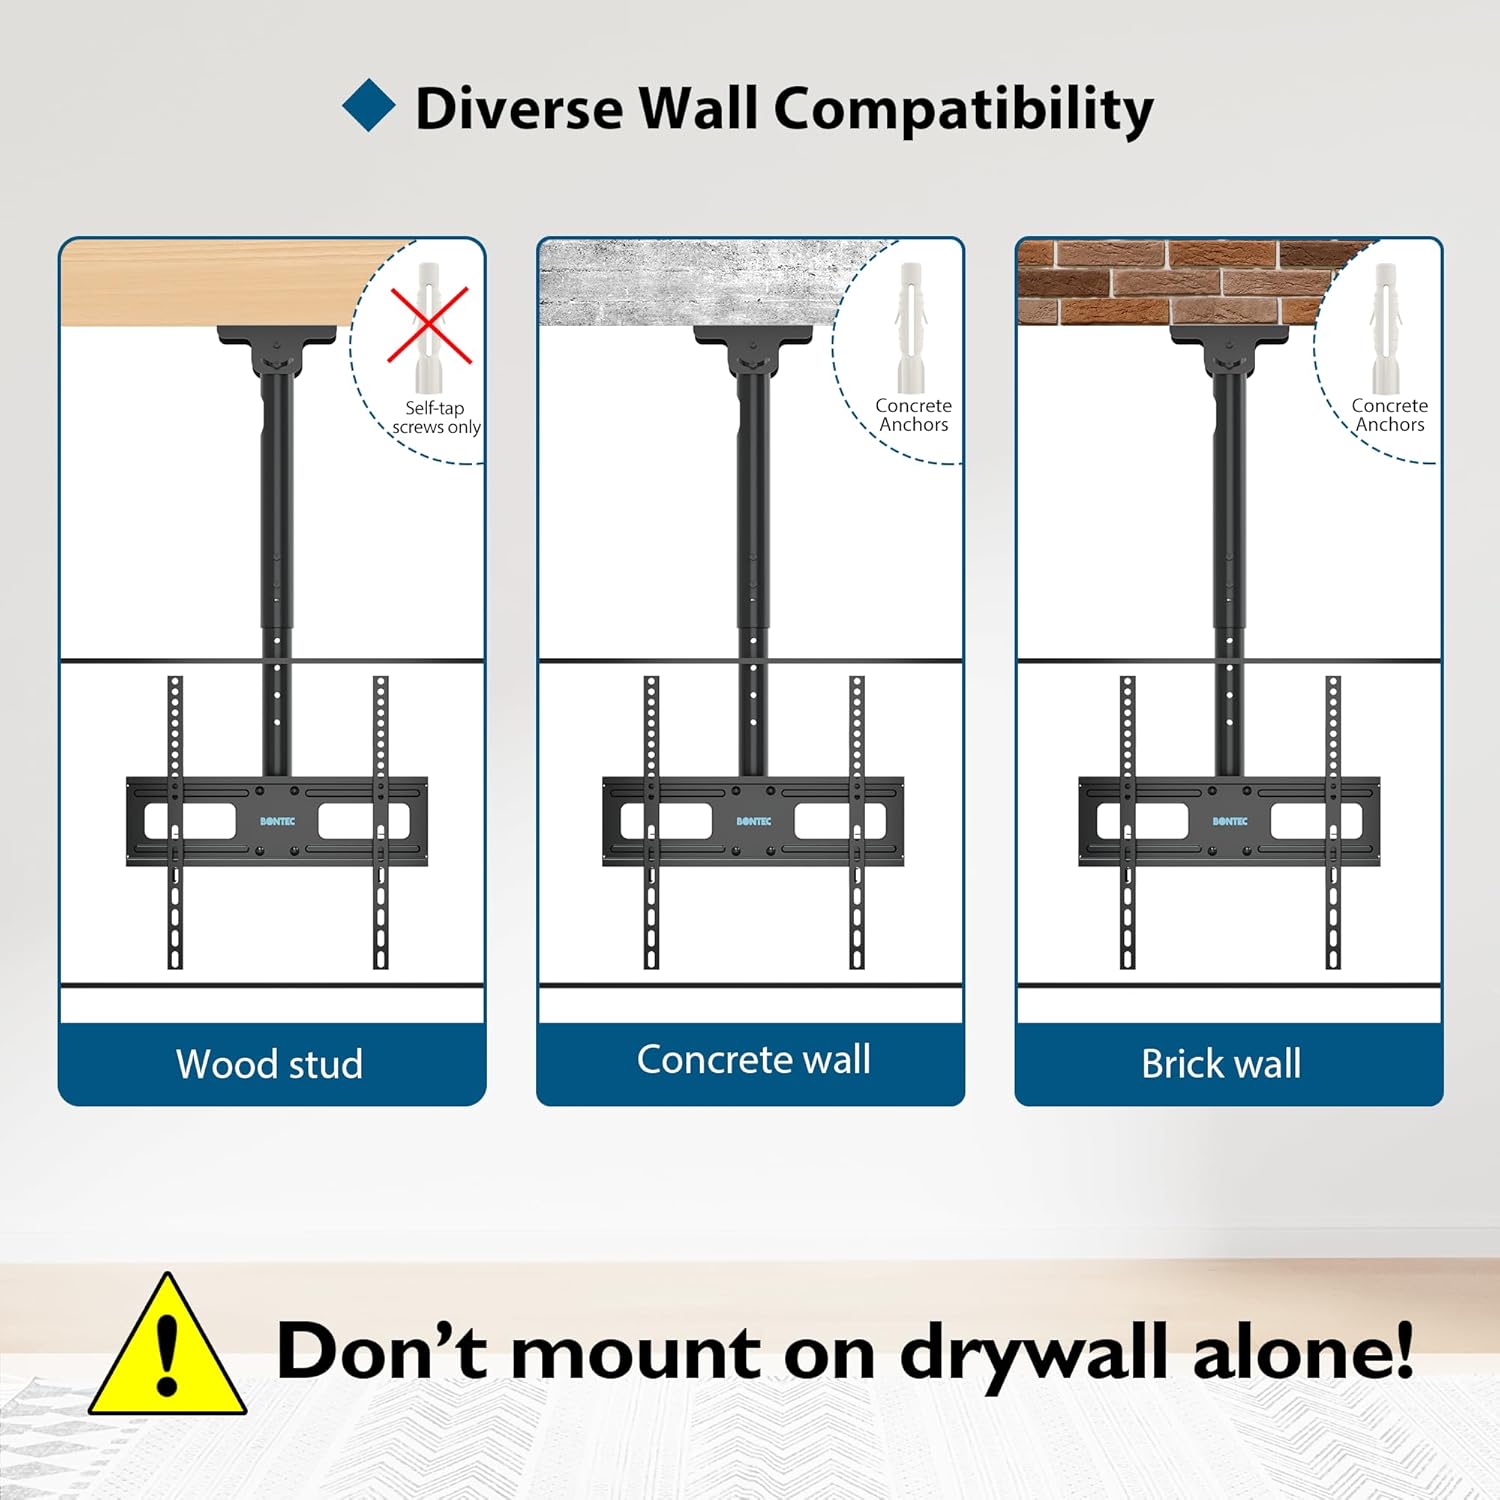
Image showing compatibility with wood studs, concrete walls, and brick walls, with a warning not to mount on drywall alone. This highlights critical safety considerations for installation.
3. Pakkens indhold
Before installation, please ensure all components are present and undamaged. All necessary tools and accessories for assembly are included in the package.
If any parts are missing or damaged, please do not attempt to install the mount. Contact customer service for assistance.
4. Specifikationer
| Feature | Specifikation |
|---|---|
| Mærkenavn | BONTEC |
| Model | CT101+V02 |
| Monteringstype | Loftmontering |
| Bevægelsestype | Swivel and Tilt |
| Materiale | Metal |
| Minimum kompatibel tv-størrelse | 26 tommer |
| Maksimal kompatibel tv-størrelse | 65 tommer |
| Maksimal vægtkapacitet | 50 kg (110 lbs) |
| VESA-kompatibilitet | 75x75mm til 400x400mm |
| Højdejusteringsområde | 730 mm til 980 mm |
| Maksimal hældningsvinkel | Up 5°, Down 15° |
| Drejevinkel | 360° |
| Vandret justering | +/- 3 ° |
| Sloped Ceiling Tilt | Up to 135° (± 45° adjustment range) |
| Forsendelsesdimensioner | 44.6 x 18.3 x 9.9 cm |
| Forsendelsesvægt | 3.28 kg |

Image illustrating the mount's compatibility with 26-65 inch screens. Always verify your TV's size before installation.

Image detailing VESA pattern compatibility from 75x75mm to 400x400mm. Ensure your TV's VESA pattern matches these specifications.
5. Opsætning og installation
This section provides general guidelines for installing your BONTEC TV Ceiling Mount. For detailed, step-by-step instructions, please refer to the assembly manual included in your product packaging. It is equipped with an easy-to-drill wall template to assist with accurate hole placement.
5.1 Tjekliste før installation
- Kontroller, at alle dele er til stede og ubeskadigede.
- Bekræft, at dit tv's vægt og VESA-mønster er inden for monteringens specifikationer.
- Identify the mounting surface (wood stud, concrete, or brick) and ensure it is structurally sound.
- Gather necessary tools (e.g., drill, level, stud finder, measuring tape, pencil).
5.2 Installationstrin (generelt overview)
- Find monteringsposition: Determine the desired location on your ceiling. Use a stud finder for wood studs or ensure the concrete/brick surface is suitable.
- Marker borehuller: Use the provided wall template to mark the precise drilling locations on the ceiling. Ensure the marks are level.
- Bor pilothuller: Drill pilot holes at the marked locations using the appropriate drill bit size for your wall type and anchors.
- Fastgør loftplade: Secure the mount's ceiling plate to the ceiling using the provided screws and anchors. Ensure it is firmly tightened.
- Assemble Pole and TV Plate: Attach the adjustable pole to the ceiling plate, then assemble the TV mounting plate to the pole according to the instructions.
- Fastgør beslag til tv'et: Secure the TV mounting brackets to the back of your television using the appropriate screws and spacers for your TV's VESA pattern.
- Hæng TV'et op på beslaget: Carefully lift the TV and hook the TV brackets onto the mounting plate on the pole. Secure the TV to the mount using the safety screws or locking mechanisms.

An illustration of the BONTEC TV ceiling mount with a television attached, demonstrating the overall installed appearance.
6. Betjeningsvejledning
Your BONTEC TV Ceiling Mount offers multiple adjustment options to achieve your desired viewvinkel og højde.
6.1 Højdejustering
The main circular pole features 6 integrated height adjustment positions, with each position spaced 40mm apart. Additionally, the suspension arm has two adjustment positions, each 50mm apart. This allows for a total height adjustment range from 730mm to 980mm. To adjust the height, use the provided Allen key to loosen the securing bolts, slide the pole to the desired height, and then firmly re-tighten the bolts.
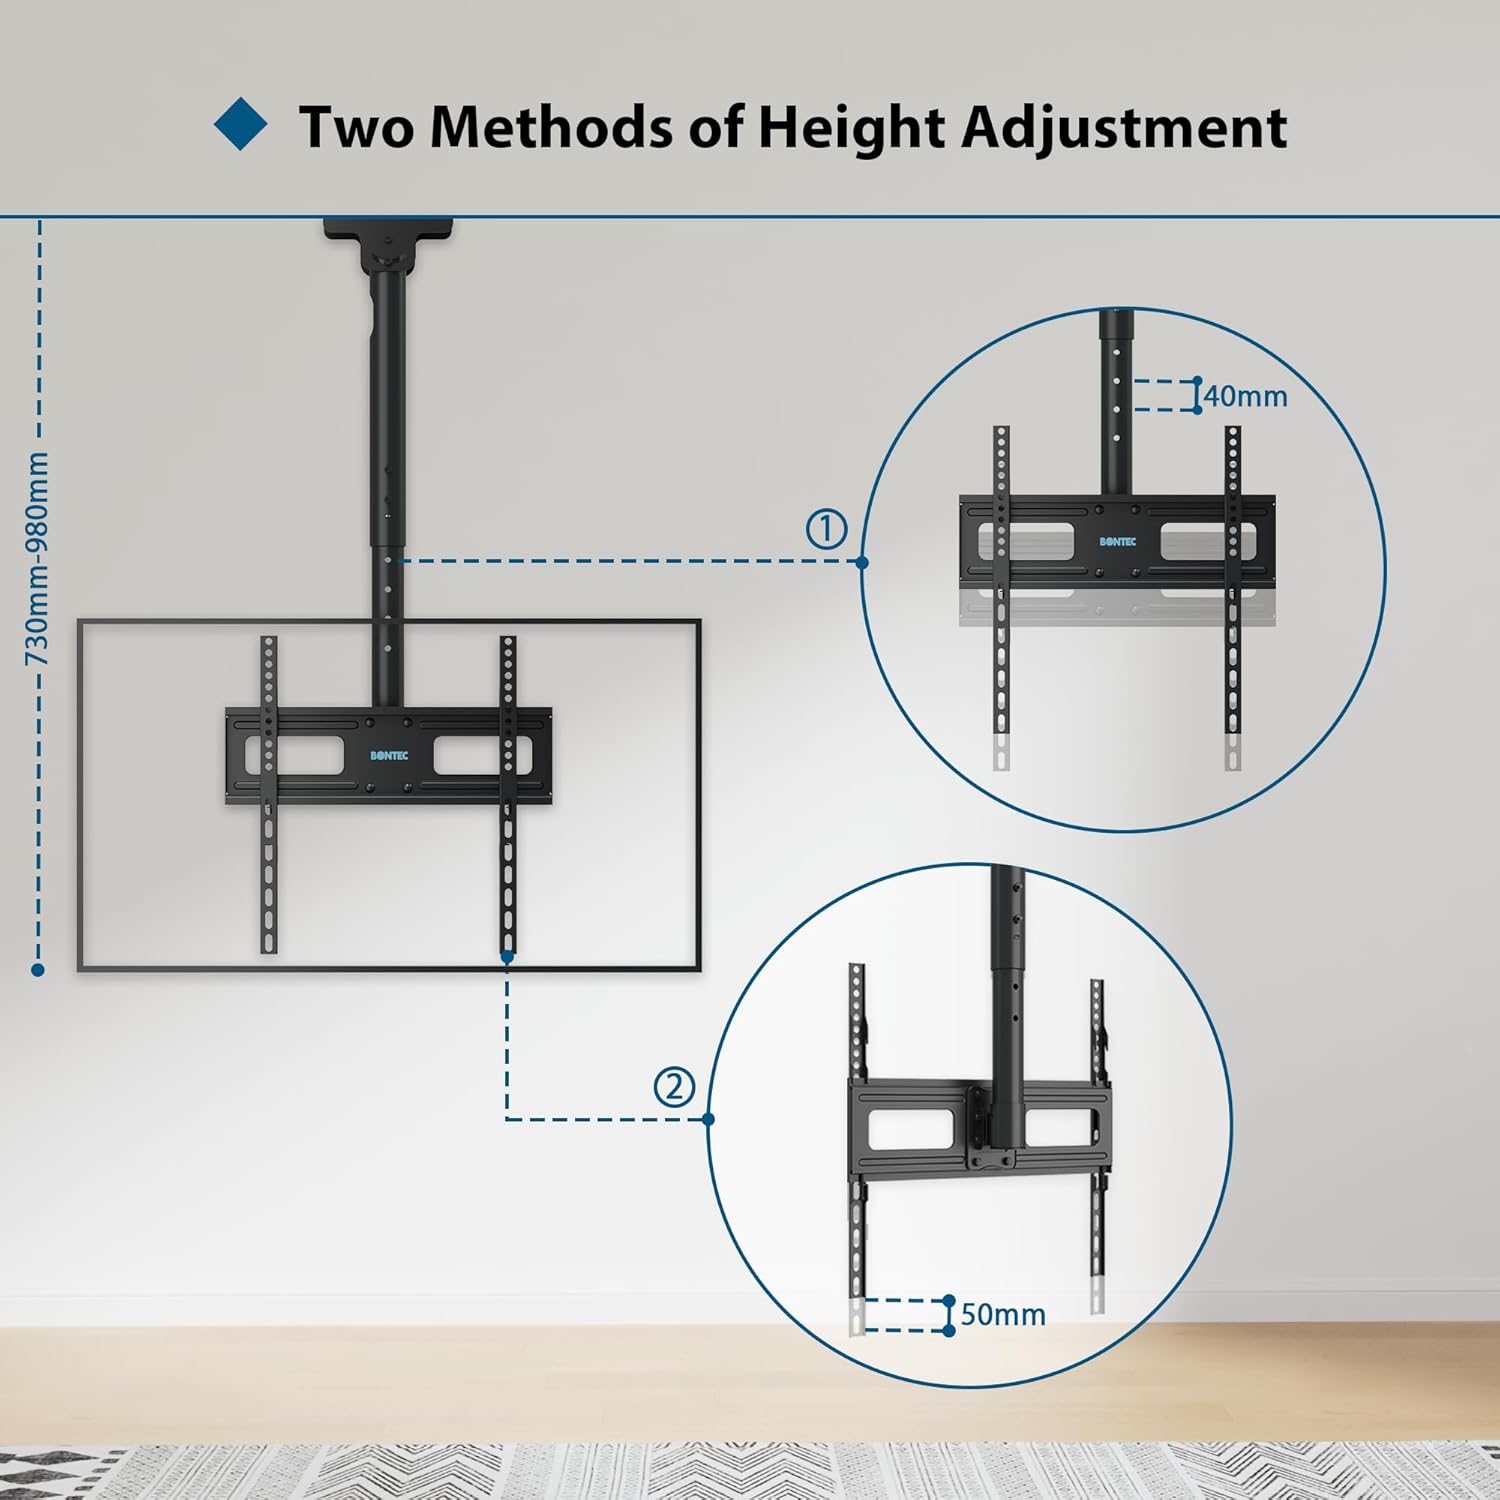
Diagram illustrating the two methods of height adjustment, showing the 40mm increments on the main pole and 50mm increments on the suspension arm, with the overall height range.
6.2 Tilt and Swivel Adjustment
The mount allows for flexible viewing angle adjustments:
- Vip: The TV can be tilted 5 degrees upwards and 15 degrees downwards to reduce glare and optimize viewing from different seating positions.
- Drejelig: The mount allows for a full 360-degree swivel, enabling you to rotate the TV to face any direction in the room.
- Horizontal Level Adjustment: Fine-tune the TV's horizontal level by +/- 3 degrees to ensure it is perfectly straight after installation.

Image demonstrating the swivel and tilt capabilities of the mount, showing the TV rotating 360 degrees and tilting up to 5 degrees up and 15 degrees down.
6.3 Sloped Ceiling Installation
This mount is also suitable for installation on sloped ceilings. The wall plate can be tilted up to 135 degrees, with an adjustment range of ± 45 degrees, allowing the TV to hang vertically even from an angled ceiling.
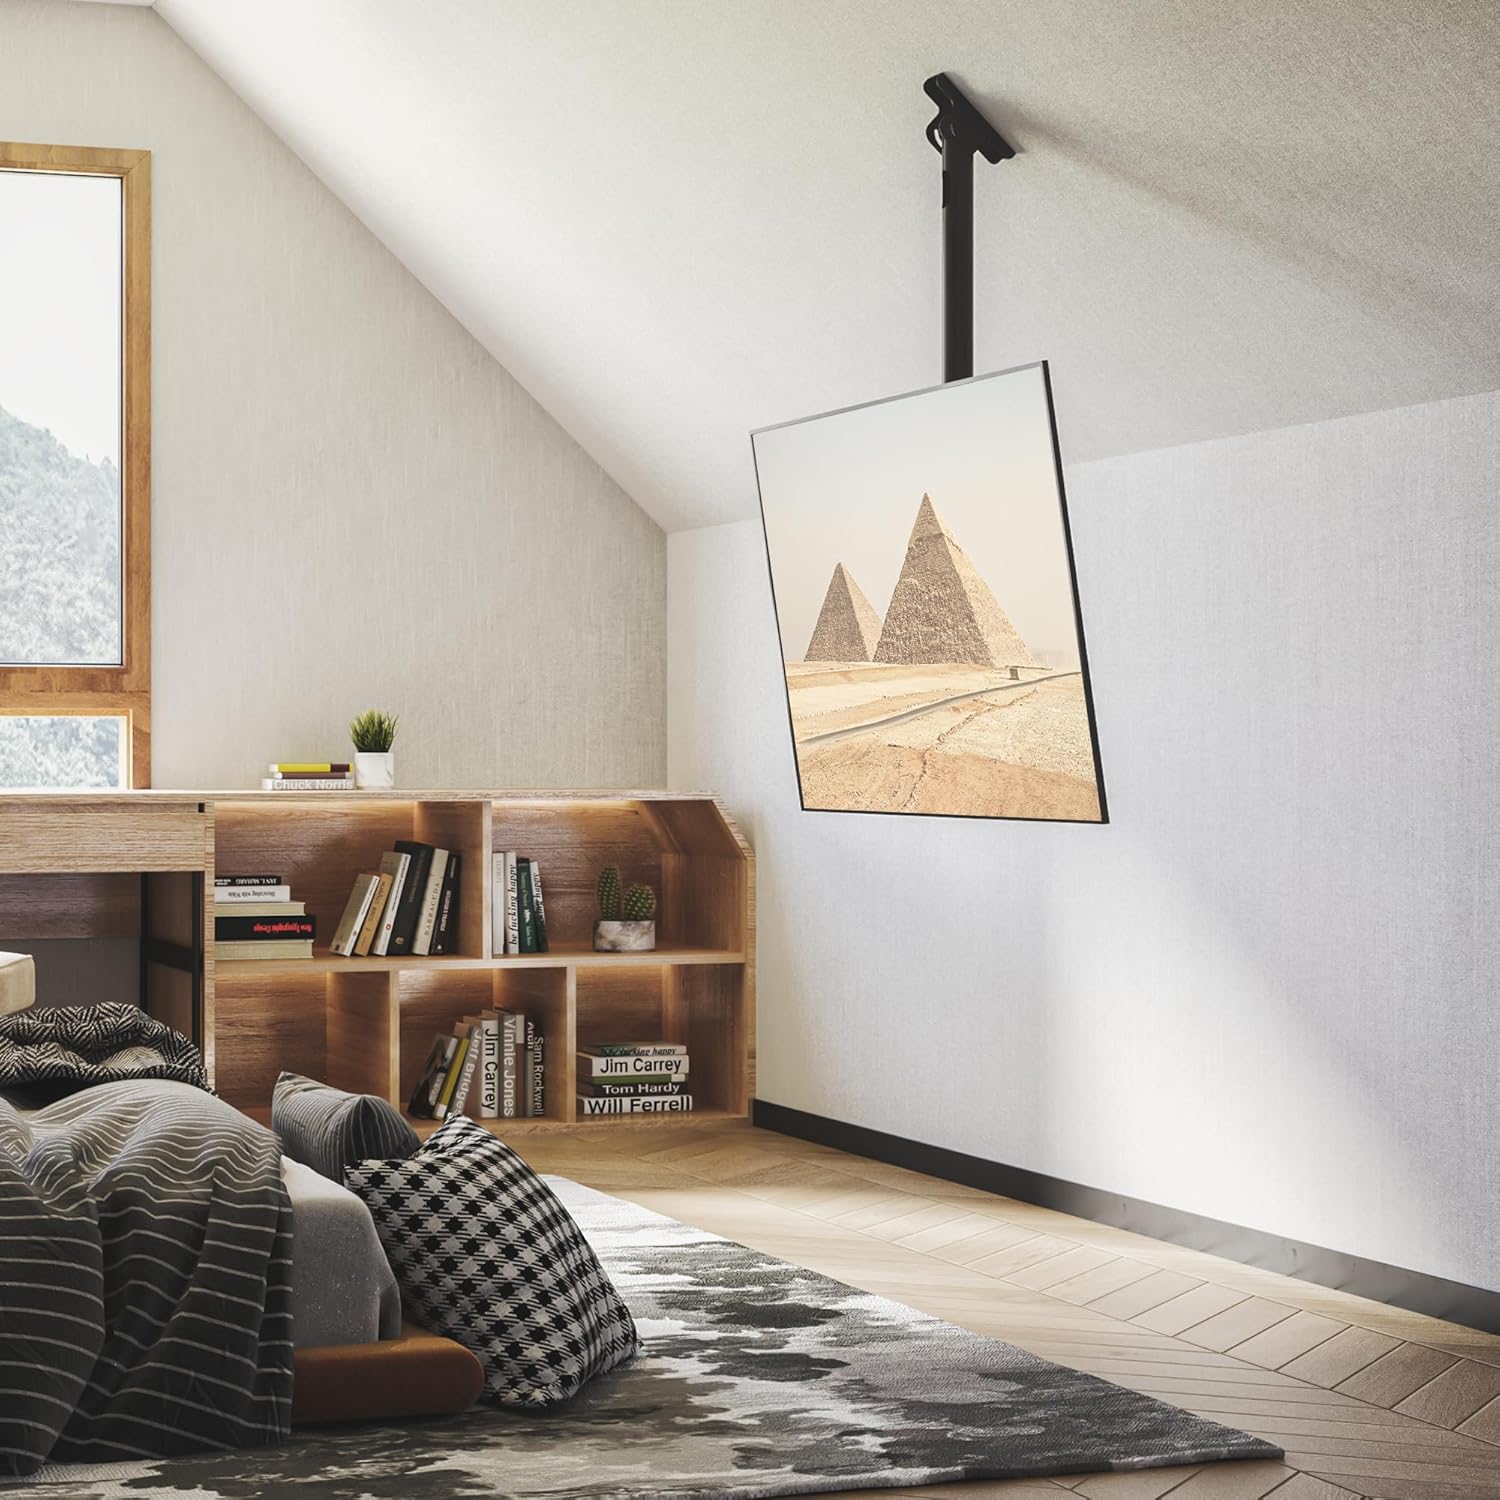
Image showing a TV mounted on a sloped ceiling, demonstrating the mount's adaptability to angled surfaces while maintaining a level screen.
6.4 Kabelstyring
The mount includes 3 extended Velcro straps for effective cable management. Use these straps to neatly bundle and secure your TV cables along the mount pole, ensuring a tidy and organized appearance.
7. Vedligeholdelse
Regular maintenance will help ensure the longevity and safe operation of your TV mount.
- Rensning: Tør holderen af med en blød, tør klud for at fjerne støv. Brug ikke slibende rengøringsmidler eller opløsningsmidler.
- Inspektion: Kontrollér regelmæssigt alle skruer og forbindelser for at sikre, at de forbliver stramme og sikre. Spænd efter om nødvendigt.
- Skadetjek: Inspect the mount for any signs of damage or wear. If any damage is observed, discontinue use and contact customer support.
8. Fejlfinding
If you encounter any issues with your TV mount, refer to the following common problems and solutions:
| Problem | Mulig årsag | Løsning |
|---|---|---|
| TV'et er ikke i vater | Mounting plate or TV brackets are not perfectly aligned. | Use the +/- 3 degree horizontal adjustment feature to level the TV. Ensure all screws are tightened evenly. |
| Difficulty adjusting height/tilt/swivel | Securing bolts are too tight or components are stiff. | Loosen securing bolts slightly before adjusting. Apply a small amount of silicone lubricant to moving parts if necessary (avoiding electrical components). |
| Mount føles ustabil | Incorrect installation, loose fasteners, or overloaded. | Immediately remove TV. Re-check all installation steps, ensuring fasteners are securely tightened and the mount is attached to a solid structural element. Verify TV weight is within limits. If issues persist, consult a professional installer. |
| TV does not fit mount | Forkert VESA-mønster eller tv-størrelse/vægt. | Verify your TV's VESA pattern, size, and weight against the mount's specifications. This mount supports 26-65 inch TVs, up to 50kg, with VESA 75x75mm to 400x400mm. |
Hvis problemet fortsætter efter at have forsøgt disse løsninger, bedes du kontakte kundesupport.
9. Garanti og support
For warranty information and customer support, please refer to the documentation included with your purchase or visit the official BONTEC website. If you have any questions regarding installation, operation, or troubleshooting that are not covered in this manual, please contact BONTEC customer service for assistance.
Ask a question about this manual
Ask about setup, troubleshooting, compatibility, parts, safety, or missing instructions. Manuals+ will review the question and use this page’s manual context to help answer it.