
1. Introduktion
This manual provides detailed instructions for the installation, operation, and maintenance of your XSDTS Smart Lock Digital Smart Lock Doorbell. This smart lock offers multiple unlocking methods including fingerprint, RFID card, digital key, mobile application (Tuya Wifi App), and traditional physical keys. It is designed for doors with a thickness between 35mm and 75mm and includes child safety features.
Nøglefunktioner
- Multiple unlocking methods: Fingerprint, RFID Card, Passcode, Tuya App, Mechanical Key.
- Integreret dørklokkefunktion.
- Remote access and control via Tuya Wifi App.
- Anti-peeping password function for enhanced security.
- Automatic locking feature.
- Batteriindikator.
- Durable aluminum construction with polished finish.
- Suitable for door thicknesses from 35mm to 75mm.
2. Produktkomponenter
The XSDTS Smart Lock package includes the following items:
- Frontpanel x 1
- Back panel x 1
- Plug lock x 1 (optional)
- Smartkort x 2
- Mechanical key x 2
- Skruesæt x 1

Figur 2.1: Overview of the XSDTS Smart Lock, showing the exterior and interior units, and the Tuya app interface for remote unlocking.

Figure 2.2: Detailed dimensions of the lock body and panels, indicating compatibility with door thicknesses between 35mm and 70mm.

Figure 2.3: Visual representation of the multiple unlocking methods: temporary password, IC card, standard password, fingerprint, manual key, and app unlock.
3. Opsætning og installation
3.1 Målinger før installation
Before beginning installation, ensure your door meets the required specifications. Accurate measurements are crucial for proper fit and function.
- Measure the thickness of your door frame.
- Measure the length of the guide piece.
- Measure the width of the guide piece.
- Confirm the door aligns with the center of the lock.
- Measure the distance for the screw hole of the back panel.

Figure 3.1: Step-by-step guide for measuring your door to ensure compatibility and proper installation of the smart lock.
3.2 Batteriinstallation
The smart lock requires 4 AA batteries (not included). Locate the battery cover on the back panel and insert the batteries according to the polarity indicators.
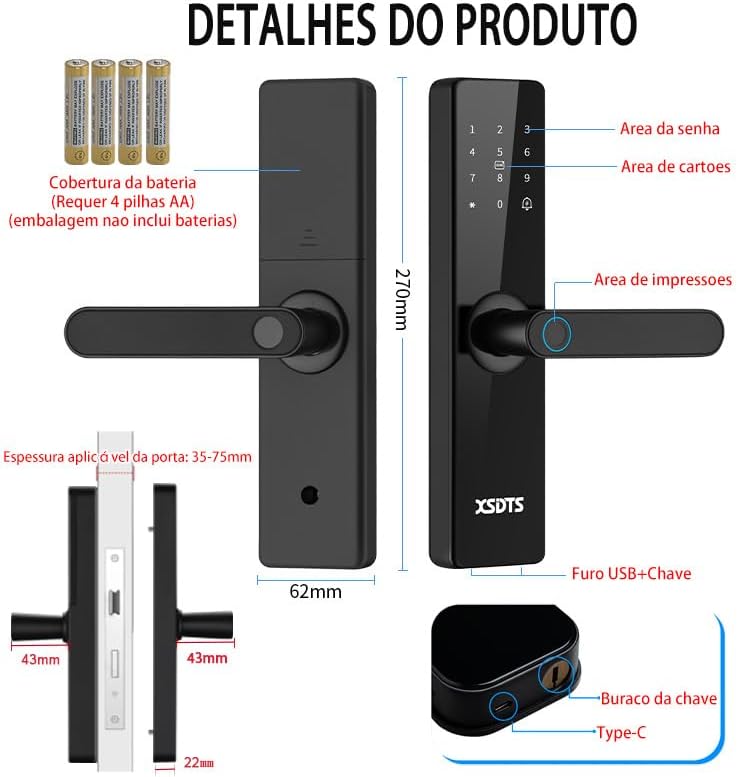
Figure 3.2: Illustration of the smart lock's components, including the battery cover, password area, card area, fingerprint area, USB port, and keyhole.
3.3 Første opsætning og app-forbindelse
To utilize the smart features, download the Tuya Smart APP.

Figure 3.3: The Tuya Smart App interface, demonstrating features like app unlock, scene linkage, information sending, and record verification.
- Download "Tuya Smart"-appen fra din enheds appbutik.
- Registrer eller log ind på din konto.
- Follow the in-app instructions to add your XSDTS Smart Lock. This typically involves putting the lock into pairing mode and connecting it to your Wi-Fi network.
- Når du er tilsluttet, kan du administrere brugere, generere midlertidige adgangskoder og view oplåsning af poster.
4. Betjening af Smart Lock
4.1 Oplåsningsmetoder
4.1.1 Lås op med fingeraftryk
Placer din registrerede finger på fingeraftrykssensoren. Låsen låses op, hvis fingeraftrykket genkendes.
Figure 4.1: Visual representation of the multiple unlocking methods, including fingerprint recognition.

Figure 4.2: Illustrates the speed and accuracy of the fingerprint recognition system: recognition speed ≤0.5s, error rate ≤0.001%, rejection rate ≤0.01%.
4.1.2 Lås op med adgangskode
Enter your registered passcode on the keypad. Press the '#' key to confirm.
Anti-kig-adgangskode: To prevent others from guessing your password, you can enter random digits before or after your actual password. For example, if your password is "123456", you can enter "987123456098" and the lock will still recognize "123456".
4.1.3 RFID Card Unlock
Present your registered RFID card to the card reading area on the lock.
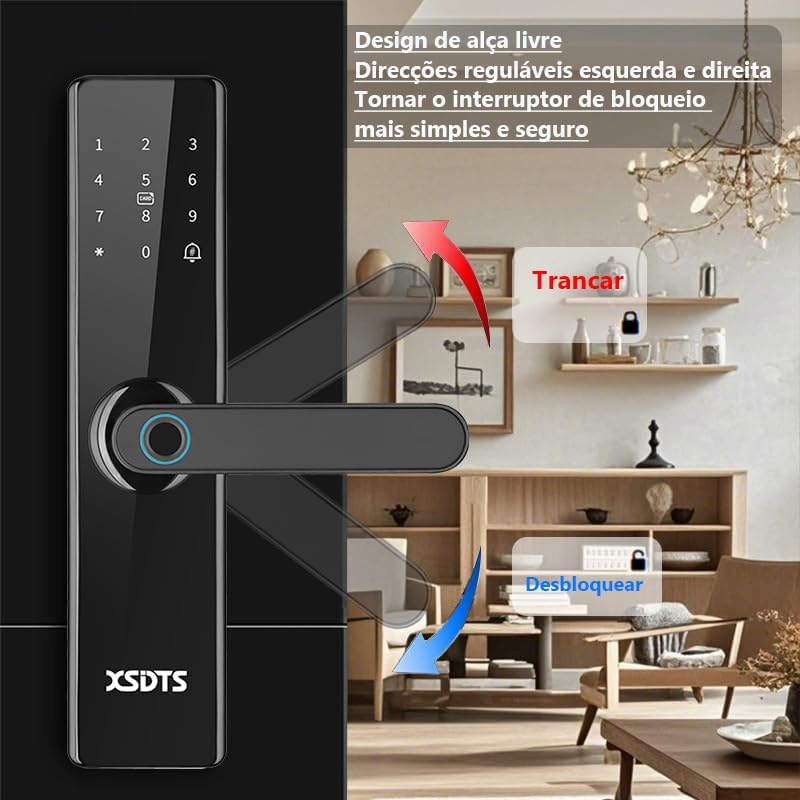
Figure 4.3: Demonstrates the use of an encrypted IC card for unlocking, highlighting dynamic encryption technology for enhanced security.
4.1.4 Tuya App Unlock
Open the Tuya Smart App on your smartphone. Select your lock and use the unlock function within the app. You can also generate temporary passwords or send remote unlocking requests.
Figure 4.4: The Tuya Smart App interface, showing options for remote unlocking requests and managing security settings.
4.1.5 Mekanisk nøgleoplåsning
In case of battery depletion or system malfunction, use the provided mechanical keys to unlock the door. The keyhole is typically located at the bottom of the front panel.
Figure 4.5: Illustration showing the location of the USB port and the mechanical keyhole on the smart lock.
4.2 Låsning af døren
The XSDTS Smart Lock features an auto-lock function. After closing the door, the lock will automatically engage.
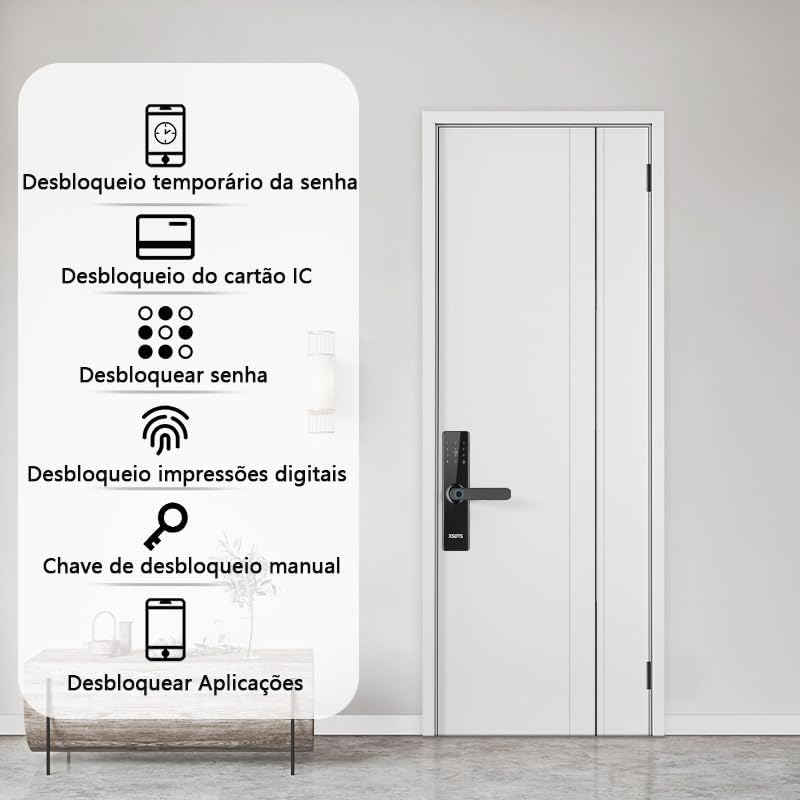
Figure 4.6: Demonstrates the free handle design, allowing the handle to be moved up to lock and down to unlock, making operation simpler and more secure.
4.3 Dørklokkefunktion
The smart lock has a built-in doorbell. When the doorbell button is pressed, it will alert you via the lock's speaker and potentially through the Tuya app, depending on your settings.
5. Vedligeholdelse
5.1 Udskiftning af batteri
When the battery indicator shows low power, replace all four AA batteries promptly. Do not mix old and new batteries.
5.2 Rengøring
Rengør låsens overflade med en blød, tør klud. Undgå at bruge slibende rengøringsmidler eller opløsningsmidler, der kan beskadige overfladen eller de elektroniske komponenter.
5.3 Pleje af fingeraftrykssensor
Keep the fingerprint sensor clean and free of dirt or moisture to ensure optimal performance.
6. Fejlfinding
6.1 Låsen reagerer ikke
- Kontroller batteriniveauet. Udskift batterierne, hvis de er lave.
- Sørg for, at låsen er korrekt installeret, og at alle forbindelser er sikre.
- Use the mechanical key as a backup.
6.2 Fingeraftryk ikke genkendt
- Sørg for, at din finger er ren og tør.
- Prøv at flytte din finger på sensoren.
- Re-register your fingerprint if the issue persists.
6.3 Problemer med app-forbindelse
- Ensure your Wi-Fi network is stable and the lock is within range.
- Restart your Wi-Fi router and the smart lock.
- Tjek for appopdateringer.
- Re-pair the lock with the Tuya app if necessary.
6.4 Lock Does Not Auto-Lock
- Verify that the auto-lock feature is enabled in the app settings.
- Kontroller, om der er forhindringer, der forhindrer døren i at lukke helt.
7. Specifikationer
| Attribut | Detalje |
|---|---|
| Mærke | XSDTS |
| Modelnummer | F17 |
| Låsetype | Dødbolt |
| Materiale | Aluminium |
| Farve | Sort |
| Slutte | Poleret |
| Produktdimensioner | 25 x 6 x 7.5 cm |
| Varens vægt | 2.5 kilo |
| Dørtykkelseskompatibilitet | 35 mm til 75 mm |
| Kontrolmetode | Application (Tuya Wifi App) |
| Strømkilde | 4 x AA batterier (medfølger ikke) |
| Særlige funktioner | Anti-Peeping Password, Auto-Lock, Battery Indicator, Fingerprint, Passcode Unlock |
8. Garantioplysninger
Specific warranty details are not provided in the product information. Please refer to the retailer or manufacturer's official webhjemmeside for garantivilkår og -betingelser.
9. Kundesupport
For technical assistance, troubleshooting, or further inquiries, please contact XSDTS customer support through their official channels. Refer to the product packaging or the manufacturer's webwebsted for kontaktoplysninger.