
Indledning
This manual provides detailed instructions for the operation and maintenance of your Sharp Alarm Clock. Please read this manual thoroughly before using the product to ensure proper function and longevity. This alarm clock is designed for ease of use and features convenient charging options for your devices.
Nøglefunktioner
- Super Fast USB-C Charging: Equipped with a USB Type-C port for rapid charging of compatible smartphones, including the latest models.
- Hurtigt 2 Amp USB-A-opladning: Includes a standard USB Type-A port delivering 2 Amps for efficient charging of various devices.
- Dobbelte alarmer: Indstil to uafhængige alarmer til forskellige vækketidspunkter.
- 9-minutters snooze: Provides a convenient snooze function for extra rest.
- 3-Step Dimmer: Adjustable display brightness with three levels to suit your preference.
- Easy-to-Read Green LED Display: Clear 0.7-inch green LED numbers for visibility day or night.
- Valgfri batteribackup: Bevarer tids- og alarmindstillinger under strømmentag(kræver 2 x AAA-batterier, medfølger ikke).
Produkt overview
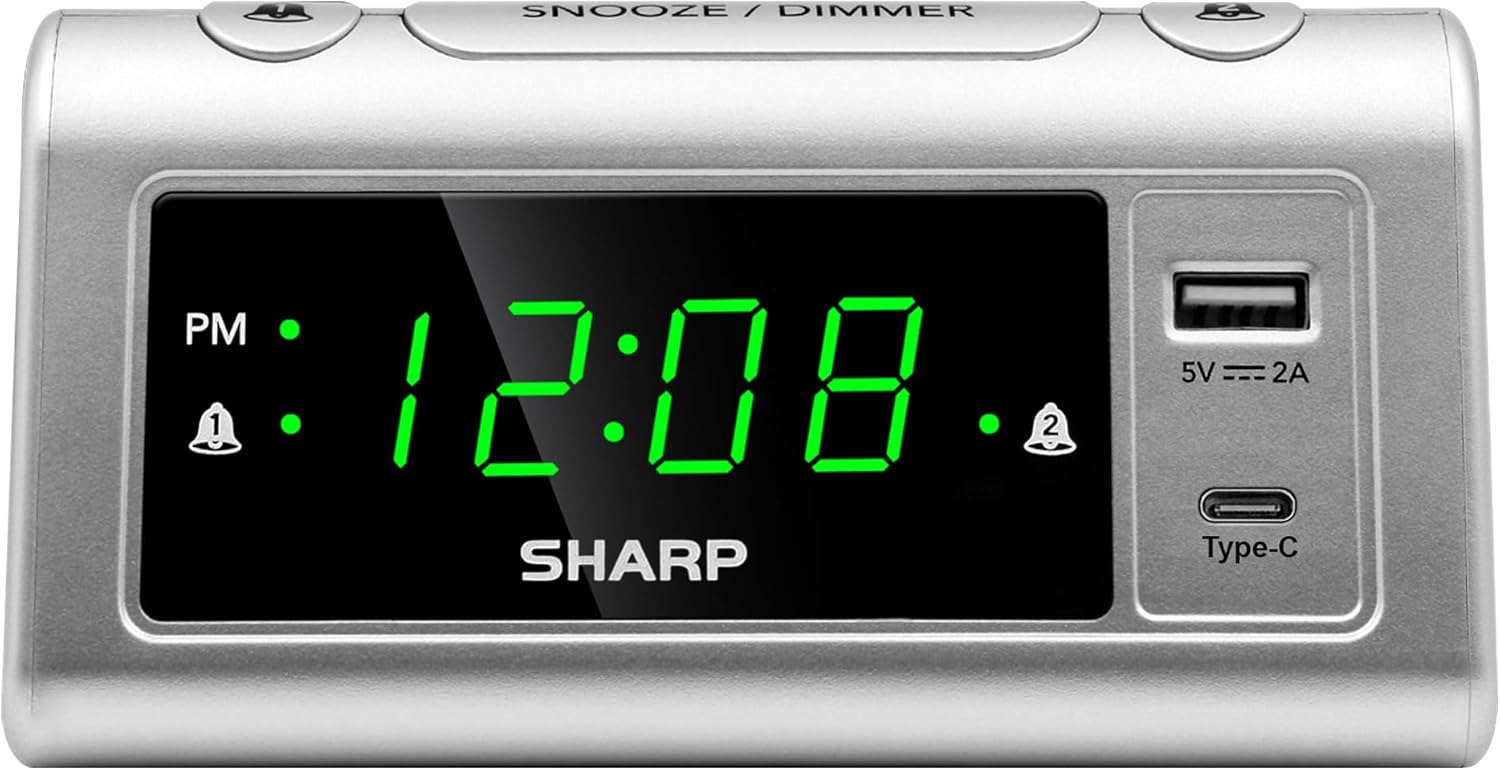
Front view of the Sharp Alarm Clock, showcasing the large green LED time display, PM indicator, alarm indicators, and the integrated USB-A and USB-C charging ports on the right side.

Top-down view of the alarm clock with labels indicating the 'Time Set', 'Time Advancing', 'Time Receding', 'Alarm 1 Set ON/OFF', 'Alarm 2 Set ON/OFF', 'Snooze/Dimmer Control (3-Levels of Brightness)', 'Super Fast Charging USB-C', and 'Fast Charging 2 Amp USB'. Dimensions are also shown as 5.65 inches wide and 2.95 inches high.
Opsætning
1. Strømtilslutning
Plug the AC power cord into a standard 120V AC wall outlet. The clock display will illuminate, and the time will default to 12:00 AM.
2. Installation af batteribackup
For optional battery backup, insert 2 x AAA batteries (not included) into the battery compartment located on the bottom of the unit. This feature ensures that time and alarm settings are retained during a power interruption. The display will not be lit during battery backup, but the alarm will still sound.

The bottom of the alarm clock, revealing the battery compartment for 2 AAA batteries (not included) to provide backup power for settings.
Betjeningsvejledning
1. Indstilling af tid
- Tryk og hold på TIDSINDSTILLING knappen. Timecifrene vil begynde at blinke.
- Mens du holder TIDSINDSTILLING, tryk på TIME Tryk gentagne gange på knappen for at justere timetallet. Se på PM-indikatoren for korrekt AM/PM-indstilling.
- Mens du holder TIDSINDSTILLING, tryk på MINUT knappen gentagne gange for at justere minutterne.
- Slip TIDSINDSTILLING knappen for at bekræfte tiden.
2. Indstilling af alarmer (dobbelt alarm)
This clock features two independent alarms (Alarm 1 and Alarm 2).
- Tryk og hold på ALARM 1 SÆT button. The hour digits for Alarm 1 will flash.
- Mens du holder ALARM 1 SÆT, tryk på TIME knappen for at indstille den ønskede alarmtime.
- Mens du holder ALARM 1 SÆT, tryk på MINUT knappen for at indstille de ønskede alarmminutter.
- Slip ALARM 1 SÆT knappen for at bekræfte.
- To activate Alarm 1, press the ALARM 1 TIL/FRA button until the alarm indicator (bell icon) appears next to 'AL1' on the display.
- Gentag trin 1-5 for ALARM 2 SÆT og ALARM 2 TIL/FRA to set and activate the second alarm.
3. Snooze-funktion
Når en alarm lyder, skal du trykke på den store SNOOZE / DIMMER knappen oven på uret. Alarmen sætter på pause i 9 minutter og lyder derefter igen.
4. Skærmdæmper
For at justere lysstyrken på LED-displayet skal du gentagne gange trykke på SNOOZE / DIMMER button when the alarm is not sounding. Cycle through the three brightness levels (High, Medium, Low) and an Off setting.

The Sharp Alarm Clock displaying the time, with a hand adjusting the dimmer function on the top of the unit. This allows for comfortable viewunder forskellige lysforhold.
5. USB-opladningsporte
The alarm clock features both a USB Type-C port and a standard USB Type-A port for charging your electronic devices. Simply connect your device's charging cable to the appropriate port on the right side of the clock.
- USB Type-C: Provides super-fast charging for compatible devices like the iPhone 15 or Galaxy smartphones.
- USB Type-A: Leverer 2 Amps of fast charging power for other USB-powered devices.

The Sharp Alarm Clock with a smartphone connected to its USB-C port, indicating active charging. The clock also features a USB-A port for additional device charging.
Opretholdelse
- Rensning: Tør uret af med en blød, tør klud. Brug ikke slibende rengøringsmidler eller opløsningsmidler.
- Strømledning: Undersøg regelmæssigt netledningen for skader. Hvis den er beskadiget, skal du ophøre med at bruge den og kontakte kundesupport.
- Udskiftning af batteri: Replace AAA backup batteries annually or when the clock's settings are no longer retained during power outages.
Fejlfinding
| Problem | Løsning |
|---|---|
| Urdisplayet er tomt. | Ensure the AC power cord is securely plugged into a working outlet. Check if the dimmer is set to 'Off'. |
| Alarmen lyder ikke. | Verify that the alarm is set and activated (bell icon visible). Check the alarm time is correct (AM/PM). |
| USB ports are not charging. | Ensure the clock is powered via AC. Check the charging cable and device compatibility. |
| Tid/indstillinger mistet efter strømafbrydelsetage. | Install fresh AAA batteries for the backup function. |
Specifikationer
- Mærke: Skarp
- Model: B0CHXR25FJ
- Farve: Sølv
- Skærmtype: LED (grøn)
- Produktdimensioner: 5.56 cm B x 2.67 cm H
- Strømkilde: Elektrisk med ledning
- Batteri-sikkerhedskopi: 2 x AAA batterier (medfølger ikke)
- USB-C udgang: Super hurtig opladning
- USB-A-output: 2 Amps Fast Charging
- Særlige funktioner: Charging Port, Corded, Dual Alarms, 3-Step Dimmer, Snooze
Officiel produktvideo
An official video from Sharp, titled 'Sharp Clocks - Keeps the Rhythm of Your Day', showcasing the features and design of Sharp alarm clocks, including this model.
Garanti og support
For warranty information or technical support, please refer to the documentation included with your product or visit the official Sharp webwebsted. Gem din købskvittering som købsbevis i tilfælde af garantikrav.