Acekool CF9
Acekool bærbar klimaanlæg brugermanual
Model: CF9 | Mærke: Acekool
1. Introduktion
Thank you for choosing the Acekool Portable Air Conditioner. This 3-in-1 unit provides powerful cooling, efficient dehumidification, and effective air circulation through its fan mode. Designed for convenience and portability, it is ideal for cooling rooms up to 35 square meters. Please read this manual thoroughly before operation to ensure proper use, maintenance, and safety.
2. Sikkerhedsoplysninger
For at reducere risikoen for brand, elektrisk stød eller skade, når du bruger dit klimaanlæg, skal du følge disse grundlæggende forholdsregler:
- Always plug the unit into a grounded 220V AC outlet. Do not use extension cords or adapter plugs.
- Betjen ikke enheden med en beskadiget ledning eller stik.
- Do not block air inlets or outlets. Ensure adequate clearance around the unit for proper airflow.
- Hold enheden væk fra varmekilder, direkte sollys og brandfarlige materialer.
- Stik ikke fingre eller fremmedlegemer ind i luftindtag eller -udtag.
- Tag stikket ud af enheden, før du rengør eller udfører vedligeholdelse.
- Dette apparat er ikke beregnet til brug af personer (inklusive børn) med nedsatte fysiske, sensoriske eller mentale evner, eller mangel på erfaring og viden, medmindre de har fået opsyn eller instruktion i brugen af apparatet af en person, der er ansvarlig for deres sikkerhed.
- Sørg for, at enheden er placeret på en flad, stabil overflade for at forhindre, at den vælter.
3. Produktfunktioner
- Kraftfuld og effektiv: Delivers strong cooling power to quickly and effectively cool your room. Enjoy personal comfort at the touch of a button.
- Flexible and Mobile: Equipped with wheels for easy movement between rooms. Provides a pleasant climate in bedrooms, living rooms, or offices. Adjustable settings allow customization of cooling needs.
- Easy to Use and Control: Features an intuitive control panel and remote control for setting temperature, timer, and fan speed. The convenient timer function allows pre-programming for energy saving.
- Energy-efficient and Environmentally Friendly: Designed for low power consumption, helping to reduce energy costs. Uses R290 refrigerant, contributing to environmental protection.
- Elegant og kompakt: Boasts a sleek and modern design that blends seamlessly into any room, making it an attractive addition to your home or office.

Image: The unit's compact size delivers high cooling performance, suitable for rooms up to 300 sq. ft. with 9000 BTU cooling capacity and 350m³/h airflow.

Image: The unit uses environmentally friendly R290 refrigerant, promoting energy efficiency and cost savings.

Image: The 3-in-1 operation system includes cooling (down to 16°C), dehumidifying (up to 42L/day), and fan (2 speeds) functions.
4. Produktspecifikationer
| Specifikation | Værdi |
|---|---|
| Mærke | Acekool |
| Modelnummer | CF9 |
| Produktmål (L x B x H) | 45 x 89 x 44 cm |
| Vægt | 26 kilo |
| Energieffektivitetsvurdering | A |
| Kølekapacitet | 9000 BTU |
| Affugtningskapacitet | 42 liter/dag |
| Årligt strømforbrug | 1000 watt |
| Støjniveau | 55 dB |
| Installationstype | Vindue |
| Speciel funktion | Affugter |
| Farve | Sort |
| Voltage | 220 volt |
| Magt | 1000 watt |
| Sæsonbestemt energieffektivitetsforhold (SEER) | 2.6 |
5. Pakkens indhold
Kontroller venligst, at alle komponenter er til stede og i god stand:
- Acekool Portable Air Conditioner Unit
- Udstødningsslange
- Window Seal Kit (includes window slider kit and adapter)
- Fjernbetjening
- Afløbsslange (til kontinuerlig dræning i affugtertilstand)
- Brugervejledning (dette dokument)
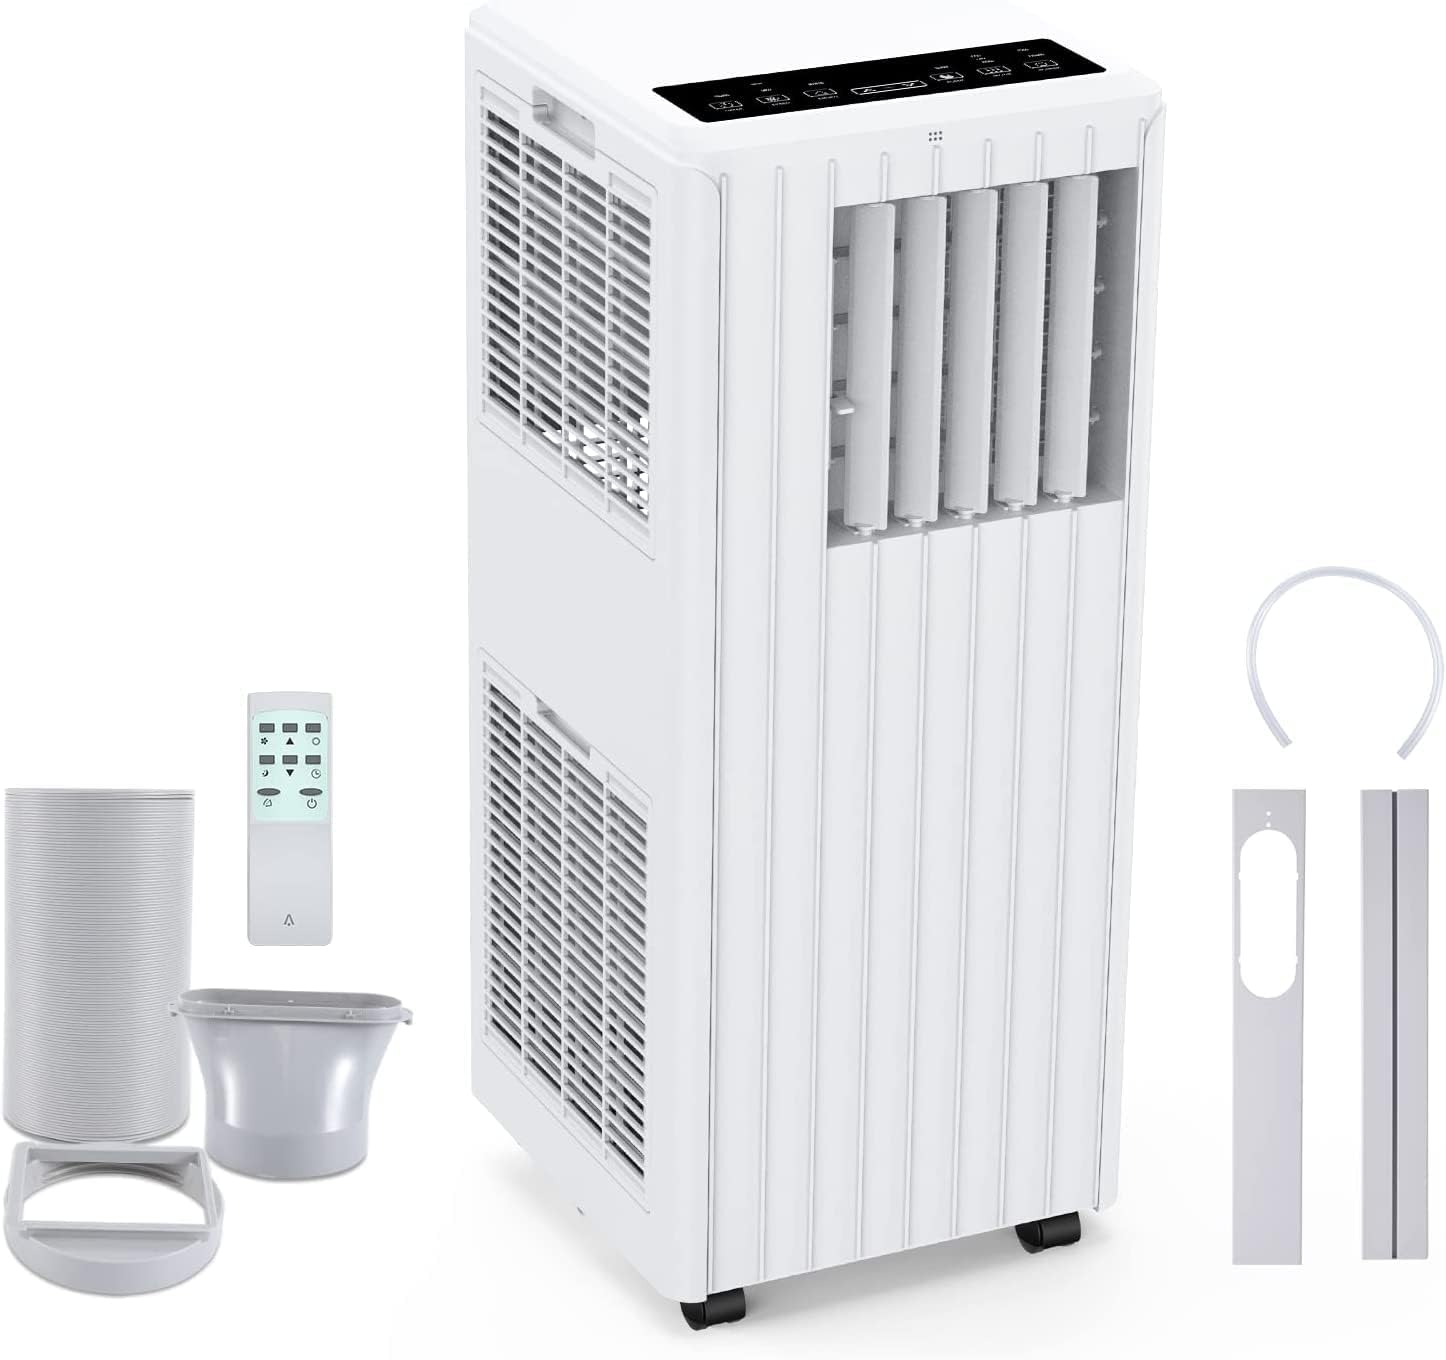
Image: All components included in the package: the main unit, exhaust hose, window sealing plate, remote control, and drain bucket.
6. Opsætning og installation
Følg disse trin for at konfigurere dit bærbare klimaanlæg:
- Placering: Place the air conditioner on a flat, stable surface near a window and a grounded electrical outlet. Ensure there is at least 20 cm (8 inches) of space around the unit for proper airflow.
- Fastgør udstødningsslange: Screw one end of the exhaust hose into the air outlet on the back of the unit.
- Install Window Seal Kit: Adjust the window slider kit to fit your window opening. Secure it in place.
- Tilslut udstødningsslangen til vinduessættet: Attach the other end of the exhaust hose to the adapter on the window slider kit, ensuring a tight seal to prevent hot air from re-entering the room.
- Strømtilslutning: Sæt netledningen i en jordet 220V AC-stikkontakt.

Image: Visual guide for easy installation, showing how to connect the exhaust hose to the unit and the window sealing plate.
7. Betjeningsvejledning
Your Acekool Portable Air Conditioner can be operated using the control panel on the unit or the included remote control.
Kontrolpanel og fjernbetjening
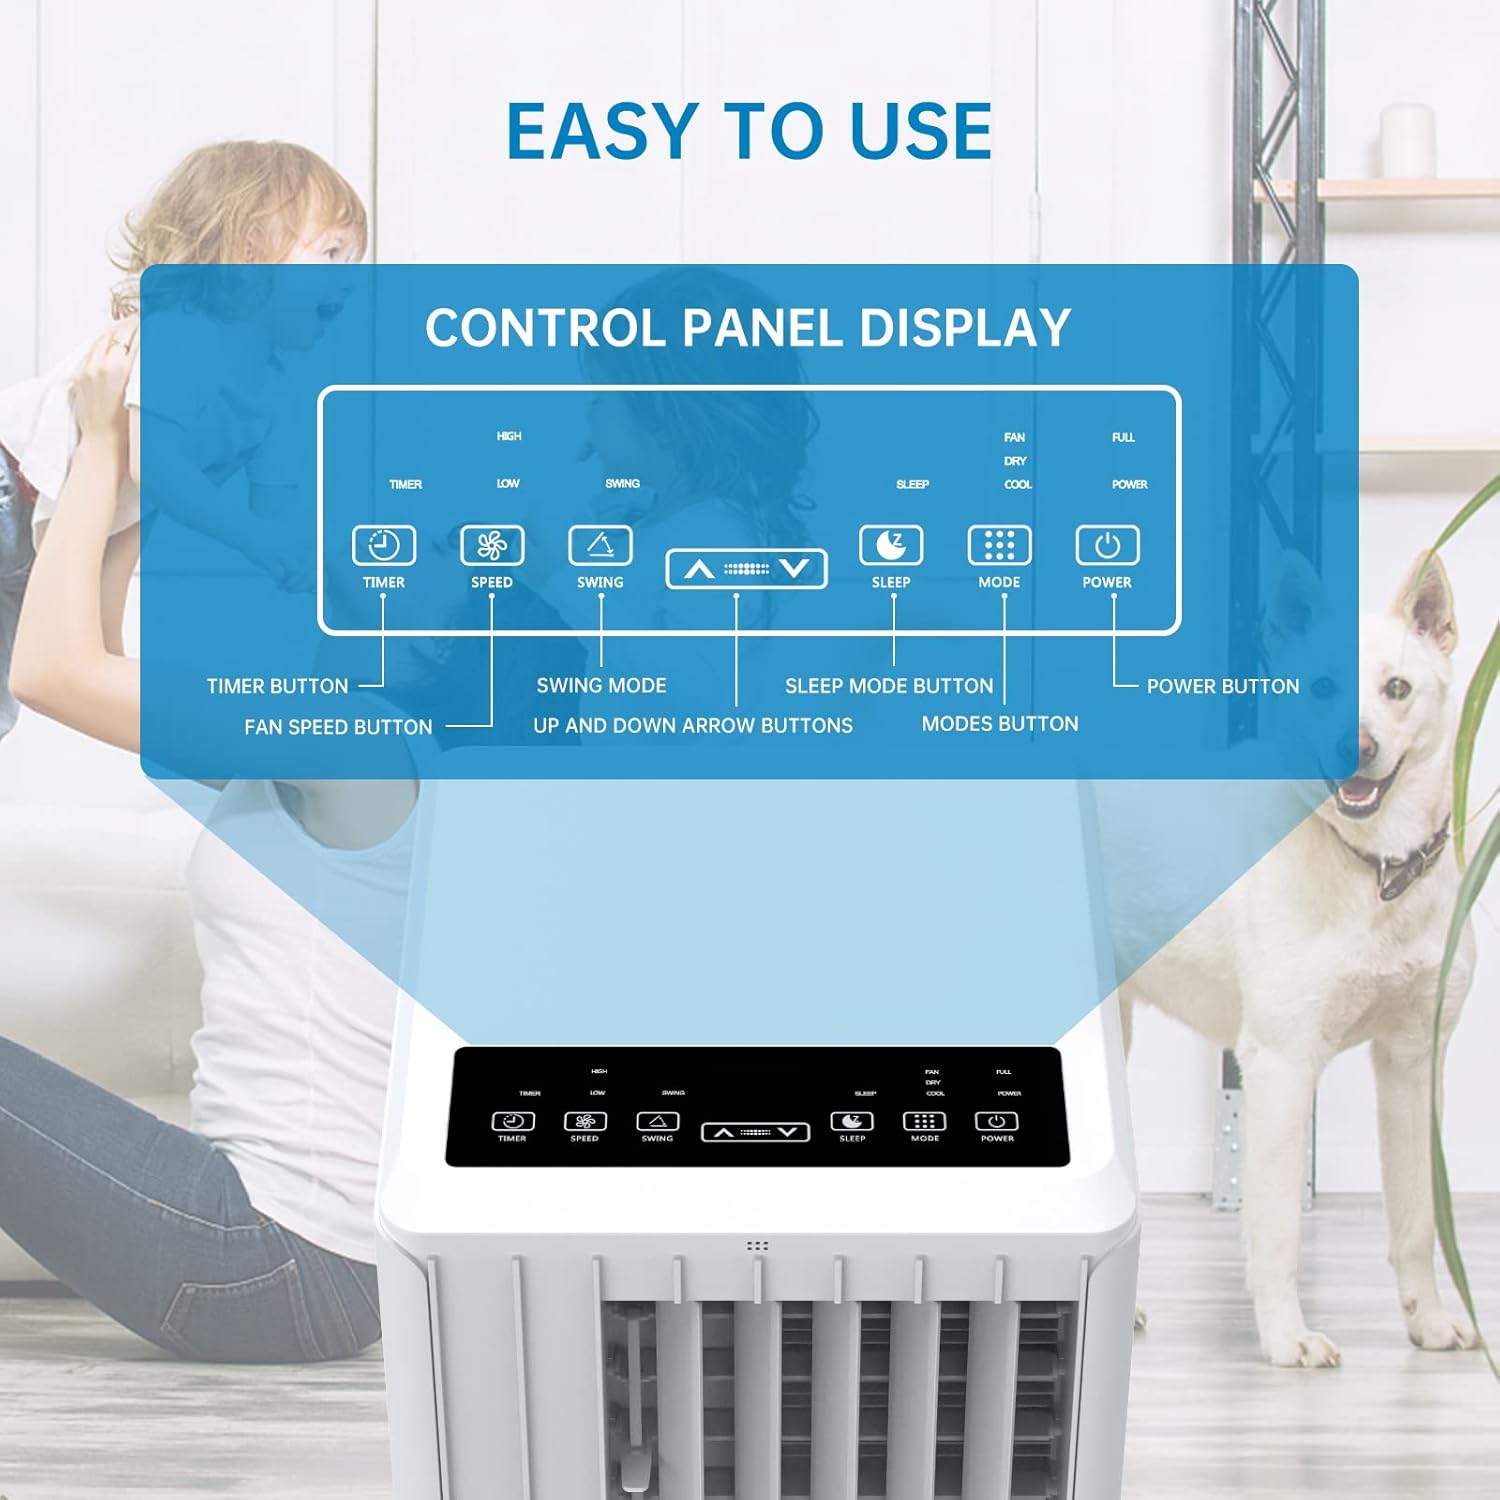
Billede: Detaljeret view of the control panel display, indicating buttons for Timer, Speed, Swing, Sleep, Mode, and Power.

Image: The unit can be conveniently controlled via the remote control, and features a swing mode for wider air distribution.
Driftstilstande

Billede: Overview of the main operating modes: Cool, Fan, Dry (Dehumidifying), and Sleep, along with smart timer functionality.
- Cool tilstand: Press the "Mode" button until the snowflake icon appears. Use the Up/Down arrows to set your desired temperature (16°C - 30°C). The unit will cool the room to the set temperature.
- Ventilatortilstand: Press the "Mode" button until the fan icon appears. In this mode, the unit circulates air without cooling. Use the "Speed" button to adjust fan speed (Low/High).
- Dehumidify Mode (Dry): Press the "Mode" button until the water drop icon appears. The unit will remove excess moisture from the air. In this mode, the fan speed cannot be adjusted. Ensure the continuous drainage hose is connected for prolonged use.
- Sove mode: Press the "Sleep" button. In this mode, the unit operates quietly and gradually increases the temperature by 1°C after the first hour and another 1°C after the second hour, maintaining this temperature for 6 hours before returning to normal operation. This mode is ideal for nighttime use.

Image: The sleep mode offers automatic shut-off, quiet operation (55dB), and a 24-hour smart timer for comfortable nighttime use.
Yderligere funktioner
- Timer funktion: Press the "Timer" button to set the desired operating time (1-24 hours) for automatic turn on/off.
- Blæserhastighed: In Cool or Fan mode, press the "Speed" button to cycle through Low and High fan speeds.
- Swing funktion: Press the "Swing" button to activate or deactivate the automatic vertical oscillation of the air louvers, distributing air more evenly.
8. Vedligeholdelse
Regelmæssig vedligeholdelse sikrer optimal ydeevne og forlænger levetiden på dit klimaanlæg. Tag altid stikket ud af enheden før rengøring.
Rengøring af luftfilteret
Luftfilteret bør rengøres hver anden uge eller oftere afhængigt af brug og luftkvalitet.
- Fjern luftfilteret fra bagsiden af enheden.
- Vask filteret med varmt sæbevand. Skyl grundigt.
- Lad filteret lufttørre helt, før du sætter det i enheden igen.
Drænende vand
The unit has an internal water tank that collects condensed water. When the tank is full, the unit will stop operating and display a "FULL" indicator. You will need to drain the water manually.
- Place a shallow pan or bucket under the drain port at the bottom rear of the unit.
- Fjern aftapningsproppen, så vandet kan løbe ud.
- Når den er tømt, skal du sætte aftapningsproppen ordentligt på.
For continuous dehumidification, attach the provided drain hose to the continuous drain port.
Rengøring af enhedens yderside
Tør ydersiden af enheden af med en blød, damp klæde. Brug ikke skrappe kemikalier eller slibende rengøringsmidler.
Opbevaring
Hvis enheden opbevares i en længere periode:
- Tøm alt vand ud af enheden.
- Rengør luftfilteret.
- Store the unit in a dry, cool place, away from direct sunlight.
9. Fejlfinding
Før du kontakter kundesupport, bedes du læse følgende fejlfindingsvejledning for almindelige problemer:
| Problem | Mulig årsag | Løsning |
|---|---|---|
| Enheden tænder ikke | No power supply; Power cord unplugged; Circuit breaker tripped; Water tank full. | Kontroller stikkontakten; Sæt netledningen ordentligt i; Nulstil afbryderen; Tøm vandtanken. |
| Enheden køler ikke effektivt | Air filter dirty; Exhaust hose not properly installed/sealed; Room too large; Doors/windows open; Air inlet/outlet blocked. | Clean air filter; Ensure exhaust hose is properly installed and sealed; Close doors/windows; Clear obstructions from air inlets/outlets. |
| Enheden er støjende | Enheden står ikke på en plan overflade; Luftfilteret er snavset; Indvendige komponenter vibrerer. | Place unit on a flat, stable surface; Clean air filter; If noise persists, contact customer support. |
| Vandlækage fra enheden | Drain plug loose; Continuous drain hose not properly connected or blocked. | Ensure drain plug is secure; Check continuous drain hose for proper connection and clear any blockages. |
| Fjernbetjening virker ikke | Batterier døde eller forkert isat; Blokering mellem fjernbetjening og enhed. | Replace batteries; Ensure line of sight between remote and unit. |
10. Garanti og support
For warranty information and customer support, please refer to the warranty card included with your product or visit the official Acekool website. Do not attempt to repair the unit yourself, as this may void the warranty and pose safety risks. For any issues not covered in this manual, please contact Acekool customer service.
Ask a question about this manual
Ask about setup, troubleshooting, compatibility, parts, safety, or missing instructions. Manuals+ will review the question and use this page’s manual context to help answer it.