1. Introduktion
Thank you for choosing the Crivit Auriol Radio-Controlled Projection Alarm Clock. This device combines a precise radio-controlled clock with a clear LCD display, dual alarms, and a convenient projection feature. This manual will guide you through the setup, operation, and maintenance of your new alarm clock.

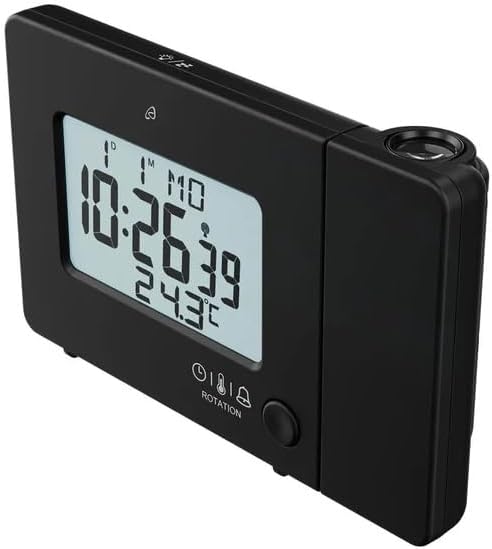
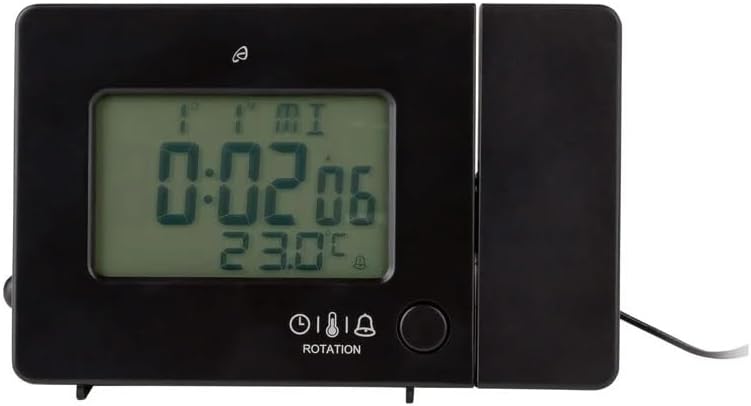
Front view of the alarm clock displaying time, date, and temperature.
2. Sikkerhedsinstruktioner
- Læs alle instruktioner omhyggeligt før brug og gem dem til fremtidig reference.
- Udsæt ikke enheden for ekstreme temperaturer, direkte sollys eller høj luftfugtighed.
- Undgå at tabe eller udsætte enheden for kraftige stød.
- Forsøg ikke selv at skille enheden ad eller reparere den. Kontakt kvalificeret servicepersonale.
- Opbevar batterier utilgængeligt for børn. Bortskaf brugte batterier i henhold til lokale regler.
- Use only the provided AC adapter or one with identical specifications.
3. Pakkens indhold
Tjek venligst pakken for følgende varer:
- Crivit Auriol Radio-Controlled Projection Alarm Clock (Model 373928)
- AC strømadapter
- Batterier (forinstalleret eller separat)
- Brugervejledning (dette dokument)

Included AC power adapter.
4. Produktfunktioner
- Radiostyret tid: Automatic time synchronization for precise timekeeping.
- Projektionsfunktion: Projects time, alarm times, or ambient temperature onto a wall or ceiling.
- Pivoting Projection Arm: Adjustable projection angle with easy focus adjustment.
- LCD-skærm: Clear screen showing time, day, month, week number/day of the week, and indoor temperature.
- Dobbelte alarmer: Two independent alarm settings with snooze function.
- Berøringssensor: Activates short-term projection and screen backlight.
- Strømindstillinger: Operates via AC adapter or batteries.
- USB-A-opladningsport: Convenient 5V, 800mA output for charging external devices.
- Justerbar lysstyrke: Customizable display brightness.
5. Komponentidentifikation
Front View:
Front view med LCD-display.
- LCD-skærm: Shows time, date, temperature, alarm status, and radio control signal.
- Touch Sensor Area: Located above the display, for temporary backlight and projection.
- Projection Indicator: Icon indicating projection is active.
- Alarmindikatorer: Ikoner for Alarm 1 og Alarm 2.
- Rotationsknap: Adjusts projection orientation.
Side View (Projection Arm):
Side view with projection arm extended.
- Projektionsarm: Pivots to direct the projection.
- Fokushjul: Justerer klarheden af det projicerede billede.
- Projektionsobjektiv: Emits the time/temperature display.
Bag View:

Bag view with control buttons and ports.
- -/WEEK Button: Decreases values, sets week display.
- +/ZONE Button: Increases values, sets time zone.
- °C/°F knap: Skifter temperaturenhed.
- LANG Button: Selects display language for day of the week.
- 12/24 knap: Toggles 12/24 hour format.
- MODE knap: Cycles through settings modes (Time, Alarm 1, Alarm 2).
- SET -knap: Enters setting mode for current display.
- Genstarts knap: Resets the device to factory defaults (use a pointed object).
- Batterirum: Til backup-batterier.
- DC IN-port: Til tilslutning af AC-strømadapteren.
- USB-A udgangsport: Til opladning af eksterne enheder.
6. Opsætning
6.1. Tænder
The alarm clock can be powered by either the included AC adapter or batteries for backup.
- Batteri installation: Open the battery compartment on the rear of the unit. Insert the included batteries, observing the correct polarity (+/-). Batteries primarily serve as backup in case of power outage.
- AC-adaptertilslutning: Connect the small plug of the AC adapter into the DC IN port on the back of the alarm clock. Plug the AC adapter into a standard wall outlet. The display will light up.
Alarm clock connected to power.
6.2. Initial Setup and Radio Control Synchronization
Upon first power-up or after a reset, the clock will automatically attempt to synchronize with the radio-controlled time signal (DCF77). This process can take several minutes to an hour, depending on your location and signal strength. During synchronization, a radio tower icon will flash on the display.
- Placer uret i nærheden af et vindue for bedre signalmodtagelse.
- Undgå at placere den i nærheden af elektroniske enheder, der kan forårsage interferens.
- Once synchronized, the radio tower icon will appear solid on the display.
If the radio signal is not received, you may need to set the time manually (see Section 7.1).
6.3. Basic Settings (if not automatically set or for adjustment)
Tryk på SÆT button to enter setting mode. Use the -/WEEK og +/ZONE buttons to adjust values, and SÆT for at bekræfte og gå til den næste indstilling.
- Tidszone: Adjust if you are not in the standard time zone for the radio signal.
- 12/24 timers format: Tryk på 12/24 button to toggle between 12-hour (with AM/PM) and 24-hour formats.
- Temperaturenhed: Tryk på ° C / ° F knappen for at skifte mellem Celsius og Fahrenheit.
- Visningssprog: Tryk på LANG button to select the language for the day of the week display (5 languages available).
7. Betjeningsvejledning
7.1. Indstilling af tid manuelt
If the radio-controlled time signal is weak or unavailable, you can set the time manually:
- Tryk og hold på SÆT knappen, indtil timecifrene blinker.
- Brug -/WEEK og +/ZONE knapper for at justere timen.
- Trykke SÆT to confirm and move to minutes, then year, month, and day.
- Trykke SÆT again to exit manual time setting.
7.2. Indstilling af alarmer (Alarm 1 og Alarm 2)
Uret har to uafhængige alarmer.
- Tryk på MODE button once to display Alarm 1 time, or twice for Alarm 2 time. The corresponding alarm icon (e.g., A1) will flash.
- Mens alarmtidspunktet vises, skal du trykke på og holde SÆT knappen, indtil timecifrene blinker.
- Brug -/WEEK og +/ZONE knapper for at justere timen.
- Trykke SÆT to confirm and move to minutes. Adjust minutes using -/WEEK og +/ZONE.
- Trykke SÆT igen for at bekræfte og afslutte alarmindstillingen.
- For at aktivere/deaktivere en alarm skal du trykke på MODE button to display the desired alarm, then press the +/ZONE button. The alarm icon (bell) will appear/disappear on the display.
7.3. Snooze-funktion
Når en alarm lyder, skal du trykke på Berør sensorområdet eller tryk på SNOOZE / LYS button (if available, otherwise use the touch sensor) to activate the snooze function. The alarm will pause for approximately 5 minutes and then sound again. To stop the alarm completely, press any other button.
7.4. Projektionsfunktion
The alarm clock can project the time, alarm times, or ambient temperature onto a wall or ceiling.
- Aktivér projektion: The projection is continuously active when powered by the AC adapter. If running on batteries, touch the Berør sensorområdet for short-term projection.
- Juster projektionsvinkel: Pivot the projection arm to direct the image to your desired location.
- Juster fokus: Brug Fokushjul on the projection arm to sharpen the projected image.
- Change Projected Content: Tryk på MODE button repeatedly to cycle through projecting Time, Alarm 1, Alarm 2, or Temperature.
- Roter projektion: Tryk på ROTATION button to rotate the projected image by 90-degree increments (4 orientations available).

Time projected onto a surface.
7.5. Displaybaggrundsbelysning
When powered by the AC adapter, the display backlight is continuously on. When running on batteries, touch the Berør sensorområdet for at aktivere baggrundsbelysningen i et par sekunder.
7.6. USB Charging Output
The USB-A port on the back of the unit provides a 5V, 800mA output for charging small electronic devices like smartphones or tablets. Connect your device's USB charging cable to this port.
8. Vedligeholdelse
- Rensning: Tør enheden af med en blød, tør klud. Brug ikke slibende rengøringsmidler eller opløsningsmidler.
- Udskiftning af batteri: If using batteries for backup, replace them annually or when the display becomes dim during power outagSørg for korrekt polaritet.
- Opbevaring: Hvis enheden opbevares i længere tid, skal batterierne fjernes for at forhindre lækage.
9. Fejlfinding
| Problem | Mulig årsag | Løsning |
|---|---|---|
| Skærmen er tom eller svag. | No power, dead batteries, or AC adapter not connected. | Ensure AC adapter is securely connected. Replace batteries if using for backup. |
| Radio-controlled time not synchronizing. | Weak signal, interference, or incorrect time zone. | Move the clock to a window or open area. Avoid electronic devices. Manually set time if necessary. Check time zone setting. |
| Projektionen er sløret. | Fokus ikke justeret. | Juster Fokushjul on the projection arm. |
| Alarmen lyder ikke. | Alarmen er ikke aktiveret eller indstillet forkert. | Ensure the alarm icon is visible on the display. Recheck alarm time settings. |
| USB-opladning virker ikke. | Device not properly connected, or device requires more power than 800mA. | Ensure the USB cable is securely connected. Check if your device's charging requirements exceed 5V/800mA. |
10. Specifikationer

Produktdimensioner.
- Modelnummer: 373928
- Dimensioner (L x B x H): 15 x 3.81 x 9.5 cm (approx. 15l x 9.5H centimeters)
- Materiale: Plast
- Skærmtype: Digital LCD
- Strømkilde: AC Adapter (included) or Batteries (included)
- USB-udgang: 5V, 800mA
- Særlige funktioner: Adjustable brightness, Snooze, Projection, Radio-controlled time
- Bevægelsestype: Kvarts
- Monteringstype: Bordplade
- Indendørs/udendørs brug: Indendørs
11. Garanti og support
This Crivit Auriol Projection Alarm Clock comes with a standard manufacturer's warranty. Please refer to the warranty card included in your package or contact your retailer for specific warranty terms and conditions.
For technical support or inquiries, please contact the customer service department of your retailer or the Crivit support line as indicated on the product packaging or official webwebsted.