1. Introduktion
This manual provides detailed instructions for the installation, operation, and maintenance of your TOPSKY Electric Adjustable Ceiling TV Mount. This motorized flip-down mount is designed to securely hold flat and curved screen TVs ranging from 32 to 70 inches, offering electric adjustment for optimal viewing angles and space-saving convenience.
Please read this manual thoroughly before installation and use to ensure safe and correct operation of the product. Keep this manual for future reference.

Image 1.1: The TOPSKY Electric Adjustable Ceiling TV Mount with its remote control.
2. Sikkerhedsoplysninger
- To-personers installation: Due to the weight and complexity of this ceiling TV mount, two people are strongly recommended for installation. One person should hold the mount in place while the other secures it, ensuring proper alignment and safety.
- Ceiling Structure Verification: Før købasing and installing, carefully check your ceiling structure to ensure it can safely support the weight of the mount and your television. Incorrect ceiling support may lead to installation failure and potential damage or injury.
- Vægt kapacitet: Do not exceed the maximum weight capacity of 88 lbs (40 kg). Overloading can cause instability and damage.
- VESA-kompatibilitet: Ensure your TV's VESA mounting pattern is compatible with the mount (200x100mm to 600x400mm).
- Strømforsyning: Use only the provided power adapter. Disconnect power before performing any maintenance or adjustments.
- Batterier til fjernbetjening: The factory remote control does not include batteries. Please purchase 2 AAA batteries separately.
- Klarering: Ensure adequate clearance around the TV mount for safe operation and ventilation.

Image 2.1: Illustration emphasizing the recommendation for two-person installation for safety and optimal setup.
3. Specifikationer
| Feature | Specifikation |
|---|---|
| Modelnummer | TV01.01 |
| Kompatible tv-størrelser | 32 to 70 inches (Flat and Curved Screens) |
| VESA-kompatibilitet | 200x100mm, 200x200mm, 200x400mm, 300x200mm, 300x300mm, 400x200mm, 400x300mm, 400x400mm, 600x400mm |
| Vægt kapacitet | 88 lbs (40 kg) |
| Tilt rækkevidde | 0-80 grader |
| Skærmnivellering | ±2 grader |
| Full Expansion Time | 32 sekunder |
| Juster hastighed | 2.5 grader/sekund |
| Fjernbetjenings rækkevidde | Op til 98 fod (30 m) |
| Folded Distance from Ceiling | Cirka 5 tommer (12 cm) |
| Materiale | Jern |
| Farve | Sort |
| Varens vægt | 23.9 pund |
| Pakkedimensioner | 28 x 10 x 8 tommer |
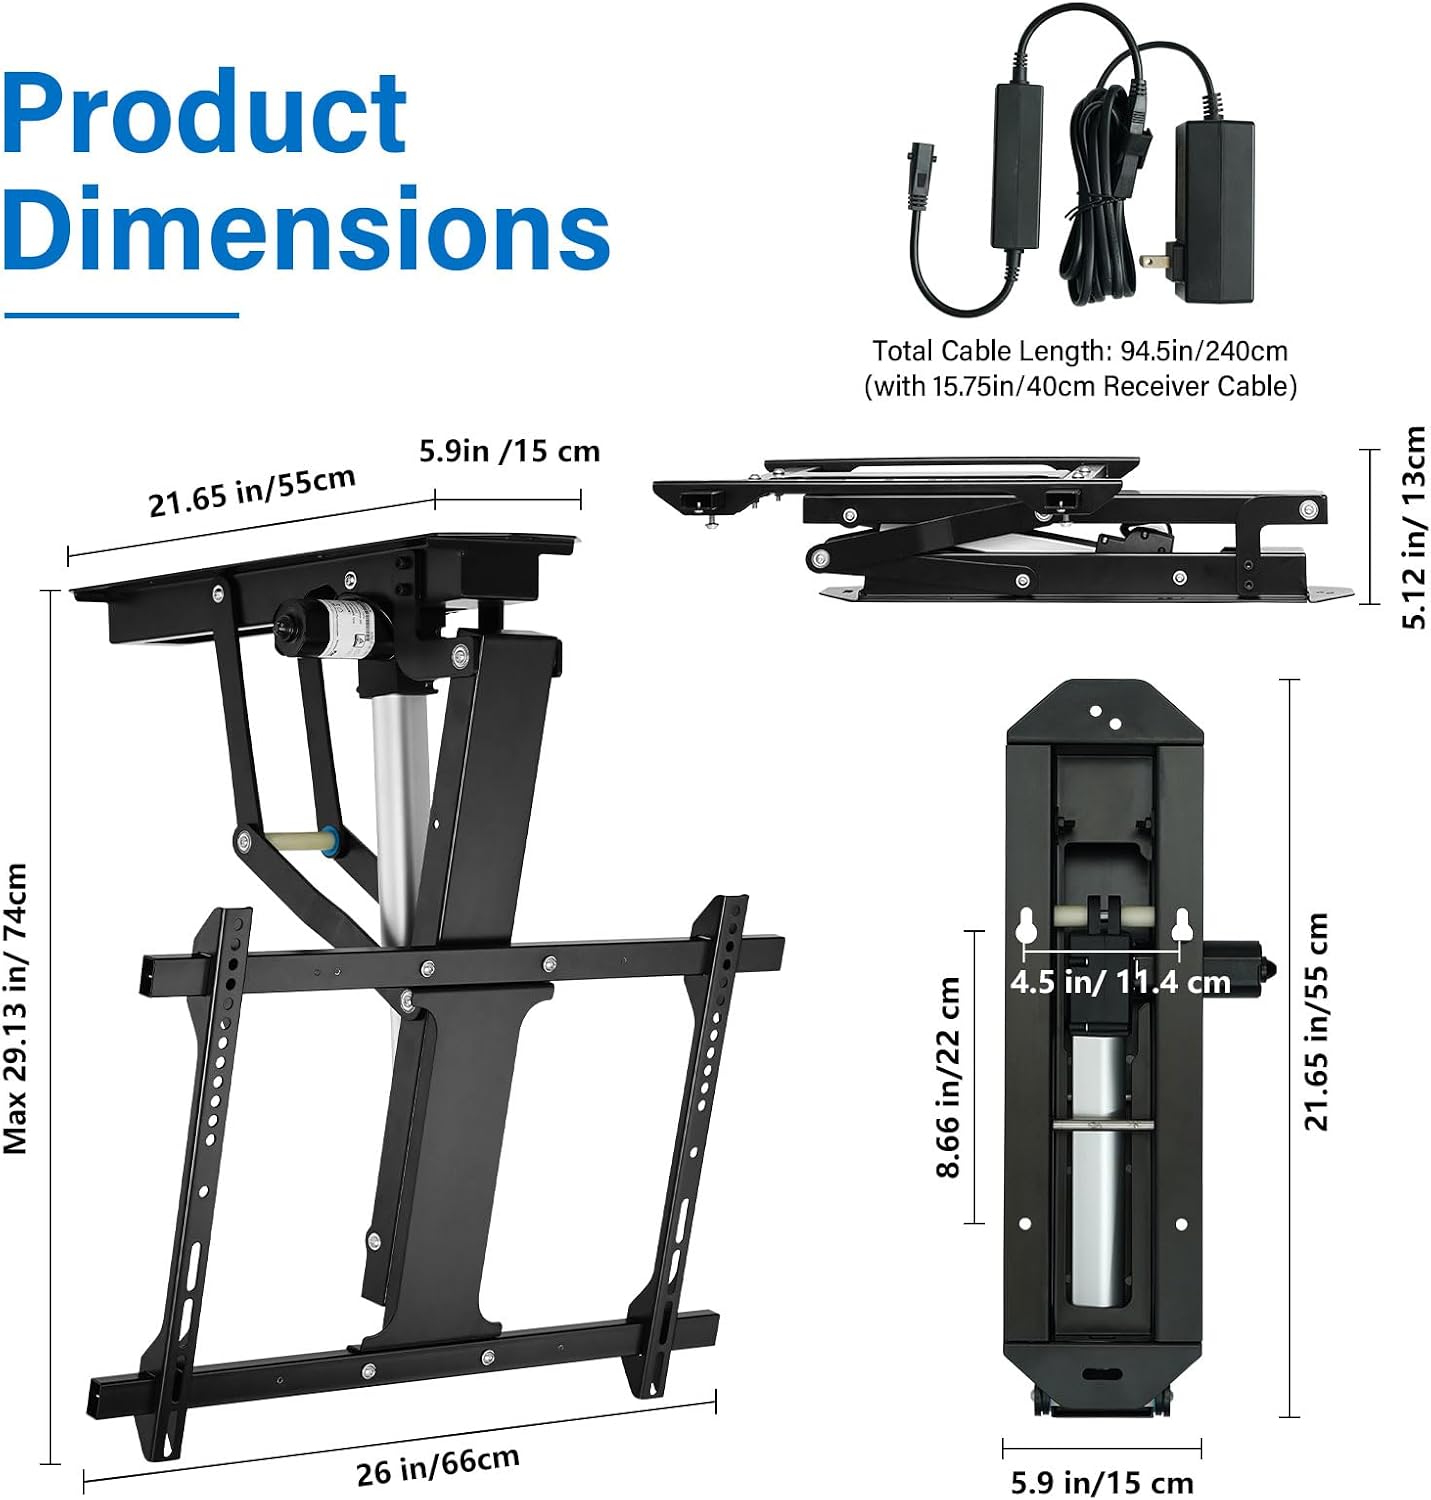
Image 3.1: Detailed product dimensions of the ceiling TV mount and its power components.

Billede 3.2: Overview of the durable motor lift system's performance metrics, including tilt range, expansion time, and adjustment speed.

Image 3.3: Comparison of key specifications such as tilt range, expansion time, adjustment speed, and weight capacity.
4. Opsætning og installation
4.1 Kontrol før installation
- Verify your ceiling structure can support the combined weight of the mount and your TV.
- Confirm your TV's VESA mounting pattern is within the supported range (200x100mm to 600x400mm).
- For 55", 65", or 70" TVs, ensure the VESA holes on your TV are centered for proper clearance between the screen and the ceiling when folded. If the VESA holes are positioned lower on the TV back, additional planks or spacers may be needed to adjust the distance and prevent the TV from hitting the ceiling.

Image 4.1: Visual guide for checking if your TV's VESA holes are centered for optimal clearance with the ceiling mount.

Image 4.2: Explanation of VESA hole positioning for larger TVs (55", 65", 70") and when additional planks might be required for proper clearance.
4.2 Montering af enheden
- Identify the desired mounting location on your ceiling. Ensure it is structurally sound and free from electrical wires or plumbing.
- Using the mounting plate as a template, mark the drilling points on the ceiling.
- Drill pilot holes according to the recommended drill bit size for your ceiling type (wood or concrete).
- With the assistance of a second person, lift the mount into position and secure it to the ceiling using the appropriate fasteners.
- Attach the TV brackets to the back of your television, aligning them with the VESA holes.
- Carefully lift the TV and hook the TV brackets onto the mount's arms. Secure the TV to the mount using the provided screws and safety mechanisms.

Image 4.3: The ceiling TV mount installed on both wood and concrete ceiling types, demonstrating versatility.

Image 4.4: The mount successfully installed on a pitched ceiling, suitable for rooms with varying roof angles.

Image 4.5: Demonstrates compatibility with both flat and pitched ceiling installations.
5. Betjeningsvejledning
5.1 Parring af fjernbetjening
Before initial use, you must complete the code pairing between the remote control and the receiver unit. Refer to the specific code pairing guide provided on the last page of the instruction manual (not included in this digital format, please refer to the physical manual or manufacturer's website for detailed steps).
5.2 Electric Adjustment
Once paired, use the remote control to operate the mount:
- Tryk på UP button to raise the TV towards the ceiling.
- Tryk på NED button to lower the TV from the ceiling.
- The mount supports a tilt range of 0-80 degrees, allowing you to adjust the TV for your preferred viewvinkel.
- The powerful motor allows for smooth and quiet operation, fully expanding or retracting the TV in approximately 32 seconds.

Image 5.1: The mount in motion, demonstrating its ability to fully open in 32 seconds and tilt up to 80 degrees, controlled by the remote.

Image 5.2: The TV mount adjusted to an 80-degree tilt, illustrating the optimal viewing angle capability.

Image 5.3: The remote control in use, capable of operating the mount from up to 98 feet away.
6. Vedligeholdelse
- Rensning: Tør holderen af med en blød, tør klud. Brug ikke slibende rengøringsmidler eller opløsningsmidler.
- Inspektion: Kontrollér regelmæssigt alle skruer og forbindelser for at sikre, at de er fastgjort. Spænd eventuelle løse fastgørelseselementer.
- Motorpleje: The motor is designed for long-term use and generally requires no special maintenance. Avoid obstructing the motor's movement.
7. Fejlfinding
7.1 Fjernbetjeningen reagerer ikke
- Tjek batterier: Ensure the remote control has fresh AAA batteries installed correctly.
- Parring: If the remote has not been paired or has lost its connection, perform the code pairing procedure as described in the physical instruction manual (refer to the last page).
- Forhindringer: Ensure there are no obstructions between the remote control and the mount's receiver.
- Rækkevidde: Confirm you are within the effective operating range of 98 ft (30 m).
7.2 Mount Not Moving Smoothly or Making Unusual Noises
- Overbelaste: Ensure the combined weight of your TV and any accessories does not exceed the 88 lbs (40 kg) weight capacity.
- Forhindringer: Check for any physical obstructions preventing the mount from moving freely.
- Løse fastgørelseselementer: Inspect all mounting screws and connections for tightness.
7.3 TV'et er ikke i vater
- The mount allows for ±2 degrees of screen leveling. Refer to the installation instructions for how to adjust the leveling screws to correct any slight tilt.
8. Garanti og support
The TOPSKY Electric Adjustable Ceiling TV Mount (Model TV01.01) comes with a 3 års eftersalgsservice. For any questions, technical assistance, or warranty claims, please contact TOPSKY customer support.
You can find contact information and additional resources by visiting the official TOPSKY store on Amazon: TOPSKY Store.


