1. Introduktion
Thank you for choosing the EMKE Mini Wall-Mounted Ceramic Washbasin, Model CB06. This manual provides essential information for the safe and efficient installation, operation, and maintenance of your new washbasin. Please read these instructions carefully before installation and retain them for future reference.
This compact and practical washbasin (40 x 20 x 10 cm) is designed for bathrooms and guest toilets, offering a space-saving solution with a modern aesthetic. It features high-quality ceramic construction and a nano-coating for easy cleaning.

Billede 1.1: Forside view of the EMKE Mini Wall-Mounted Ceramic Washbasin.
2. Sikkerhedsinstruktioner
- Always ensure the water supply is turned off before beginning any installation or maintenance work.
- Brug passende personlige værnemidler (PPE) såsom handsker og øjenbeskyttelse under installationen.
- Handle the ceramic washbasin with care to prevent chipping or breakage. Ceramic is heavy and fragile.
- Ensure the wall structure is suitable and strong enough to support the weight of the washbasin when filled with water. Consult a professional if unsure.
- Do not use abrasive cleaners or harsh chemicals on the ceramic surface, as this may damage the nano-coating.
- Opbevar små dele og værktøj utilgængeligt for børn.
3. Pakkens indhold
Please check that all components are present and undamaged before proceeding with installation. The package includes:
- EMKE Mini Wall-Mounted Ceramic Washbasin (Model CB06)
Note: Faucet, drain, and mounting hardware are IKKE medfølger og skal købes separat.
4. Opsætning og installation
Denne vaskemaskineasin is designed for wall-mounted installation. Ensure you have the necessary tools and additional components (faucet, drain, mounting hardware) before starting.
4.1 Required Tools and Materials (Not Included):
- Drill and appropriate drill bits for your wall type
- Målebånd og blyant
- Niveau
- Wrench/Spanner
- Sealant (silicone)
- Mounting screws and wall plugs suitable for your wall type and the washbasin's weight
- Faucet and drain assembly
4.2 Installationstrin:
- Mål og markér: Carefully measure the dimensions of the washbasin and the desired installation height. Mark the positions for the two wall mounting holes on the wall. The distance between the mounting holes is approximately 150 mm (refer to Image 4.1). Ensure the marks are level.
- Bore huller: Drill holes at the marked positions using an appropriate drill bit for your wall material. Insert the wall plugs.
- Fastgør monteringsudstyr: Secure the mounting screws or studs into the wall plugs, leaving enough thread exposed for the washbasin.
- Installer vandhane og afløb: Before mounting the washbasin to the wall, install the faucet and drain assembly according to their respective manufacturer's instructions. Ensure all connections are sealed properly to prevent leaks.
- Mount Washbasin: Carefully lift the washbasin and align the mounting holes on the back with the exposed screws/studs on the wall. Push the washbasin onto the screws and tighten securely. Do not overtighten, as this can crack the ceramic.
- Forseglingskanter: Apply a bead of silicone sealant around the edges where the washbasin meets the wall to prevent water ingress. Note that the back of the washbasin is not glazed.
- Tilslut vandforsyning: Connect the hot and cold water supply lines to the faucet. Turn on the water supply and check for any leaks.
- Testdræning: Lad vand løbe ind i basin and check that the drain functions correctly and there are no leaks in the drain assembly.
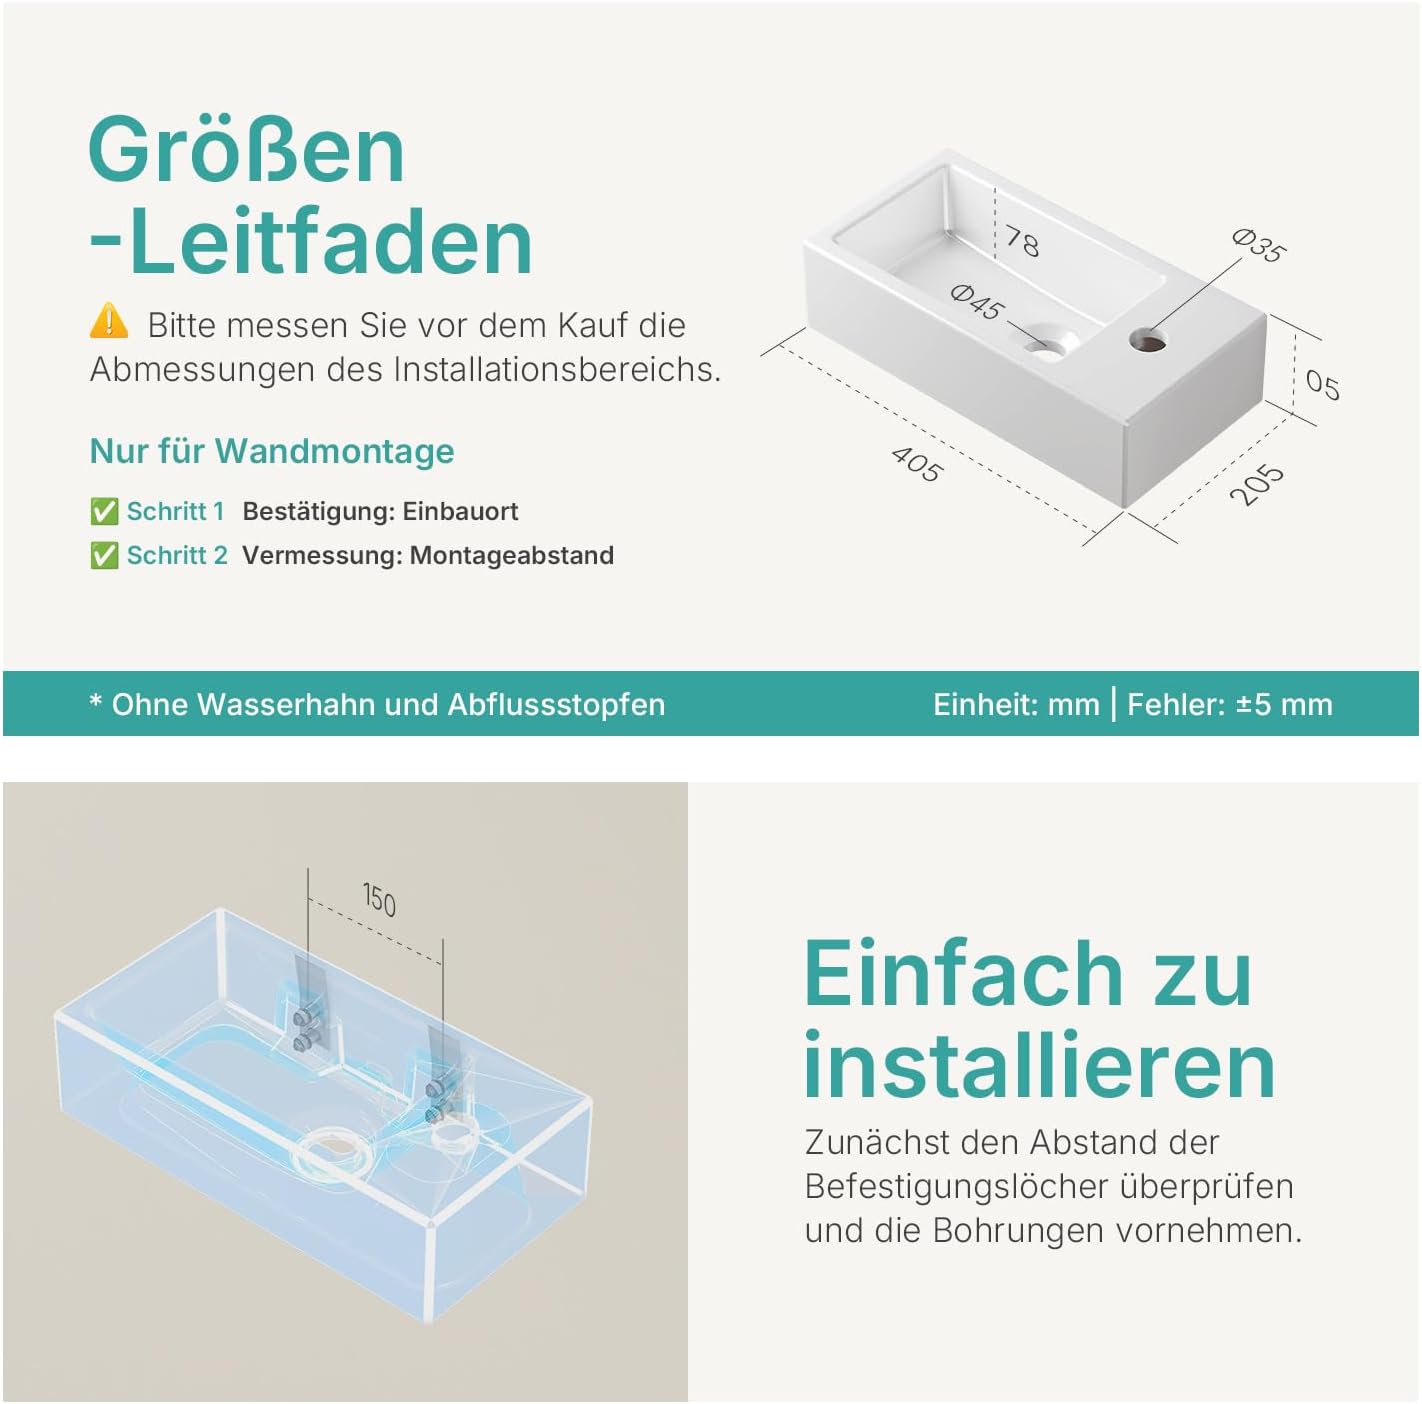
Image 4.1: Size guide and installation measurements. Note the mounting hole spacing.

Image 4.2: Illustration of the wall mounting process.
Vaskebænkenasin features a single faucet hole and a standard drain opening. Its compact size is ideal for small spaces.

Image 4.3: Detailed dimensions of the washbasin, including faucet and drain hole diameters.
5. Betjeningsvejledning
The EMKE Mini Wall-Mounted Ceramic Washbasin is designed for standard use in bathrooms and guest toilets. Simply use the installed faucet to control water flow and temperature. The basin is crafted for durability and ease of use, featuring ceramic properties that are resistant to stains, corrosion, acids, and alkalis.

Image 5.1: The washbasin's ceramic is resistant to stains, corrosion, acids, and alkalis, ensuring long-lasting quality.
6. Vedligeholdelse og rengøring
Regular cleaning will help maintain the appearance and longevity of your EMKE washbasin. The nano-coating makes cleaning effortless.
- Daglig rengøring: Tør overfladen af med en blød, damp cloth and mild soap or a non-abrasive bathroom cleaner. Rinse thoroughly with water and wipe dry with a soft cloth to prevent water spots.
- Nano Smart Glaze: Vaskebænkenasin features a Nano Smart Glaze for easier cleaning. This coating repels dirt and germs, making maintenance simple.
- Undgå slibemidler: Do not use abrasive sponges, scouring pads, or harsh chemical cleaners (e.g., strong acids, alkalis, or bleach) as these can damage the ceramic surface and the nano-coating.
- Pletfjernelse: For stubborn stains, use a ceramic-safe cleaner and follow the product instructions.
- Faucet and Drain: Clean the faucet and drain according to their manufacturer's instructions.

Image 6.1: The Nano Smart Glaze ensures effortless cleaning and hygiene.
7. Fejlfinding
| Problem | Mulig årsag | Løsning |
|---|---|---|
| Vandlækage | Loose connections at faucet or drain; improper sealant application. | Check and tighten all connections. Reapply sealant if necessary. |
| Langsom dræning | Drain partially clogged with hair or debris. | Remove and clean the drain stopper. Use a drain cleaner if blockage persists. |
| Vaskasin føles ustabil | Monteringsskruerne er løse, eller vægstøtten er utilstrækkelig. | Carefully re-tighten mounting screws. If the wall is inadequate, reinforce it or consult a professional. |
| Stains on ceramic surface | Hard water deposits or residue from certain products. | Use a non-abrasive ceramic cleaner. For hard water, use a descaling agent designed for bathroom ceramics. |
If you encounter issues not listed here or if solutions do not resolve the problem, please contact EMKE customer support.
8. Specifikationer
The EMKE Mini Wall-Mounted Ceramic Washbasin (Model CB06) is manufactured with high-temperature fired ceramic, ensuring high porcelain density, durability, and resistance to breakage.

Image 8.1: High-temperature firing at 1280°C ensures the ceramic's strength and durability.
| Feature | Detalje |
|---|---|
| Modelnummer | CB06 |
| Mærke | EMKE |
| Materiale | Keramik af høj kvalitet |
| Farve | White A06 |
| Overordnede mål (L x B x H) | 40 x 20 x 10 cm (approx. 40.5 x 20.5 x 10.5 cm including slight manufacturing variations) |
| Produktets vægt | 6.3 kilo |
| Installationstype | Vægmontering |
| Form | Rektangulær |
| Kranhul | Single, Right-sided (Standard diameter, approx. Ø35mm) |
| Drænhul | Standard diameter (approx. Ø45mm) |
| Finish Type | Painted (Glazed) |
| Særlige funktioner | Nano Smart Glaze for easy cleaning, Corrosion Resistant, Resistant to Acids and Alkalis, High Porcelain Density |
| Inkluderede komponenter | Vaskasin kun |
9. Garanti og support
EMKE products are manufactured to high-quality standards. For information regarding warranty coverage, please refer to the warranty card included with your purchase or visit the official EMKE webwebsted. Gem din købsbevis til garantikrav.
For technical assistance, troubleshooting, or spare parts, please contact EMKE customer support through the retailer where you purchased the product or via the contact information provided on the EMKE official webwebsted.
EMKE Customer Service:
- Webwebsted: www.emke.de (eller relevant regionalt webwebsted)
- Contact details may vary by region. Please check the product packaging or EMKE webwebsted for specifikke kontaktoplysninger.


