
Della 048-OPAC-6H
Della 10000 BTU Portable Air Conditioner User Manual
Model: 048-OPAC-6H | Brand: Della
1. Vigtige sikkerhedsoplysninger
Please read this manual carefully before operating your portable air conditioner. Keep this manual for future reference. Always follow basic safety precautions to reduce the risk of fire, electric shock, or injury.
- Sørg for, at enheden er placeret på en flad, stabil overflade for at forhindre, at den vælter.
- Betjen ikke enheden med en beskadiget ledning eller stik.
- Stik ikke fingre eller genstande ind i luftindtaget eller -udtaget.
- Hold enheden væk fra brandfarlige materialer og åben ild.
- Tag altid stikket ud af enheden, før du rengør eller udfører vedligeholdelse.
- Dette apparat er ikke beregnet til brug af personer (inklusive børn) med nedsatte fysiske, sensoriske eller mentale evner, eller mangel på erfaring og viden, medmindre de har fået opsyn eller instruktion i brugen af apparatet af en person, der er ansvarlig for deres sikkerhed.
2. Produktet er slutview
The Della 10000 BTU Portable Air Conditioner is a versatile unit designed to provide cooling, heating, dehumidification, and fan functions for spaces up to 450 sq. ft. It features smart WiFi connectivity for convenient control via a mobile app, a remote control, and an intuitive soft-touch control panel.

Image: Della Portable Air Conditioner unit, remote control, and smartphone displaying the control app.
Key components include the main unit with integrated handle, exhaust hose, window installation kit, and remote control.

Image: Diagram showing the dimensions of the portable air conditioner: 12.2 inches (width) x 12.2 inches (depth) x 27.6 inches (height).
3. Opsætning
3.1 Udpakning
Carefully remove the unit and all accessories from the packaging. Retain the original packaging for future storage or transport. Allow the unit to stand upright for at least 24 hours before initial use to allow the refrigerant to settle.
3.2 Placering
Place the air conditioner on a firm, level surface in a location that allows for proper air circulation. Ensure there is at least 20 inches (50 cm) of space from walls or other objects to allow for adequate airflow around the unit.
3.3 Montering af vinduessæt
The included window kit is designed for easy installation in both horizontal and vertical sliding windows. No drilling is required.

Image: Diagrams illustrating the installation of the window kit in both horizontal and vertical sliding windows, showing compatibility with window openings from 25.5 to 64.1 inches.
- Assemble the window slider kit by sliding the adjustable panels together to fit your window opening. The kit is compatible with window sizes from 25.5 to 64.1 inches.
- Secure the panels with the provided screws.
- Open the window and place the assembled window kit into the window frame. Extend the panels to fit snugly and close the window against the kit to secure it.
- Ensure the window kit is sealed properly to prevent air leakage. Use foam seals if necessary.
3.4 Udstødningsslangetilslutning
- Fastgør udstødningsslangeforbindelsesstykket til den ene ende af udstødningsslangen.
- Fastgør vinduessættets adapter til den anden ende af udstødningsslangen.
- Insert the exhaust hose connector into the exhaust outlet on the back of the air conditioner unit.
- Insert the window kit adapter into the opening on the window slider kit.
- Ensure all connections are secure to prevent hot air from re-entering the room.
3.5 Strømtilslutning
Plug the power cord into a grounded 115V/60Hz electrical outlet. Do not use extension cords or power strips.
4. Betjeningsvejledning
4.1 Kontrolpanel
The unit features an intuitive soft-touch control panel on the top of the unit.
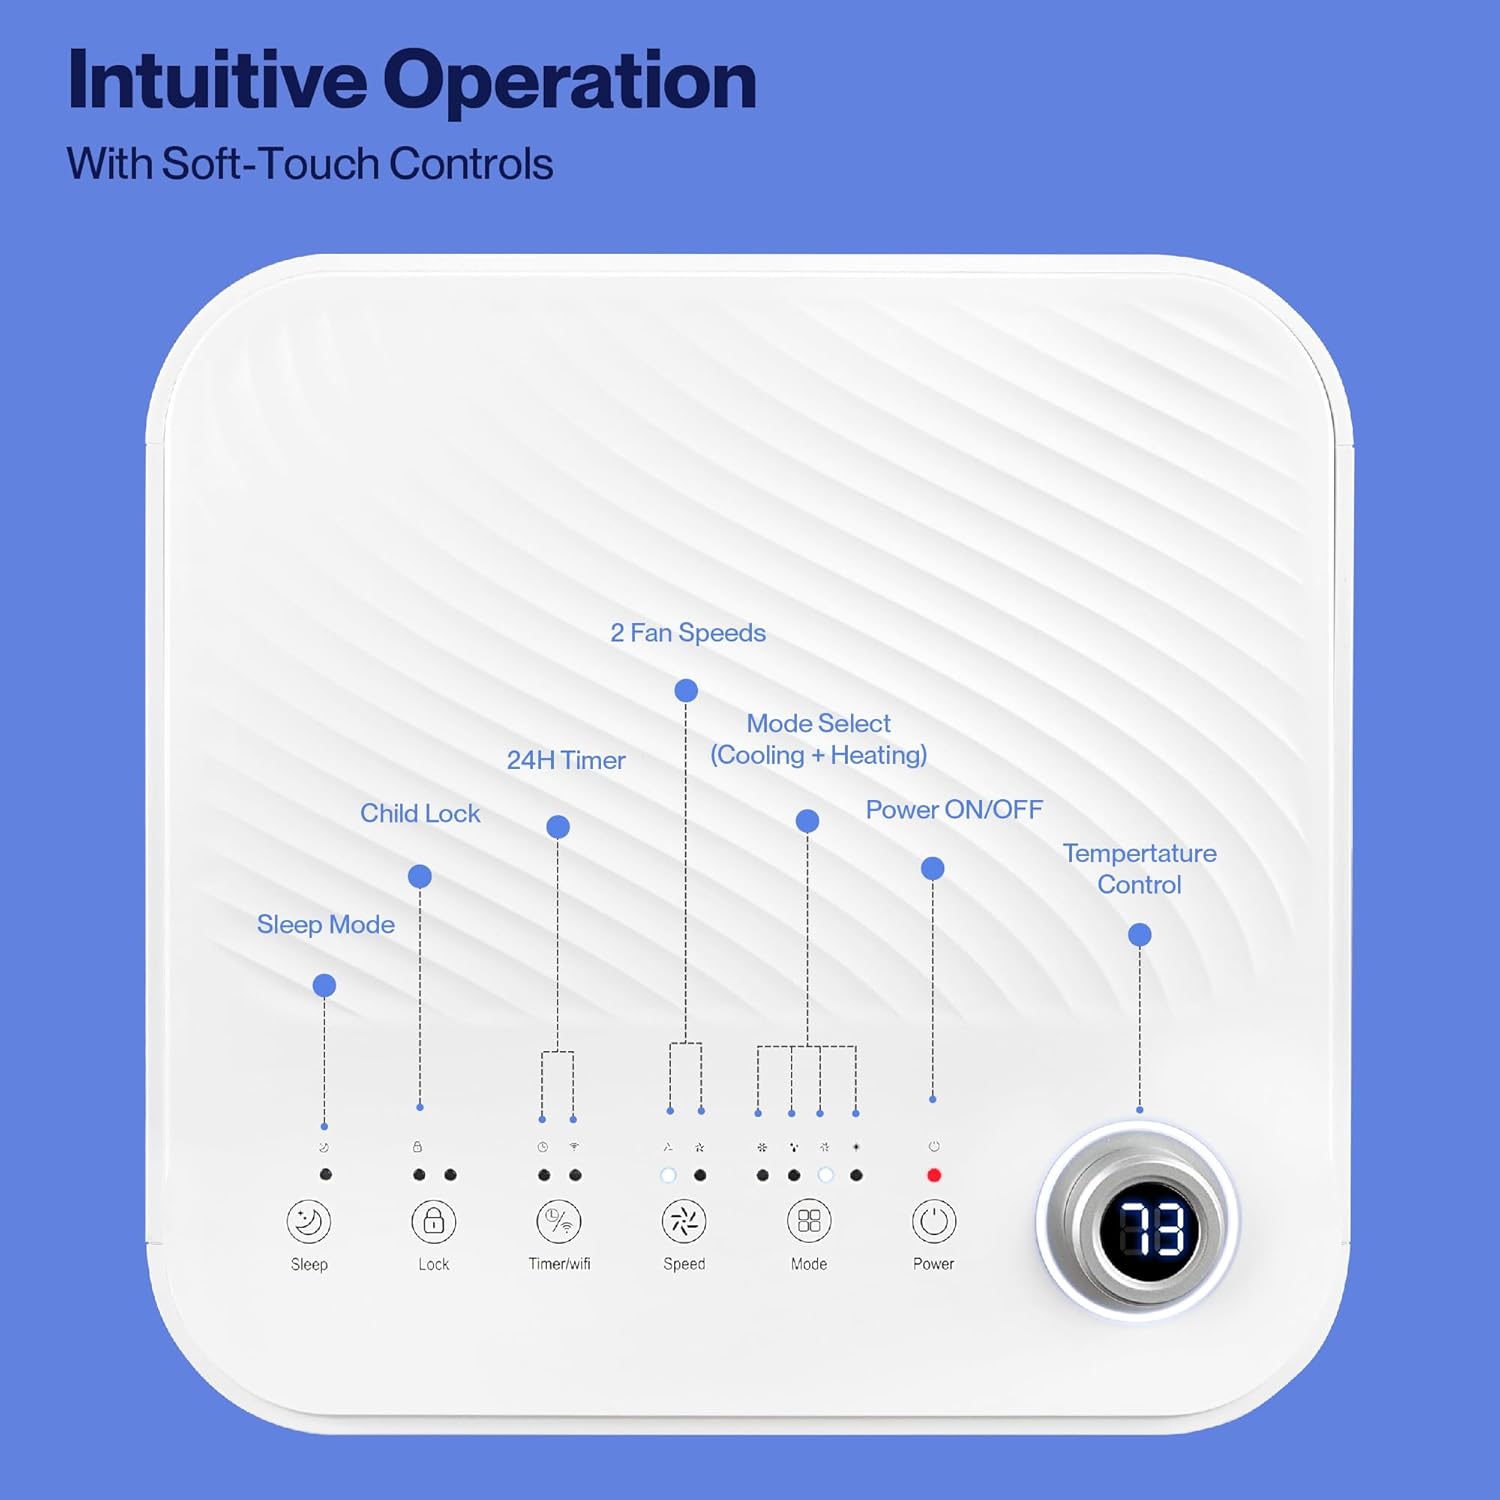
Image: Detailed diagram of the control panel with labels for each button: Sleep, Child Lock, Timer/WiFi, Fan Speed, Mode Select (Cooling + Heating), Power ON/OFF, and Temperature Control with digital display.
- Tænd/sluk: Tryk for at tænde eller slukke for enheden.
- Valg af tilstand: Cycle through Cooling, Heating, Dehumidification, Ventilation (Fan), and Sleep modes.
- Temperaturkontrol: Use the up/down arrows to adjust the desired temperature.
- Blæserhastighed: Select between 2 fan speeds (Low, High).
- Timer: Indstil en 24-timers timer til automatisk tænd/sluk-funktion.
- Børnelås: Aktiverer eller deaktiverer børnesikringsfunktionen.
- Sove mode: Aktiverer dvaletilstand for mere støjsvag drift og gradvis temperaturjustering.
4.2 Fjernbetjening
The unit comes with a remote control for convenient operation from a distance. All functions available on the control panel can be accessed via the remote.
4.3 WiFi/Smart App Control
Control your Della Portable Air Conditioner from anywhere using the free DELLA+ app on your smartphone. The unit is compatible with Google Assistant and Amazon Alexa for voice control.

Image: A person relaxing on a couch, using a smartphone to control the air conditioner, with text indicating compatibility with Google Assistant and Amazon Alexa.
- Download the DELLA+ app from your smartphone's app store.
- Follow the in-app instructions to connect your air conditioner to your home WiFi network.
- Når du er tilsluttet, kan du styre tilstande, temperatur, ventilatorhastighed og indstille tidsplaner eksternt.
The app also supports Smart Geo Location, allowing the unit to automatically turn on or off based on your proximity to home.

Image: A smartphone screen showing a map with a car icon and a notification indicating the AC unit automatically turned on due to Smart Geo Location.
5. Vedligeholdelse
Regular maintenance ensures optimal performance and extends the lifespan of your unit. Always unplug the unit before cleaning.
5.1 Rengøring af luftfilteret
Luftfilteret bør rengøres hver anden uge eller oftere afhængigt af brug og luftkvalitet.
- Find luftfilterpanelet (normalt på bagsiden eller siden af enheden).
- Fjern filteret.
- Vask filteret med varmt sæbevand. Skyl grundigt, og lad det lufttørre helt, før det sættes i igen.
5.2 Aftapning af vand
The unit has a self-evaporating system, but in high humidity conditions, water may accumulate. The "Water-full indicator" will illuminate when the water tank needs draining.
- Place a shallow pan or tray under the drain port (located at the bottom rear of the unit).
- Fjern aftapningsproppen.
- Allow all accumulated water to drain out.
- Sæt aftapningsproppen ordentligt på plads.
5.3 Opbevaring
Hvis enheden opbevares i en længere periode:
- Tøm alt ophobet vand.
- Rengør luftfilteret.
- Kør enheden i kun ventilatortilstand i et par timer for at tørre indersiden.
- Tag netledningen ud, og rul den pænt op.
- Opbevar enheden på et køligt, tørt sted, helst i den originale emballage.
6. Fejlfinding
Se dette afsnit for almindelige problemer og deres løsninger.
| Problem | Mulig årsag | Løsning |
|---|---|---|
| Enheden tænder ikke | No power; Power cord unplugged; Circuit breaker tripped; Water tank full | Check power outlet; Plug in power cord; Reset circuit breaker; Drain water tank |
| Enheden køler ikke effektivt | Air filter dirty; Exhaust hose not properly installed; Room too large; Doors/windows open; Temperature setting too high | Clean air filter; Ensure exhaust hose is sealed; Close doors/windows; Lower temperature setting |
| Enheden er støjende | Unit not on level surface; Air filter dirty; Obstruction in fan | Place unit on level surface; Clean air filter; Check for obstructions |
| Vandlækage | Drain plug loose or missing; Unit tilted | Secure drain plug; Ensure unit is level |
| Problemer med WiFi-forbindelse | Incorrect WiFi password; Unit too far from router; Router issues | Verify password; Move unit closer to router; Restart router |
Hvis problemet fortsætter efter at have prøvet disse løsninger, bedes du kontakte kundesupport.
7. Specifikationer
| Feature | Specifikation |
|---|---|
| Modelnummer | 048-OPAC-6H |
| Kølekapacitet | 10000 BTU |
| Dækningsområde | Op til 450 kvm. Ft. |
| Funktioner | Cooling, Heating, Dehumidifier, Fan, Sleep Mode |
| Voltage | 115 volt |
| Støjniveau | 54 dB |
| Kølemiddel | R410A |
| Dimensioner (L x B x H) | 12.2 x 12.2 x 27.6 tommer |
| Materiale | ABS plast |
| Særlige funktioner | Portable, Dehumidifier, WiFi Enabled, Remote Control, Built-in Handle, 24-hour timer, Child Lock |
8. Garanti og kundesupport
For warranty information or technical assistance, please refer to the warranty card included with your product or visit the official Della website. You may also contact Della customer support directly for further assistance with troubleshooting or parts replacement.
Ask a question about this manual
Ask about setup, troubleshooting, compatibility, parts, safety, or missing instructions. Manuals+ will review the question and use this page’s manual context to help answer it.