Genérico GD168B
GVDA GD168B True RMS Digital Clamp Brugervejledning til måler
Model: GD168B
1. Introduktion
The GVDA GD168B is a new generation high-performance True RMS intelligent digital clamp meter designed to make your electrical measurement tasks easier, more efficient, and safer. This versatile instrument combines multiple functions, allowing for precise measurement of AC/DC voltage, AC/DC current, frequency, duty cycle, resistance, capacitance, temperature, diode, continuity, Non-Contact Voltage (NCV), and live wire detection, among others.
Its robust design and comprehensive features make it an essential tool for electricians, technicians, and DIY enthusiasts alike.
2. Sikkerhedsoplysninger
Overhold altid sikkerhedsforanstaltningerne, når du bruger elektrisk testudstyr. Undladelse af at gøre dette kan resultere i personskade eller beskadigelse af måleren eller det udstyr, der testes.
- Read this manual thoroughly before operation.
- Anvend ikke voltage or current that exceeds the maximum rated values specified for the meter.
- Udvis ekstrem forsigtighed, når du arbejder med spændingsførende kredsløb.
- Ensure the test leads are in good condition, free from cracks or damage.
- Brug ikke måleren, hvis den ser ud til at være beskadiget eller ikke fungerer korrekt.
- Afbryd altid strømmen til kredsløbet, før du foretager modstands-, kapacitans- eller diodemålinger.
- Udskift batterierne med det samme, når indikatoren for lavt batteri vises, for at sikre nøjagtige aflæsninger.
3. Produktet er slutview
The GD168B clamp meter features a compact and ergonomic design for comfortable handling and ease of use. Below are the key components and what is included in the package.

Figur 3.1: Forside view of the GD168B Clamp Meter with included test leads, showcasindens display og kontrolknapper.
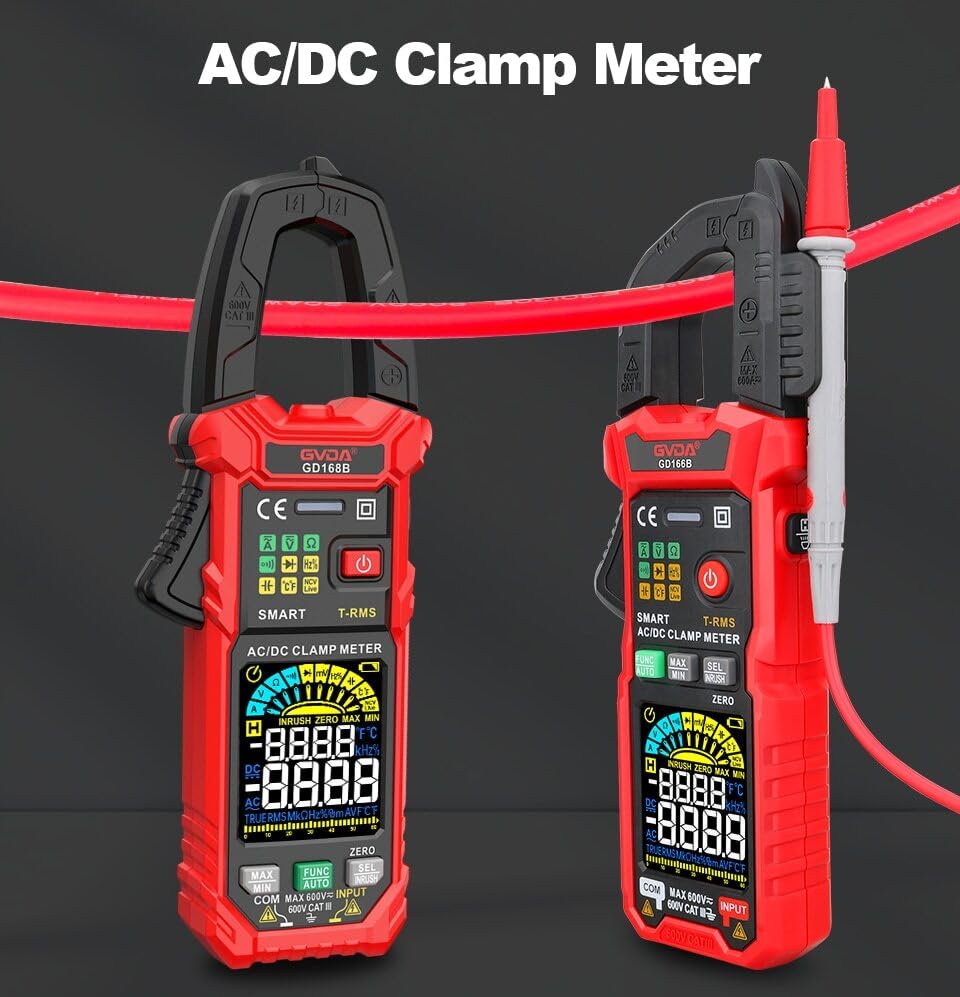
Figure 3.2: Two GD168B Clamp Meters, demonstrating the clamp opening mechanism for AC/DC current measurement.
Pakkeindhold:

Figure 3.3: All items included in the GD168B Clamp Målerpakke.
- 1 x GD168B Digital Clamp Måler
- 1 x Set of Test Leads
- 1 x rengøringsklud
- 1 x termoelementprobe
- 1 x brugermanual
4. Opsætning
4.1 Batteriinstallation
The GD168B clamp meter requires 3 x 1.5V AAA batteries (not included) for operation. To install or replace batteries:
- Find batteridækslet på bagsiden af måleren.
- Brug en skruetrækker til at åbne batterirummet.
- Isæt de 3 AAA-batterier, og sørg for at polerne vender korrekt (+ og -).
- Sæt batterirummets dæksel på igen og fastgør det med skruen.
4.2 Tilslutning af testledninger
For bdtage, resistance, capacitance, diode, and continuity measurements, connect the test leads to the appropriate input jacks.

Figure 4.1: Correct connection of test leads for various measurements.
- Insert the red test lead into the "VΩHz" or "INPUT" jack.
- Sæt den sorte testledning i "COM"-stikket (fælles).
- Ensure a secure connection before taking measurements.
5. Betjeningsvejledning
The GD168B features a smart measurement mode (AUTO) that automatically identifies the measurement type, simplifying operation. You can also manually select specific functions.
5.1 Tænd/sluk
Tryk på tænd / sluk-knappen (⏻) to turn the meter on or off. The meter may have an auto-power-off feature to conserve battery life.
5.2 AC/DC Voltage Måling
- Tilslut testledningerne som beskrevet i afsnit 4.2.
- Vælg voltage measurement mode (or use AUTO mode).
- Tilslut testproberne parallelt til det kredsløb eller den komponent, der skal måles.
- Læs bindtage -værdi på displayet.
5.3 AC/DC strømmåling (Clamp)
Til strømmåling skal du bruge clamp jaw. Do not use test leads for current measurement with the clamp fungere.
- Select the AC or DC current measurement mode.
- Åbn clamp kæben og omslut kun én leder af kredsløbet. Sørg for, at kæben er helt lukket.
- Aflæs den aktuelle værdi på displayet.
5.4 Måling af indkoblingsstrøm
The inrush current function measures the initial surge of current when a device is turned on, useful for diagnosing motor startup issues or circuit breaker tripping.

Figure 5.1: Measuring inrush current on an electrical circuit.
- Select the Inrush Current mode.
- Åbn clamp jaw and enclose the conductor of the device you wish to test.
- Turn on the device, and the meter will capture and display the peak inrush current.
5.5 Non-Contact Voltage (NCV) Detektion
NCV-funktionen muliggør hurtig og sikker detektion af AC-volumentage uden direkte kontakt med ledere.

Figure 5.2: Using the NCV function to detect live voltagi nærheden af en stikkontakt.
- Vælg NCV-tilstand.
- Place the NCV sensor (usually at the top of the clamp jaw) near the conductor or outlet.
- Måleren vil indikere tilstedeværelsen af AC-volumentage through audible beeps and/or visual indicators.
5.6 Andre funktioner
- Modstand: Connect test leads to the component. Select resistance mode.
- Kapacitans: Connect test leads to the capacitor. Select capacitance mode.
- Frekvens/arbejdscyklus: Connect test leads to the signal source. Select frequency/duty cycle mode.
- Temperatur: Connect the thermocouple probe to the meter and place the probe tip on the object to be measured. Select temperature mode.
- Diode test: Connect test leads to the diode. Select diode mode.
- Kontinuitetstest: Connect test leads across the circuit or component. Select continuity mode. A beep indicates continuity.
- Data Hold: Tryk på "HOLD"-knappen for at fryse den aktuelle aflæsning på displayet. Tryk igen for at slippe.
- Baggrundslys/lommelygte: Use the dedicated button to turn on/off the display backlight or the built-in flashlight for working in dimly lit areas.
- MAX/MIN-måling: Capture the maximum and minimum readings over a period.
- DCA Zero: Used to zero out residual readings in DC current measurement mode for improved accuracy.
6. Vedligeholdelse
6.1 Rengøring
Tør målerens c afasing med annonceamp klud og mildt rengøringsmiddel. Brug ikke slibemidler eller opløsningsmidler. Sørg for, at måleren er tør før opbevaring eller brug.
6.2 Udskiftning af batteri
Udskift batterierne, når indikatoren for lavt batteriniveau vises på displayet. Se afsnit 4.1 for instruktioner om batteriinstallation.
6.3 Opbevaring
Hvis måleren ikke bruges i længere tid, skal batterierne fjernes for at forhindre lækage. Opbevar måleren et køligt og tørt sted, væk fra direkte sollys og ekstreme temperaturer.
7. Fejlfinding
This section addresses common issues you might encounter with your GD168B clamp måler.
| Problem | Mulig årsag | Løsning |
|---|---|---|
| Måleren tænder ikke. | Døde eller forkert installerede batterier. | Kontroller batteripolariteten, eller udskift med nye AAA-batterier. |
| "OL" vises. | Over-range condition; input value exceeds meter's maximum range. | Ensure the measured value is within the meter's specified range. |
| Upræcise aflæsninger. | Low battery, dirty test leads, or incorrect measurement mode. | Replace batteries, clean test leads, or select the correct measurement function. |
| Ingen kontinuitetsbip. | Åbent kredsløb eller høj modstand. | Verify the circuit is closed and resistance is low enough for continuity detection. |
8. Specifikationer
| Parameter | Værdi |
|---|---|
| DC bindtage | 600mV, 6V, 60V, 600V |
| AC Voltage | 600mV, 6V, 60V, 600V |
| AC strøm | 60A, 600A |
| DC-strøm | 60A, 600A |
| Modstand | 600Ω, 6kΩ, 60kΩ, 600kΩ, 6MΩ, 60MΩ |
| AC-indgangsstrøm | 60A, 600A |
| Kapacitans | 6nF, 60nF, 600nF, 6µF, 60µF, 600µF, 6mF, 60mF |
| Frekvens | 100Hz, 1000Hz, 10kHz, 100kHz, 1000kHz, 10MHz |
| Duty Cycle | 1-99 % |
| Temperatur | -40°C til 1000°C (-40°F til 1832°F) |
| Temperaturenhed | °C/°F kan vælges |
| Maks. Voltage between terminals and ground | 600V |
| Vise | 6000 tæller |
| Over-range indikation | "OL" |
| Lavt batteri indikation | Ja |
| Indikation af indgangspolaritet | "-" display |
| AC/DC mV Measurement | Ja |
| Kontinuitetstest | Ja |
| Maks./min. måling | Ja |
| Smart Measurement (Auto) | Ja |
| Ægte RMS | Ja |
| Diode måling | Ja |
| DCA nul | Ja |
| Live Wire Detection | Ja |
| Non-Contact AC Voltage Detektion (NCV) | Ja |
| Baggrundsbelysning | Ja |
| Lommelygte | Ja |
| Datahold | Ja |
| Clamp Åbningsstørrelse | 36 mm |
| Strømbehov | 3 x 1.5V AAA-batterier (medfølger ikke) |
| Pakkevægt | 440 g |
| Produktstørrelse | 199x81x32 mm |
9. Garanti og support
This product comes with a standard manufacturer's warranty. Please refer to the warranty card included in your package for specific terms and conditions. For technical support, troubleshooting assistance, or warranty claims, please contact your retailer or the manufacturer directly.
For further assistance, please visit the official GVDA webwebsted eller kontakt deres kundeservice.
Ask a question about this manual
Ask about setup, troubleshooting, compatibility, parts, safety, or missing instructions. Manuals+ will review the question and use this page’s manual context to help answer it.