
1. Introduktion
The RadioMaster Boxer is a compact yet powerful 2.4GHz radio transmitter designed for remote control applications, featuring 16 channels and Hall effect gimbals for precise control. This manual provides essential information for setting up, operating, and maintaining your Boxer transmitter.
Nøglefunktioner:
- Available with built-in ExpressLRS or 4-in-1/CC2500 MPM RF modules. This model features the CC2500 multi-protocol module.
- Powered by a robust STM32VGT6 processor with 1MB RAM for fast and reliable performance.
- Compact design with excellent ergonomics, including new low-profile latching SE switch and momentary SF switch.
- Oversized battery compartment designed for a 2S 6200mAh pack, offering up to 20 hours of operation (batteries not included).
- Equipped with full-sized V4.0 Hall effect gimbals as standard, with an option to upgrade to AG01 CNC Hall effect gimbals.
- Standard JR module compartment for external RF module expansion.
- RadioMaster standardized button layout for intuitive control.
- Features an industry-first fabric handle for improved portability and changeable, ergonomic grips.
2. Hvad er der i æsken
Kontroller venligst indholdet af din pakke for at sikre, at alle varer er til stede:
- RadioMaster Boxer Radio Transmitter with Antenna
- Bæretaske
- Kardanbeskytter
- USB-C kabel
- Battery Tray (Note: Battery Cells Sold Separately)
- Tilbehør
- Brugervejledning (dette dokument)

Figure 2.1: RadioMaster Boxer Transmitter and included accessories.
3. Opsætning
3.1. Batteriinstallation
The RadioMaster Boxer requires two 3.7V 18650 Lithium-Ion cells or a 7.4V 2-cell Lithium-Polymer battery pack (not included). Ensure correct polarity when installing individual 18650 cells.
- Åbn batterirummets dæksel på bagsiden af senderen.
- Insert the recommended batteries into the battery tray, observing the correct polarity markings.
- Connect the battery tray to the internal power connector.
- Luk batterirummets dæksel forsvarligt.

Figur 3.1: Bagside view of the transmitter with the battery compartment.
3.2. Installation af antenne
Before powering on the transmitter, always ensure the antenna is securely installed.
- Screw the provided T-shape antenna into the antenna port on the top of the transmitter until finger-tight.
- Adjust the antenna to an upright position for optimal signal transmission.

Figur 3.2: Forside view of the RadioMaster Boxer with the antenna in place.
3.3. Første opstart
To power on the transmitter:
- Ensure the antenna is installed and the battery is correctly inserted.
- Press and hold the power button located on the front panel until the screen illuminates.
- The transmitter will boot into the EdgeTX operating system.

Figure 3.3: The transmitter displaying the EdgeTX firmware interface.
4. Betjeningsvejledning
4.1. Grundlæggende kontroller
The Boxer transmitter features two Hall effect gimbals for primary control inputs (throttle, rudder, aileron, elevator) and various switches and buttons for auxiliary functions.
- Gimbaler: Provide smooth and precise control for your RC model.
- Kontakter: Brug den lave profile latching SE switch and momentary SF switch for customizable functions.
- Knapper: Navigate menus and access telemetry data using the standardized button layout (SYS, RTN, PAGE, TELE).

Figur 4.1: Detaljeret view of the transmitter's switches and gimbals.
4.2. Model Binding and Configuration
Refer to the EdgeTX firmware documentation for detailed instructions on model setup, binding with receivers, and advanced configuration options. The Boxer supports up to 16 channels, depending on the receiver.
4.3. Brug af simulator
The USB-C port on the transmitter can be used to connect to a flight simulator on your computer. This allows for practice and skill development without risking your physical model.
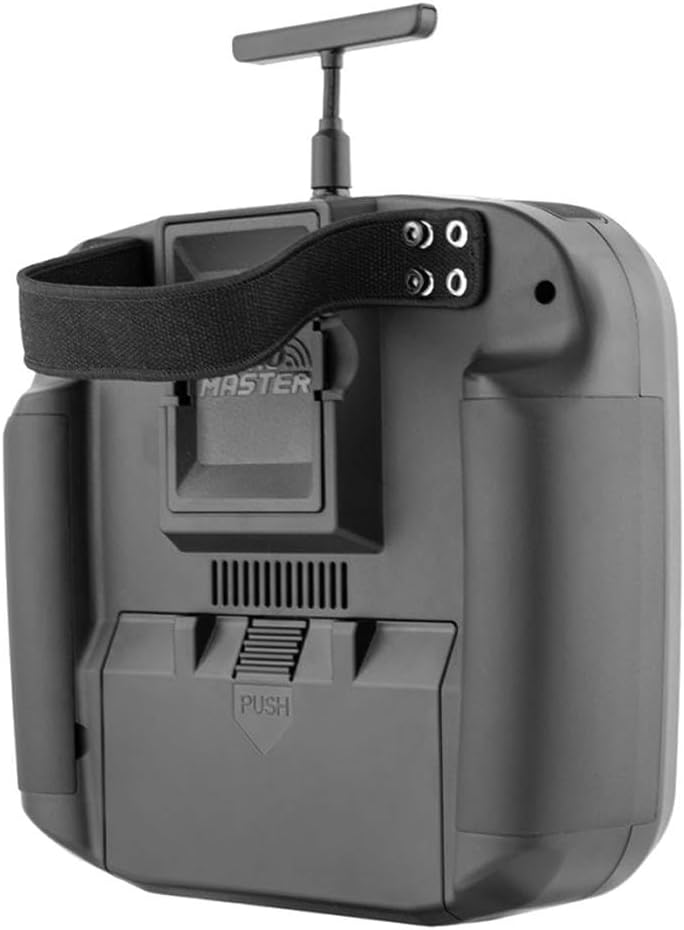
Figure 4.2: The USB-C port for charging and simulator connection.
5. Vedligeholdelse
5.1. Batteriopladning
The transmitter can be charged via the USB-C port. Use the provided USB-C cable and a suitable power adapter (not included) to charge the internal batteries. The system features smart balance battery charging.
Caution: Only use recommended battery types and charging methods to prevent damage or injury.
5.2. Rengøring og opbevaring
- Wipe the transmitter's exterior with a soft, dry cloth. Avoid using harsh chemicals or solvents.
- Store the transmitter in its carry case in a cool, dry place away from direct sunlight and extreme temperatures.
- Remove batteries if storing for extended periods to prevent discharge or leakage.
6. Fejlfinding
6.1. Common Warnings
The EdgeTX firmware may display warnings upon startup or during operation. Common warnings include:
- Advarsel om gasspjæld: Indicates the throttle stick is not at its lowest position during power-on. Move the throttle stick to the lowest position to clear.
- Advarsel om kontakt: Indicates one or more switches are not in their default position during power-on. Return all switches to their default positions to clear.
- Lavt batteri: Angiver batterivolumentage is low. Charge the battery immediately.
6.2. Ingen strøm
- Sørg for, at batterierne er korrekt installeret og fuldt opladet.
- Check the battery connections for any loose contacts.
- Verify the power button is pressed and held for a sufficient duration.
6.3. Signal Loss
- Ensure the antenna is properly installed and oriented.
- Verify the model is correctly bound to the transmitter.
- Kontrollér for potentielle interferenskilder i driftsmiljøet.
7. Specifikationer
| Feature | Beskrivelse |
|---|---|
| Model | Bokser |
| Størrelse | 235 x 178 x 77 mm (9.25" L x 7.01" B x 3.03" H) |
| Vægt | 532.5 g |
| Frekvens | 2.400GHz-2.480GHz |
| Interne RF-muligheder | CC2500 multi-protocol (as per current model) |
| Understøttede protokoller | Module dependent (e.g., CC2500 protocols) |
| Transmitting Power (CC2500) | Max 20dBm |
| VoltagRækkevidde | 6.6-8.4V DC |
| Radio firmware | EdgeTX (Transmitter) / Multi-Module (RF module) |
| Kanaler | Max 16 kanaler (afhængig af modtager) |
| Batterikompatibilitet | 7.4V 2-cellet lithium-polymer / to 3.7V 18650 lithium-ion-celler (batterier ikke inkluderet) |
| Vise | 128*64 Monokrom LCD-skærm |
| Gimbal | Højpræcisions 4.0 Hall kardankardan som standard (AG01 valgfri) |
| Ekstern modulbås | Standard JR module compartment |
| Opgraderingsmetode | USB/SD-kort & EdgeTX Companion PC-software |
| Materiale | Plast |

Figure 7.1: Physical dimensions of the RadioMaster Boxer Transmitter.
8. Officielle produktvideoer
RadioMaster Boxer M2 ELRS Portable RC Transmitter Overview
Denne video giver et generelt overblikview of the RadioMaster Boxer M2 ELRS Portable RC Transmitter, highlighting its design and key features. Note that this specific product is the CC2500 version.
RadioMaster Boxer Crush RC Transmitter EdgeTX Operating System
This video demonstrates the EdgeTX operating system on a RadioMaster Boxer Crush transmitter, showcasing its interface and functionalities relevant to all Boxer models.
Xiangtat RadioMaster Boxer 2.4G 16ch RC Transmitter ELRS
A direct product video for the RadioMaster Boxer 2.4G 16ch RC Transmitter, providing a visual guide to its features and operation.
9. Garanti og support
9.1. Begrænset garanti
The RadioMaster Boxer Transmitter is covered by a limited warranty against defects in materials and workmanship. Please retain your proof of purchase for warranty claims. For specific warranty terms and conditions, refer to the manufacturer's official webwebsted eller kontakt kundesupport.
9.2. Kundesupport
For technical assistance, troubleshooting, or any questions regarding your RadioMaster Boxer Transmitter, please visit the official RadioMaster website or contact their customer support team. Online resources, FAQs, and firmware updates are often available on the manufacturer's support pages.
Producent: Xiangtat
For yderligere information, besøg: RadioMasterRC.com