1. Introduktion
This manual provides detailed instructions for the installation, operation, and maintenance of the FRONTECH H110 Chipset Motherboard. This motherboard is designed to support 6th, 7th, and 8th generation Intel CPUs with an LGA1151 socket, featuring 2x DDR4 RAM slots, 4x SATA slots, NVMe/M.2 slot, and various connectivity options including USB 3.0, USB 2.0, HDMI, and VGA ports. Please read this manual thoroughly before proceeding with installation to ensure proper setup and functionality.
2. Sikkerhedsoplysninger
Overhold altid følgende sikkerhedsforanstaltninger ved håndtering og installation af bundkortet:
- Forebyggelse af elektrostatisk udladning (ESD): Wear an anti-static wrist strap or frequently touch a grounded metal object (e.g., the computer case) before handling components.
- Strømafbrydelse: Sørg for, at strømforsyningen er taget ud af stikkontakten, før du installerer eller fjerner komponenter.
- Komponentkompatibilitet: Verify that all components (CPU, RAM, power supply) are compatible with this motherboard model.
- Korrekt ventilation: Sørg for tilstrækkelig luftgennemstrømning i computerkabinettet for at forhindre overophedning.
- Håndteres med forsigtighed: Avoid touching pins or sensitive components directly. Hold the motherboard by its edges.
3. Pakkens indhold
The FRONTECH H110 Motherboard package typically includes:
- FRONTECH H110 Chipset Motherboard
- SATA kabel
- I/O Shield/Bracket
- Brugervejledning (dette dokument)
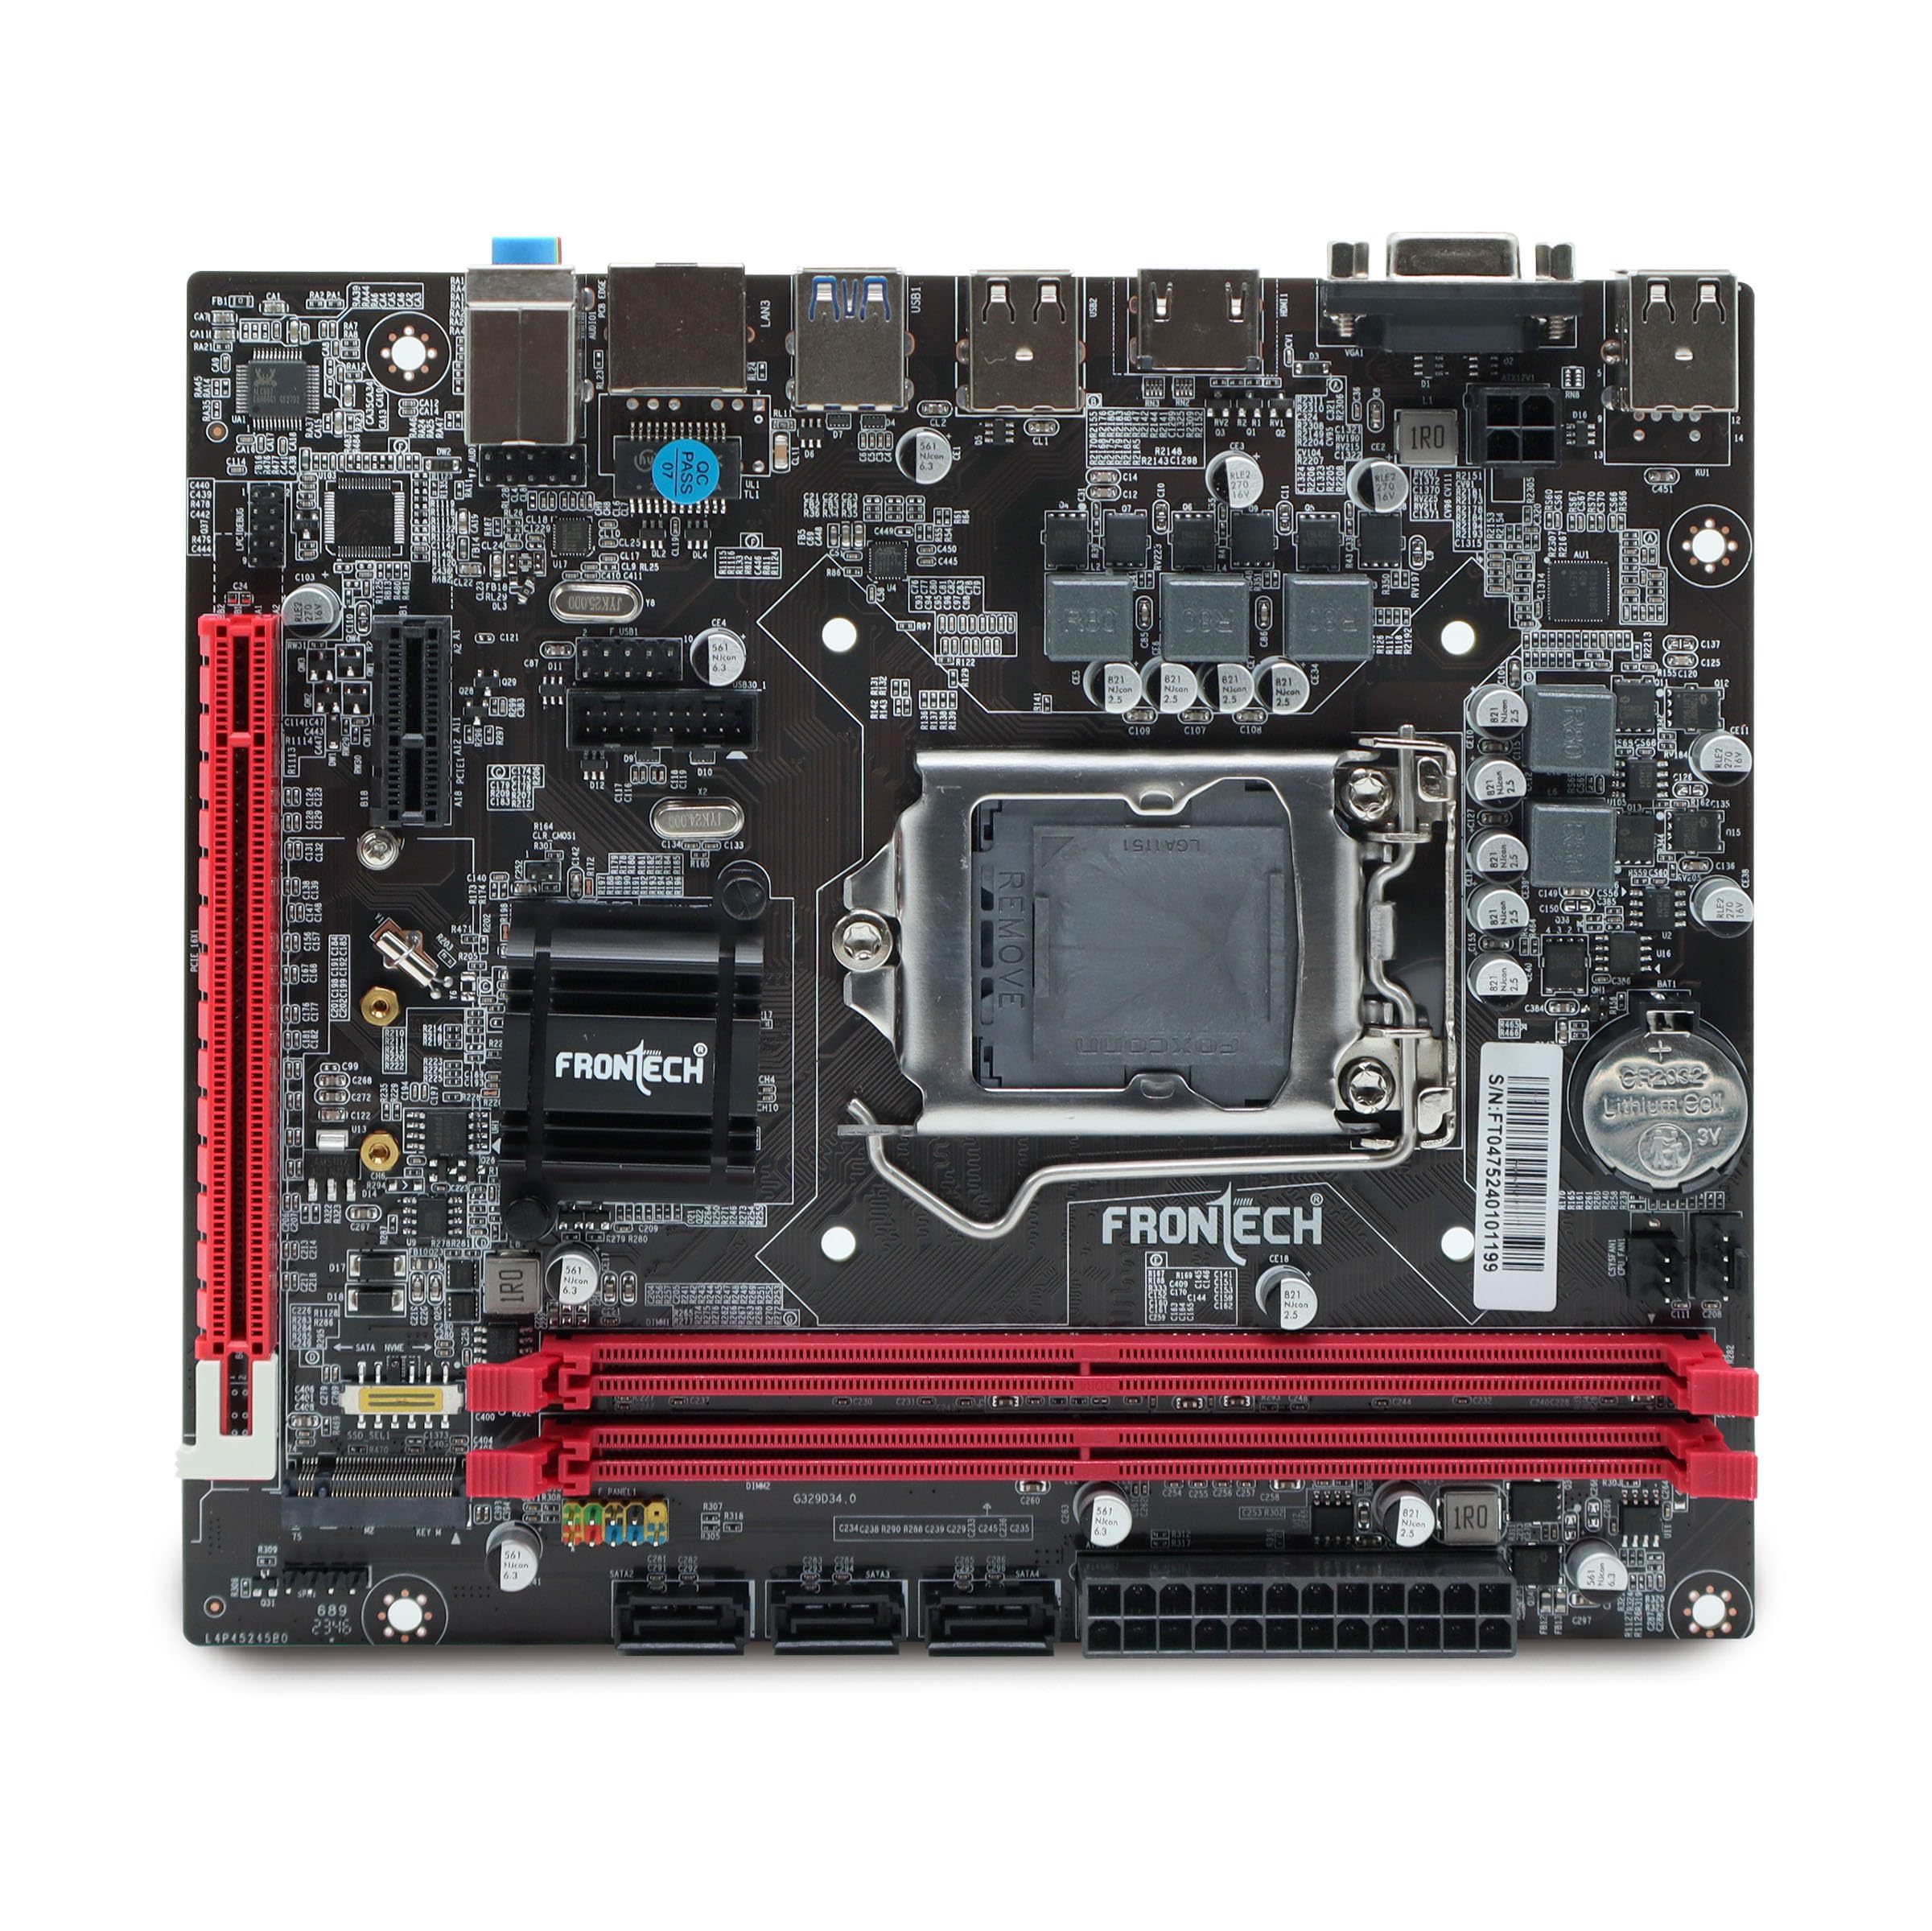
Image: FRONTECH H110 Motherboard with included accessories and packaging.
4. Produktet er slutview
4.1 External Connectors (Rear I/O Panel)
The rear I/O panel provides various ports for connecting external devices:
- USB 2.0-porte: For connecting peripherals like keyboards, mice, and printers.
- USB 3.0-porte: Til højhastigheds dataoverførsel med kompatible enheder.
- LAN-port (RJ45): Til netværksforbindelse.
- Lydporte: Til tilslutning af højttalere, hovedtelefoner og mikrofoner.
- HDMI-port: For digital video and audio output.
- VGA port: Til analog videoudgang.

Billede: Detaljeret view of the FRONTECH H110 Motherboard's rear I/O panel, highlighting USB 2.0, USB 3.0, LAN, and Audio ports.

Image: Close-up of the HDMI and VGA display output ports on the FRONTECH H110 Motherboard.
4.2 Internal Connectors and Slots
Key internal components and connectors include:
- LGA1151 CPU-sokkel: Supports 6th, 7th, and 8th generation Intel Core i3/i5/i7 processors.
- DDR4 RAM Slots (x2): Supports dual-channel DDR4 memory up to 32GB at speeds of 2400 MHz.
- NVMe/M.2 Slot: Til højhastigheds solid-state-drev.
- PCIe x16-slot: Til grafikkort og andre udvidelseskort.
- SATA Slots (x4): For connecting SATA storage devices like HDDs and SSDs.
- ATX Power Connector: Hovedstrømindgang fra strømforsyningen.
- Ventilatorstik: For connecting CPU and chassis fans.
- Frontpanelstik: For power button, reset button, USB ports, and audio jacks on the computer case.

Image: The FRONTECH H110 Motherboard highlighting the two DDR4 RAM slots and the NVMe/M.2 slot.

Billede: Intern view of the FRONTECH H110 Motherboard, indicating SATA ports, the main power socket, and the CPU socket area.
5. Opsætning og installation
Follow these steps for proper installation of your FRONTECH H110 Motherboard:
- Forbered sagen: Installer I/O-skjoldet i den bageste åbning af computerkabinettet.
- Installer bundkortet: Carefully place the motherboard into the case, aligning the screw holes. Secure it with screws.
- Installer CPU'en: Open the CPU socket lever, align the CPU with the socket (match the golden triangle/notch), gently place it in, and close the lever. Apply thermal paste and install the CPU cooler.
- Installer RAM: Open the clips on the DDR4 slots, align the RAM modules with the notch, and press down firmly until the clips snap into place.
- Installer lagerenheder: Connect SATA data cables from the motherboard to your SATA SSDs/HDDs. If using an NVMe SSD, install it into the M.2 slot and secure it with a screw.
- Tilslut strømforsyning: Connect the 24-pin ATX power connector and the 4/8-pin CPU power connector from your power supply to the motherboard. Connect power to your storage devices and graphics card (if applicable).
- Tilslut frontpanelkabler: Connect the power switch, reset switch, HDD LED, power LED, front USB, and front audio cables from your case to the corresponding headers on the motherboard. Refer to the motherboard diagram for exact pin locations.
- Installer grafikkort (valgfrit): If using a dedicated graphics card, insert it into the PCIe x16 slot and secure it. Connect any required PCIe power cables from the power supply.
- Tilslut ydre enheder: Tilslut din skærm, tastatur, mus og andet tilbehør til det bageste I/O-panel.
6. Betjeningsvejledning
After successful installation, follow these steps to operate your system:
- Tænd: Ensure all connections are secure, then plug in the power supply and press the power button on your computer case.
- BIOS/UEFI-adgang: Tryk gentagne gange på knappen under opstart. DEL or F2 for at åbne BIOS/UEFI-opsætningsprogrammet. Her kan du konfigurere opstartsrækkefølge, systemtid og andre avancerede indstillinger.
- Installation af operativsystem: Indsæt installationsmediet til dit operativsystem (USB-drev eller dvd), og følg vejledningen på skærmen for at installere dit foretrukne operativsystem.
- Driver installation: After OS installation, install the necessary drivers for the motherboard chipset, audio, LAN, and graphics. These are typically provided on a CD/DVD or can be downloaded from the manufacturer's webwebsted.
7. Vedligeholdelse
Regelmæssig vedligeholdelse er med til at sikre dit bundkorts levetid og optimale ydeevne:
- Støvrensning: Rengør bundkortet og komponenterne regelmæssigt med trykluft. Sørg for, at systemet er slukket og frakoblet, før rengøring.
- BIOS-opdateringer: Tjek producentens website for BIOS/UEFI updates. Update only if necessary and follow the instructions carefully to avoid system damage.
- Driver opdateringer: Hold dine drivere opdaterede for optimal ydeevne og kompatibilitet.
- Miljøkontrol: Operate the computer in a clean, dry, and well-ventilated environment.
8. Fejlfinding
Hvis du støder på problemer, kan du se følgende almindelige fejlfindingstrin:
- Ingen strøm: Check all power connections (24-pin ATX, CPU power, wall outlet). Ensure the power supply switch is on.
- Ingen visning: Bekræft skærmforbindelse og inputkilde. Genindsæt grafikkortet (hvis relevant) og RAM-modulerne. Prøv at starte med kun én RAM-nøgle.
- System Not Booting/Random Crashes: Check RAM installation. Ensure CPU cooler is properly seated. Verify all cables are securely connected. A faulty power supply can also cause instability.
- Periferiudstyr ikke fundet: Try connecting the peripheral to a different USB port. Ensure drivers are installed.
- Overophedning: Ensure all fans are spinning correctly. Clean dust from heatsinks and fans. Verify proper thermal paste application on the CPU.
- BIOS/UEFI-problemer: If you cannot enter BIOS or experience issues, try clearing the CMOS (refer to motherboard diagram for CMOS clear jumper/button).
9. Specifikationer
Below are the technical specifications for the FRONTECH H110 Motherboard:

Image: FRONTECH H110 Motherboard with a summary of its specifications.
| Feature | Specifikation |
|---|---|
| Mærke | FRONTECH |
| Modelnummer | H110/1151 SOCKET DDR4 |
| Chipsæt | H110 Express Chipset |
| CPU socket | LGA 1151 |
| Kompatible processorer | Intel Core i3/i5/i7 (6th, 7th, 8th Gen) |
| Hukommelsesteknologi | DDR4 |
| Hukommelsessokler | 2 x DDR4 DIMM-moduler |
| Maksimal hukommelse understøttet | 32 GB |
| Hukommelses urhastighed | 2400 MHz |
| Grafikkort interface | PCIe x16 |
| Lagringsgrænseflader | 4 x SATA 3.0, 1 x NVMe/M.2 Slot |
| USB-porte | 2 x USB 3.0, 4 x USB 2.0 (Rear I/O) |
| Vis udgange | 1 x HDMI, 1 x VGA |
| LAN | 1 x Ethernet Port (Realtek 10/100/1000 Mbps) |
| Lyd | 3-in-1 Audio Ports (F-speaker, F-audio) |
| Formfaktor | ATX |
| Produktdimensioner | 17 x 19 x 2.1 cm |
| Varens vægt | 490 g |
10. Garanti og support
The FRONTECH H110 Motherboard comes with a 1 års garanti from the date of purchase. For warranty claims or technical support, please contact FRONTECH customer service. Keep your proof of purchase for warranty validation.
For further assistance, please visit the official FRONTECH webwebstedet eller kontakt deres supportkanaler.