
1. Introduktion
This manual provides essential information for the proper installation, operation, maintenance, and troubleshooting of your RUJIXU 20 Inch Fat Tire Air Suspension Fork. Please read this manual thoroughly before installation and use to ensure safe and optimal performance. Retain this manual for future reference.
2. Produktet er slutview og funktioner
The RUJIXU 20 Inch Fat Tire Air Suspension Fork is designed for 20-inch fat bikes and electric bicycles, offering enhanced shock absorption and control across various terrains. Key features include:
- Luftaffjedring: Justerbar damping to suit different riding conditions and preferences.
- Double Shoulder Design: Provides increased rigidity and stability.
- Disc Brake Compatibility: Designed for disc brake systems.
- Fat Tire Support: Accommodates 4.0-inch fat tires, enhancing traction and stability on diverse surfaces.
- Holdbar konstruktion: Made from magnesium aluminum alloy for balanced durability and impact resistance.

Billede: Overview of the RUJIXU 20 Inch Fat Tire Air Suspension Fork, highlighting its design and compatibility with 20x4.0 fat tires.
3. Specifikationer
| Feature | Detalje |
|---|---|
| Mærkenavn | RUJIXU |
| Modelnavn | RUJIXU001 |
| Varenummer | GXFWJD001 |
| Størrelse | 20 tommer |
| Hovedrør | 28.6mm x 270mm (1-1/8") |
| Travel Tube | 34 mm x 180 mm |
| Actual Travel | 140 mm |
| Gaffelbredde | 135 mm |
| Akseltype | QR 9mm |
| Disc Brake Support | PM 74mm (Match for 180mm disc rotor, 203mm needs adapter) |
| Materiale | Magnesium aluminiumslegering |
| Varens vægt | 3000 gram |
| Farve | Sort |

Image: Detailed dimensions of the fork components.
4. Installation
Korrekt installation er afgørende for sikkerhed og ydeevne. Hvis du er usikker på et trin, skal du kontakte en professionel cykelmekaniker.
- Remove Old Fork: Carefully remove the front wheel, brake caliper, handlebars, and existing fork from your bicycle frame.
- Prepare New Fork: Ensure the new RUJIXU fork's steerer tube length is appropriate for your bike's head tube. Trim if necessary, ensuring enough length for the stem and spacers.
- Installer Crown Race: Install the crown race onto the steerer tube of the new fork.
- Insert Fork: Insert the steerer tube through the head tube of the bicycle frame, ensuring the headset bearings are correctly seated.
- Install Stem and Spacers: Place any necessary spacers and the stem onto the steerer tube.
- Secure Top Cap: Install the top cap and tighten the bolt to preload the headset bearings.
- Align and Tighten Stem: Align the stem with the front wheel and tighten the stem bolts securely.
- Installer bremsekaliber: Attach your disc brake caliper to the fork's disc brake mounts (PM 74mm). Ensure proper alignment with the rotor.
- Monter forhjul: Mount the front wheel onto the quick-release (QR 9mm) dropouts of the fork and secure it firmly.
Video: Demonstrates the installation process of a fat tire fork on an electric bicycle. This video is provided by LLONGSHOP.
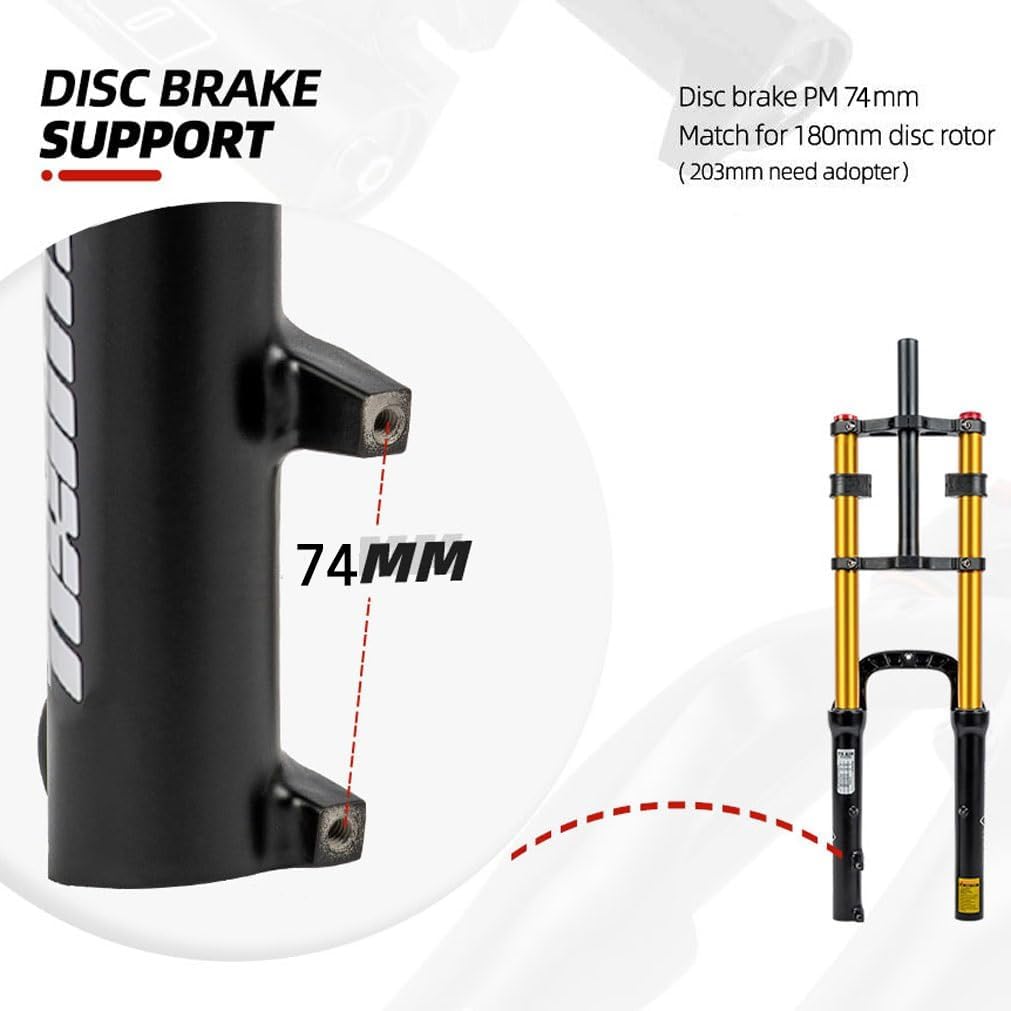
Image: Detail of the 74mm Post Mount disc brake support.
5. Betjening og justering
Your air suspension fork offers adjustable settings to fine-tune your riding experience.
Justering af lufttryk
The air chamber allows you to adjust the fork's stiffness. Use a high-pressure shock pump to add or release air. Refer to the air spring guide sticker on the fork leg for recommended pressure ranges based on rider weight.

Image: Air chamber valve for pressure adjustment.
Rebound justering
The rebound adjustment knob controls the speed at which the fork extends after compression. Turn the knob to adjust the rebound speed:
- Med uret: Slower rebound (for more control on rough terrain).
- Mod uret: Faster rebound (for quicker response on smoother trails).

Image: Rebound adjustment knob.
Video: Demonstrates the features and adjustments of an electric bike air suspension fork, including air chamber and rebound. This video is provided by QQCycling-US.
6. Vedligeholdelse
Regular maintenance extends the life and performance of your suspension fork.
- Rensning: After each ride, especially in dirty or wet conditions, clean the stanchions (inner tubes) and seals with a soft cloth and mild soap and water. Avoid high-pressure washers directly on seals.
- Smøring: Apply a small amount of suspension-specific lubricant to the stanchions periodically to keep the seals supple and reduce friction. Cycle the fork a few times after application.
- Kontroller lufttryk: Check the air pressure before each ride using a high-pressure shock pump. Adjust as needed based on your weight and riding conditions.
- Undersøg for skader: Regularly inspect the fork for any signs of damage, cracks, or leaks. Pay close attention to the stanchions, seals, and dropouts.
- Professionel service: For internal service or if you notice significant issues, consult a professional bicycle mechanic.
7. Fejlfinding
Her er nogle almindelige problemer og deres potentielle løsninger:
| Problem | Mulig årsag | Løsning |
|---|---|---|
| Fork feels too soft or bottoms out easily | Lavt lufttryk | Add air using a high-pressure shock pump. Refer to the air spring guide. |
| Fork feels too stiff or doesn't use full travel | Too much air pressure | Release air gradually until desired stiffness is achieved. |
| Slow or sluggish rebound | Rebound adjustment set too slow | Turn the rebound adjustment knob counter-clockwise to speed up rebound. |
| Fast or uncontrolled rebound | Rebound adjustment set too fast | Turn the rebound adjustment knob clockwise to slow down rebound. |
| Oil leakage around seals | Worn or damaged seals, excessive dirt buildup | Clean stanchions and seals. If leakage persists, professional service is required for seal replacement. |
| Unusual noises (creaking, clunking) | Loose components, lack of lubrication, internal issue | Check all bolts for tightness. Ensure stanchions are clean and lubricated. If noise continues, seek professional inspection. |
8. Garanti og support
For warranty information, please refer to the product packaging or contact your retailer. If you have any questions or require technical assistance, please reach out to the manufacturer or your point of purchase.