
Indledning
This manual provides essential information for setting up, operating, and maintaining your GEEKOM Mini PC AS5. Please read these instructions carefully before using the device to ensure optimal performance and longevity. The GEEKOM Mini PC AS5 is a compact and powerful computing solution designed for various applications, from home entertainment to professional tasks.
Pakkens indhold
Før du fortsætter med opsætningen, skal du kontrollere, at alle nedenstående varer er inkluderet i din pakke:
- GEEKOM Mini PC AS5
- Strømadapter
- VESA Mount (with screws)
- SSD Mounting Screws
- HDD Mounting Screws
- Hurtig guide
- Brugervejledning (dette dokument)
- USB-C til USB-C kabel

Figur 1: Contents of the GEEKOM Mini PC AS5 package.
Opsætningsvejledning
1. Tilslutning af eksterne enheder
Connect your monitor, keyboard, and mouse to the GEEKOM Mini PC AS5. Refer to the port diagram below for correct connections.
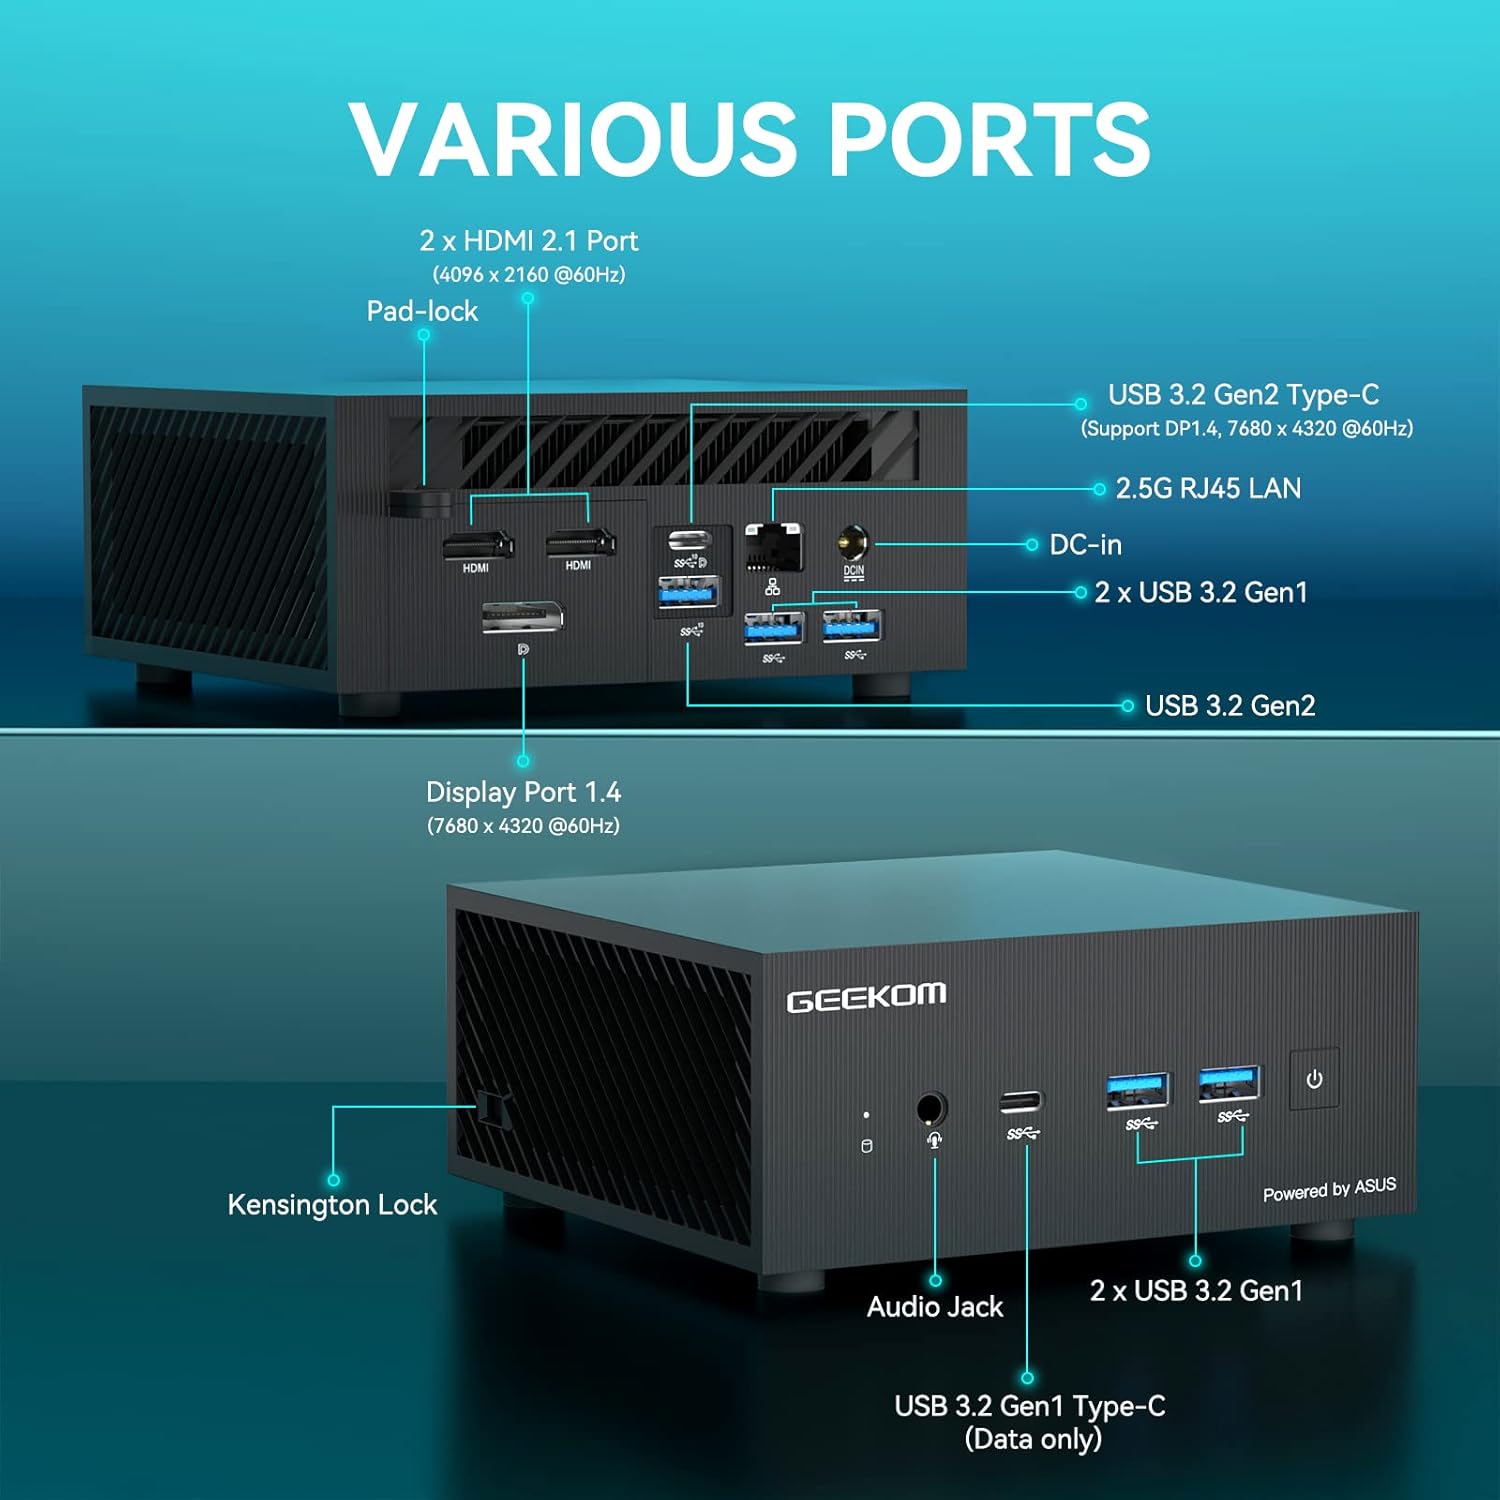
Figur 2: Overview of available ports on the GEEKOM Mini PC AS5.
- Skærmforbindelse: Use an HDMI cable to connect your monitor to one of the two HDMI 2.1 ports, or a DisplayPort cable to the Display Port 1.4. The USB 3.2 Gen2 Type-C port also supports DisplayPort 1.4 for video output.
- USB-enheder: Connect your keyboard, mouse, and other USB devices to the available USB 3.2 Gen1 and Gen2 ports.
- Netværks forbindelse: For a wired network connection, connect an Ethernet cable to the 2.5G RJ45 LAN port. For wireless, ensure your Wi-Fi network is available.
- Lyd: Connect headphones or speakers to the Audio Jack.
2. Strømtilslutning
Connect the power adapter to the DC-In port on the Mini PC, then plug the power adapter into a wall outlet.
3. Første opstart
Press the power button located on the front of the Mini PC. The system will boot up, and you will see the operating system loading on your connected display.
4. Opsætning af operativsystem
Follow the on-screen instructions to complete the initial setup of Windows 10 Pro, including language selection, network configuration, and user account creation.
Betjeningsvejledning
Grundlæggende betjening
- Tænd/sluk: Tryk på tænd/sluk-knappen for at tænde enheden. For at slukke den skal du bruge Windows' nedlukningsfunktion eller trykke på tænd/sluk-knappen og holde den nede i 5 sekunder.
- Genstart: Use the restart option within the Windows operating system.
- Sove mode: The system will enter sleep mode after a period of inactivity. Press any key or move the mouse to wake it up.
Skærmkonfiguration
The GEEKOM Mini PC AS5 supports multiple displays, including up to four 4K displays or ultra-realistic 8K visuals.

Figur 3: The GEEKOM Mini PC AS5 supports ultra-realistic 8K visuals.

Figur 4: Multitasking across four 4K displays with the GEEKOM Mini PC AS5.
To configure multiple displays, right-click on the desktop, select "Display settings," and arrange your monitors as desired.
Network Connectivity (Wi-Fi 6E)
The Mini PC supports Wi-Fi 6E, offering enhanced wireless performance. To connect to a Wi-Fi network:

Figur 5: GEEKOM Mini PC AS5 featuring Wi-Fi 6E support for faster, lower-latency wireless connectivity.
- Klik på Wi-Fi-ikonet i proceslinjen.
- Vælg det ønskede netværk fra listen.
- Indtast netværksadgangskoden, hvis du bliver bedt om det.
- Klik på "Opret forbindelse".
Opretholdelse
Rensning
- Sørg for, at enheden er slukket og frakoblet før rengøring.
- Brug en blød, tør klud til at tørre ydersiden af Mini PC'en af.
- For genstridige mærker, gnid letampRengør kluden med vand. Undgå skrappe kemikalier eller slibende rengøringsmidler.
- Keep ventilation openings clear of dust and debris using compressed air.
Softwareopdateringer
Regularly update your Windows operating system and drivers to ensure optimal performance and security. You can check for updates via Windows Update settings.
Lagerstyring
Tjek jævnligt din lagerpladsforbrug og fjern unødvendige files to maintain system speed. The Mini PC supports additional storage expansion (SSD/HDD) if needed.
Fejlfinding
- Ingen strøm:
- Sørg for, at strømadapteren er korrekt tilsluttet både mini-pc'en og en fungerende stikkontakt.
- Kontroller, at stikkontakten fungerer ved at tilslutte en anden enhed.
- Ingen visning:
- Kontroller, at skærmen er tændt, og at den korrekte inputkilde er valgt.
- Ensure the HDMI or DisplayPort cable is securely connected to both the Mini PC and the monitor.
- Prøv et andet kabel eller en anden skærm, hvis det er muligt.
- Ingen internetforbindelse:
- Ved kabelforbindelser skal du kontrollere Ethernet-kablets og routerens status.
- For Wi-Fi skal du sørge for, at Wi-Fi er aktiveret i Windows-indstillingerne, og at du er forbundet til det korrekte netværk med den korrekte adgangskode.
- Genstart din router og mini-pc'en.
- Systemnedbremsning:
- Luk unødvendige programmer, der kører i baggrunden.
- Søg efter og installer eventuelle ventende Windows-opdateringer.
- Run a disk cleanup and defragmentation (for HDDs) or TRIM (for SSDs).
- Scan for malware eller virus.
Specifikationer
| Modelnavn | AS5 |
| Processor | AMD Ryzen™ 9 5900HX (8 Cores, 16 Threads, Max Turbo Frequency 4.60 GHz, 16MB Cache, cTDP 35W) |
| Operativsystem | Windows 10 Pro |
| VÆDDER | 32 GB DDR4 SDRAM |
| Opbevaring | 1 TB (PCIE x 2 interface) |
| Grafik | AMD Radeon™ Vega 8 Graphics (supports 8K visuals) |
| Trådløs forbindelse | Wi-Fi 6E |
| Havne |
|
| Dimensioner | 13 x 12 x 5.8 cm |

Figur 6: AMD Ryzen™ 9 5900HX Processor details.
Garanti & Support
Garantioplysninger
GEEKOM products typically come with a standard manufacturer's warranty. Please refer to the warranty card included in your package or visit the official GEEKOM webwebstedet for detaljerede garantivilkår og -betingelser, der er specifikke for din region og købsdato. Gem din købsbevis til garantikrav.
Kundesupport
For technical assistance, troubleshooting beyond this manual, or warranty inquiries, please contact GEEKOM customer support. You can usually find contact information on the official GEEKOM website or in the quick guide provided with your product.
GEEKOM Officiel Webwebsted: www.geekompc.com