
1. Introduktion
Tak for købetasing the MUSE Dual Alarm Clock Radio PLL M-186CMR. This device combines a digital clock, dual alarm functions, and a PLL FM/AM radio into a compact unit, ideal for your bedroom or office. This manual provides detailed instructions for setup, operation, and maintenance to ensure optimal performance and longevity of your device. Please read this manual thoroughly before use and retain it for future reference.
2. Vigtige sikkerhedsinstruktioner
For at mindske risikoen for elektrisk stød, brand eller personskade skal du altid følge disse grundlæggende sikkerhedsforanstaltninger:
- Læs alle instruktioner, inden du betjener apparatet.
- Udsæt ikke dette apparat for regn eller fugt.
- Brug ikke dette apparat i nærheden af vand.
- Rengør kun med en tør klud.
- Bloker ikke ventilationsåbninger. Installer i overensstemmelse med producentens anvisninger.
- Må ikke installeres i nærheden af varmekilder såsom radiatorer, varmeapparater, komfurer eller andre apparater (inklusive ampløftere), der producerer varme.
- Beskyt netledningen mod at blive gået på eller klemt, især ved stik, stikkontakter og det punkt, hvor de kommer ud af apparatet.
- Brug kun tilbehør/tilbehør specificeret af producenten.
- Træk stikket ud af dette apparat under tordenvejr, eller når det ikke skal bruges i længere perioder.
- Overlad al service til kvalificeret servicepersonale. Service er påkrævet, når apparatet er blevet beskadiget på nogen måde, f.eks. hvis strømledningen eller stikket er beskadiget, hvis der er spildt væske eller genstande er faldet ned i apparatet, hvis apparatet har været udsat for regn eller fugt, ikke fungerer normalt eller er blevet tabt.
3. Opsætning
3.1 Udpakning
Carefully remove the unit from its packaging. Inspect the unit for any signs of damage. Ensure all components are present: the main unit and power adapter.
3.2 Strømtilslutning
This device operates on AC power. Connect the provided power adapter to the DC input jack on the back of the unit, then plug the adapter into a standard wall outlet (AC 230V ~ 50Hz). The unit will power on and the display will illuminate.
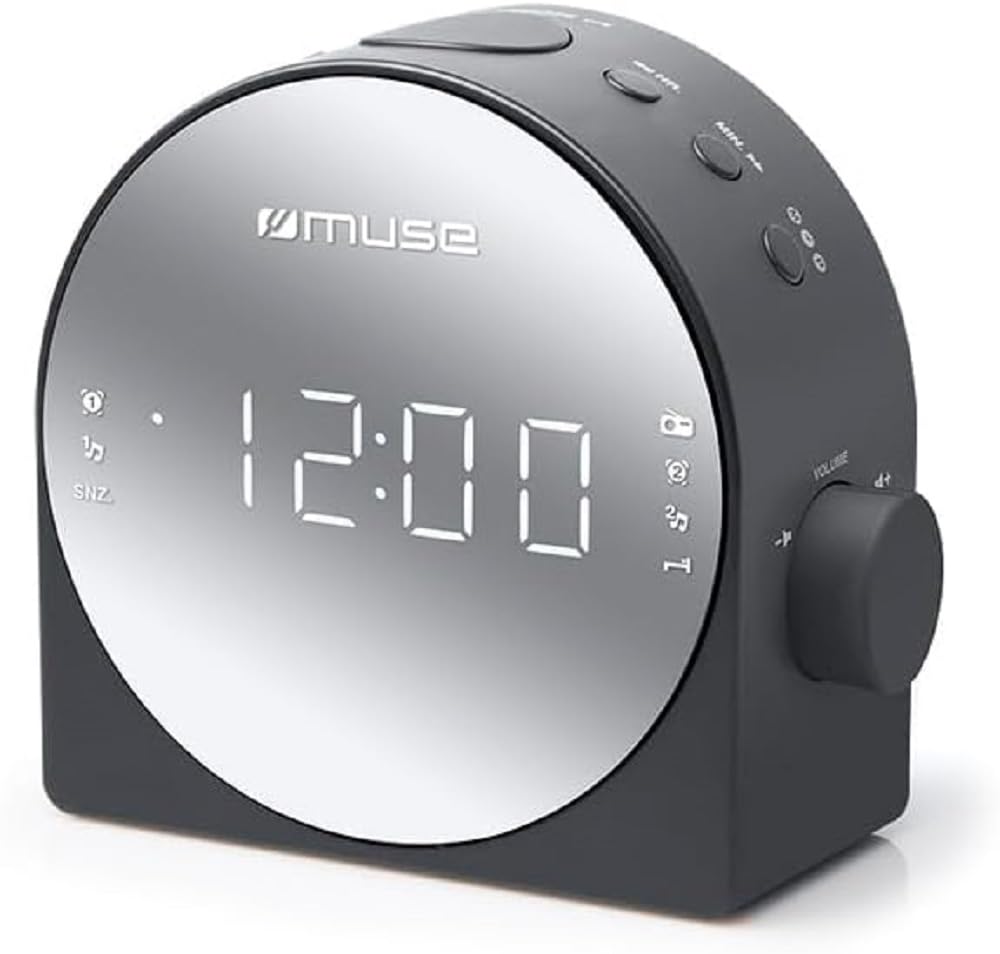
Figur 1: Forside view of the MUSE M-186CMR, showing the digital display and control buttons.
3.3 Batteribackup (medfølger ikke)
The unit requires 2 x AAA batteries (not included) for time and alarm settings backup during a power outage. Insert the batteries into the battery compartment located on the bottom of the unit, observing the correct polarity (+/-). These batteries do not power the unit for normal operation but preserve settings.
3.4 Antenneopsætning
For optimal FM radio reception, fully extend the built-in wire antenna. For AM reception, the unit has a built-in ferrite bar antenna. Rotate the unit for the best AM reception.
4. Betjening
4.1 Indstilling af klokkeslæt
- Tryk og hold på TIDSINDSTILLING knap. Timecifrene vil blinke.
- Tryk på TIME knappen gentagne gange for at justere timetallet.
- Tryk på MINUT knappen gentagne gange for at justere minuttallet.
- Trykke TIDSINDSTILLING igen for at bekræfte og afslutte tidsindstillingstilstanden.
4.2 Indstilling af alarmer (Alarm 1 og Alarm 2)
This unit features two independent alarms.
- Tryk og hold på ALARM 1 SÆT (eller ALARM 2 SÆT)-knap. Alarmtimecifrene blinker.
- Tryk på TIME knappen for at indstille den ønskede alarmtime.
- Tryk på MINUT knappen for at indstille det ønskede alarmminut.
- Trykke ALARM 1 SÆT (eller ALARM 2 SÆT) again to confirm the time.
- Tryk umiddelbart efter indstilling af tiden på ALARM 1-TILSTAND (eller ALARM 2-TILSTAND) button repeatedly to select the alarm source: Summer, Radio, eller SLUKKET. The corresponding indicator will light up on the display.
4.3 Radiodrift
4.3.1 Turning On/Off and Band Selection
- Tryk på RADIO TIL/FRA knappen for at tænde for radioen.
- Tryk på BAND knappen for at skifte mellem FM- og AM-båndene.
- Trykke RADIO TIL/FRA igen for at slukke radioen.
4.3.2 Manuel indstilling
- Mens radioen er tændt, skal du trykke på TUNE + or TUNE - knapperne kort for at justere frekvensen trin for trin.
4.3.3 Auto Scan Tuning
- While the radio is on, press and hold the TUNE + or TUNE - buttons for a few seconds. The radio will automatically scan for the next available station.
4.3.4 Setting and Recalling Presets
The unit can store a number of radio stations as presets.
- Tune to your desired station using manual or auto scan tuning.
- Tryk og hold på FORUDINDSTILLING knappen. Det forudindstillede nummer vil blinke.
- Tryk på PRESET + or FORUDINDSTILLING - knapperne til at vælge det ønskede forudindstillede nummer (f.eks. P01, P02).
- Trykke FORUDINDSTILLING igen for at gemme stationen på den valgte forudindstilling.
- For at genkalde en forudindstillet station skal du kort trykke på PRESET + or FORUDINDSTILLING - knapper.
4.4 Snooze and Sleep Function
4.4.1 Snooze
- Når en alarm lyder, skal du trykke på SLUM knappen. Alarmen stopper midlertidigt og lyder igen efter cirka 9 minutter.
4.4.2 Sleep Timer
- Mens radioen er tændt, skal du trykke på SOVE Tryk gentagne gange på knappen for at gennemgå sleep-timerens muligheder (f.eks. 90, 60, 30, 15 minutter, OFF). Radioen slukker automatisk efter det valgte tidspunkt.
4.5 Displayets lysstyrke
Tryk på DIMMER button repeatedly to adjust the brightness of the display to your preference (e.g., High, Medium, Low, Off).
5. Vedligeholdelse
5.1 Rengøring
To clean the unit, wipe it with a soft, dry cloth. Do not use abrasive cleaners, waxes, or solvents as these may damage the surface. Ensure the unit is unplugged before cleaning.
5.2 Opbevaring
If you plan to store the unit for an extended period, unplug it from the power outlet and remove the backup batteries. Store it in a cool, dry place away from direct sunlight and extreme temperatures.
6. Fejlfinding
| Problem | Mulig årsag | Løsning |
|---|---|---|
| Enheden tænder ikke. | Netledningen er ikke korrekt tilsluttet. | Sørg for, at strømadapteren er korrekt tilsluttet enheden og stikkontakten. |
| No sound from radio. | Volume too low; incorrect band/station; poor reception. | Increase volume. Check if the correct band (FM/AM) is selected. Adjust antenna position or relocate the unit for better reception. |
| Alarmen lyder ikke. | Alarm not set; alarm volume too low; alarm mode set to OFF. | Verify alarm time and mode (Buzzer/Radio) are correctly set. Ensure alarm volume is audible. |
| Tid/indstillinger nulstilles efter strømafbrydelsetage. | Backup-batterier mangler eller er opbrugte. | Install new AAA batteries in the battery compartment. |
| Skærmen er for svag eller for lys. | Display brightness setting needs adjustment. | Tryk på DIMMER knappen for at skifte mellem lysstyrkeniveauerne. |
7. Specifikationer
- Model: M-186 CMR
- Strømkilde: AC 230V ~ 50Hz (Electric with cord)
- Batteri-sikkerhedskopi: 2 x AAA batterier (medfølger ikke)
- Radiobånd: FM, AM (PLL Tuner)
- Alarmer: Dobbelt alarm (summer/radio)
- Vise: Digital LED
- Særlige funktioner: Snooze, Sleep Timer, Dimmer
- Dimensioner (B x H x D): Cirka 11.6 x 5.6 x 11.58 cm
- Vægt: Cirka 429 g
- Fabrikant: Muse
8. Garanti og support
This product is covered by a standard manufacturer's warranty. For detailed warranty information, please refer to the documentation provided with your purchase or contact your retailer. For technical support, service, or inquiries, please visit the official Muse webwebsted eller kontakt deres kundeserviceafdeling.
Gem venligst dit købsbevis for garantikrav.


