Indledning
This manual provides essential information for the proper setup, operation, and maintenance of your Wired Controller LCD Panel Touch. This controller is designed for use with specific York and GE central air conditioner indoor units, including models YR-E17, AW07LC2VHB, AW09LC2VHB, AW12LC2VHB, and AW18LC2VHB. Please read this manual thoroughly before installation and use to ensure optimal performance and longevity of the device.
Pakkens indhold
Når du åbner pakken, skal du kontrollere, at alle komponenter er til stede og ubeskadigede. Standardpakken indeholder:
- 1 x Wired Controller LCD Panel Touch
- Monteringsskruer
- Kabelforbindelser
- Operation & Installation Manual (this document)
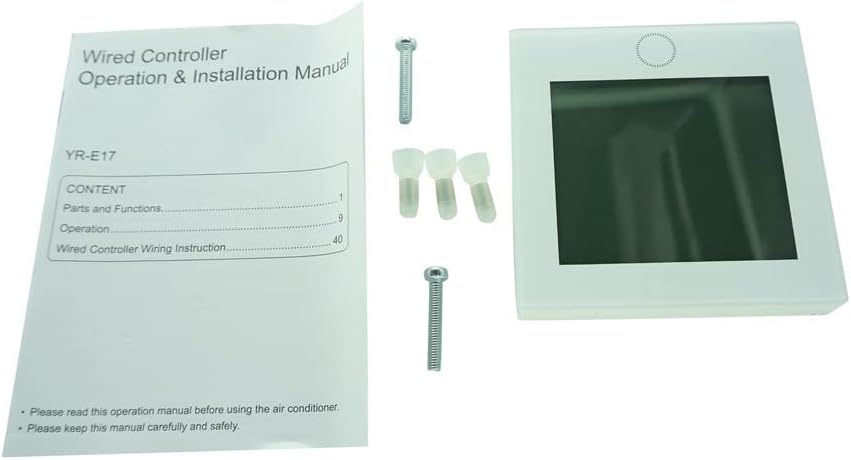
Image: The wired controller, accompanied by its operation manual, mounting screws, and wire connectors, as typically found in the product package.
Opsætning og installation
Proper installation is crucial for the functionality of the wired controller. It is recommended that installation be performed by a qualified technician.
Før installation:
- Ensure the power supply to the air conditioning unit is completely disconnected at the circuit breaker before beginning any installation work.
- Verify that this controller is compatible with your specific air conditioning indoor unit model (e.g., York YR-E17, GE AW07LC2VHB, etc.). Refer to the compatibility list in the Specifications section.
- Prepare the necessary tools, including a screwdriver, wire strippers, and a voltage tester.
Ledningsinstruktioner:
The controller connects to the indoor unit via a wired connection. The specific wiring diagram will be detailed in the full operation and installation manual provided with the product. Generally, this involves connecting communication wires from the controller to the designated terminals on the indoor unit's control board.
- Identify the communication terminals on both the wired controller and the indoor air conditioning unit.
- Carefully strip the ends of the communication wires.
- Connect the wires from the controller to the corresponding terminals on the indoor unit, ensuring correct polarity if specified. Use the provided wire connectors for secure connections.
- Secure the controller to the wall using the provided mounting screws. Ensure it is level and firmly attached.

Image: The reverse side of the wired controller, revealing the internal circuit board and connection terminals where the communication wires are attached.
Tænder:
After all connections are secure and verified, restore power to the air conditioning unit at the circuit breaker. The LCD panel on the controller should illuminate, indicating it has powered on successfully.
Note: This controller requires 2 AAA batteries for certain functions or to retain settings during power outages, though it is primarily powered by the air conditioning unit. Insert batteries into the designated compartment if applicable.
Betjeningsvejledning
The LCD Panel Touch controller provides intuitive control over your central air conditioning unit. The touch screen interface allows for easy navigation and setting adjustments.

Image: The front of the wired controller, featuring its LCD touch panel display, which serves as the primary interface for operation.
Grundlæggende funktioner:
- Tænd/sluk: Touch the power icon to turn the air conditioning unit on or off.
- Valg af tilstand: Tap the mode icon to cycle through available operating modes such as Cool, Heat, Fan, Dry, or Auto.
- Temperaturjustering: Use the up/down arrows or a slider on the screen to set your desired temperature.
- Blæserhastighedskontrol: Select the fan icon to adjust fan speed (e.g., Low, Medium, High, Auto).
- Timerindstillinger: Access the timer function to program automatic on/off times for the unit.
- Sove mode: Activate sleep mode for optimized comfort and energy saving during nighttime hours.
For detailed instructions on advanced features and specific icon meanings, please refer to the comprehensive operation manual that came with your air conditioning unit or this controller.
Opretholdelse
Regelmæssig vedligeholdelse sikrer din kabelstyrede controllers lange levetid og optimale ydeevne.
Rengøring af controlleren:
- Before cleaning, ensure the power to the air conditioning unit is off.
- Wipe the LCD screen and the controller's surface with a soft, dry, lint-free cloth.
- For genstridige pletter, tør letampen the cloth with water or a mild, non-abrasive cleaner specifically designed for electronics. Do not spray cleaner directly onto the controller.
- Avoid using harsh chemicals, abrasive cleaners, or solvents, as these can damage the screen or casing.
Udskiftning af batteri:
If your controller uses AAA batteries for backup power or specific functions, replace them when the low battery indicator appears on the screen. Ensure correct polarity when inserting new batteries.
Fejlfinding
If you encounter issues with your wired controller, refer to the following common problems and solutions:
| Problem | Mulig årsag | Løsning |
|---|---|---|
| Controllerens display er tomt. | No power to the air conditioning unit; loose wiring connection; faulty controller. | Check the circuit breaker for the AC unit. Verify all wiring connections are secure. If issues persist, contact a qualified technician. |
| Controller not responding to touch. | Screen calibration issue; temporary software glitch; physical damage. | Try restarting the AC unit by cycling its power. Ensure the screen is clean and dry. If unresponsive, professional inspection may be required. |
| Forkerte temperaturaflæsninger. | Sensor obstruction; controller placed in direct sunlight or near heat source. | Ensure nothing is blocking the controller's temperature sensor. Relocate the controller if it's exposed to extreme temperatures. |
| Air conditioner not responding to controller commands. | Communication error; incompatible unit; AC unit malfunction. | Verify controller compatibility with your AC unit model. Check wiring connections. Consult the AC unit's manual for troubleshooting its own issues. |
If the problem persists after attempting these solutions, please contact a professional HVAC technician or the product seller for further assistance.
Specifikationer
| Feature | Detalje |
|---|---|
| Modelnumre | YR-E17, 0150401331J |
| Kompatible enheder | York YR-E17, GE AW07LC2VHB, GE AW09LC2VHB, GE AW12LC2VHB, GE AW18LC2VHB Duct Type Indoor Units |
| Forbindelsesteknologi | Infrared (IR Replacement) |
| Antal knapper | 5 (Implied from product description, though it's a touch panel, it might refer to virtual buttons or physical ones not visible in images) |
| Strømkilde | Primarily powered by AC unit; 2 AAA batteries required for backup/certain functions. |
| Fabrikant | Nemt at prøve |
| Oprindelsesland | Kina |
Garanti og support
For specific warranty information regarding your Wired Controller LCD Panel Touch, please refer to the documentation provided at the time of purchase or contact the seller directly. Warranty terms and conditions may vary.
If you require technical support or have questions not covered in this manual, please reach out to the seller or manufacturer. When contacting support, have your product model number (YR-E17, 0150401331J) and purchase details readily available.
It is important to note that this product is described as an "IR Replacement" and may not offer all functions identical to your original equipment. Please verify compatibility and expected functionality before purchase and installation.


