
AVARRO 0E-HDMIMX4
AVARRO 0E-HDMIMX4 HDMI Switcher User Manual
Model: 0E-HDMIMX4
1. Introduktion
The AVARRO 0E-HDMIMX4 is a high-performance 4x4 HDMI matrix switcher designed to route any of four HDMI input sources to any of four HDMI output displays. It supports 4K Ultra HD resolutions, HDCP 2.2, and advanced features like Smart EDID Management and a built-in 4K-1080P downscaler. This manual provides detailed instructions for installation, operation, and troubleshooting to ensure optimal performance of your device.
2. Sikkerhedsoplysninger
- Læs alle instruktioner omhyggeligt, før du betjener enheden.
- Udsæt ikke denne enhed for regn, fugt eller for høj luftfugtighed.
- Do not place any objects filled with liquids on the unit.
- Bloker ikke ventilationsåbninger.
- Brug kun den medfølgende strømadapter.
- Forsøg ikke selv at udføre service på enheden. Overlad al service til kvalificeret personale.
- Sørg for korrekt jordforbindelse for alt tilsluttet udstyr.
3. Pakkens indhold
Kontroller, at alle elementer er til stede før installation:
- AVARRO 0E-HDMIMX4 HDMI Switcher Unit
- IR fjernbetjening
- DC 12V strømadapter
- Brugervejledning (dette dokument)
- Mounting Brackets (if applicable, not explicitly mentioned but common for such devices)
4. Produktet er slutview
4.1 Frontpanel

Billede: Forside view of the AVARRO 0E-HDMIMX4 HDMI Switcher, showing the IR receiver and output selector buttons.
- IR-modtager: Modtager signaler fra IR-fjernbetjeningen.
- Output Selectors (1-4): Buttons to select the input source for each corresponding HDMI output. Each output has its own set of source selection buttons (1, 2, 3, 4).
- LED-indikatorer: Indicate the currently selected input for each output.
4.2 Bagpanel
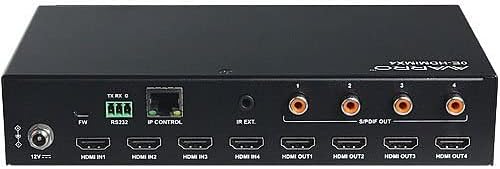
Billede: Bagside view of the AVARRO 0E-HDMIMX4 HDMI Switcher, displaying all input/output ports and control interfaces.
- DC 12V IN: Strømindgangsport.
- FW (Micro USB): Micro-USB port for firmware upgrades.
- RS232: Serial port for control via RS232 commands.
- IP CONTROL (RJ45): Ethernet port for network control and Web UI-adgang.
- IR EKST: Port for connecting an external IR receiver.
- HDMI IN (1-4): HDMI input ports for connecting source devices (e.g., Blu-ray player, game console).
- HDMI OUT (1-4): HDMI output ports for connecting display devices (e.g., TV, projector).
- S/PDIF OUT (1-4): Digital audio output ports for each HDMI output, supporting PCM 2.0/5.1, Dolby Digital, and DTS up to 5.1 Channel.
5. Opsætning og tilslutning
- Sluk alle enheder: Before making any connections, ensure all source devices, displays, and the switcher are powered off.
- Tilslut HDMI-kilder: Connect your HDMI source devices (e.g., media players, gaming consoles) to the HDMI IN 1-4 ports on the switcher using high-quality HDMI cables.
- Tilslut HDMI-skærme: Connect your HDMI display devices (e.g., TVs, projectors) to the HDMI OUT 1-4 ports on the switcher using high-quality HDMI cables.
- Tilslut lydudgange (valgfrit): If desired, connect external audio systems to the S/PDIF OUT ports for digital audio extraction.
- Tilslut netværk (valgfrit): For IP control and Web UI access, connect an Ethernet cable from your network router/switch to the IP CONTROL (RJ45) port.
- Tilslut strøm: Connect the provided DC 12V power adapter to the DC 12V IN port on the switcher, then plug the adapter into a power outlet.
- Tænd enheder: Power on the switcher, then your display devices, and finally your source devices.
Note: For optimal performance with 4K content, use certified High-Speed HDMI cables.
6. Betjeningsvejledning
6.1 Betjening på frontpanelet
To switch an input source for a specific output:
- Locate the "SELECTOR" buttons for the desired OUTPUT (1-4).
- Press the corresponding "SOURCE" button (1, 2, 3, or 4) below the "SELECTOR" button to route the desired input to that output. The LED indicator will illuminate to show the active input.
6.2 IR fjernbetjening
The included IR remote control allows for convenient switching from a distance. Point the remote towards the IR receiver on the front panel of the switcher.
- Inputknapper (1-4): Vælger inputkilden.
- Output Buttons (A-D or 1-4): Selects the output to control.
- Matrix-skift: Typically, you would press an Output button, then an Input button to route that input to the selected output. Refer to the remote's specific layout for exact button functions.
6.3 Web UI kontrol
De Web UI provides a graphical interface for advanced control and configuration.
- Ensure the switcher is connected to your network via the IP CONTROL port.
- Obtain the IP address of the switcher (refer to network settings or device documentation for default IP or discovery method).
- Åbn a web browser på en computer, der er tilsluttet det samme netværk.
- Enter the switcher's IP address into the browser's address bar.
- Log in using the default credentials (if prompted, refer to device documentation for default username/password).
- Brug Web UI to manage input/output routing, EDID settings, and other advanced features.
6.4 RS232 kontrol
The RS232 port allows for integration with control systems using serial commands. Refer to the detailed RS232 command set documentation (usually available from the manufacturer's website) for specific protocols and commands.
7. Smart EDID Management
The 0E-HDMIMX4 features Smart EDID Management to ensure compatibility between source devices and displays. EDID (Extended Display Identification Data) communicates display capabilities to the source. The switcher can automatically manage EDID or allow manual configuration via the Web UI to optimize video and audio formats for connected devices.
8. Firmware opgradering
Firmware updates can improve performance, add new features, or resolve issues. The 0E-HDMIMX4 supports firmware upgrading via both the Micro-USB port and the Web UI.
- Mikro-USB: Connect a computer to the FW (Micro USB) port and use the manufacturer's provided upgrade tool.
- Web UI: Få adgang til Web UI and navigate to the firmware upgrade section.
Always download the latest firmware and instructions from the official AVARRO website before attempting an upgrade.
9. Specifikationer
| Feature | Detalje |
|---|---|
| Model | 0E-HDMIMX4 |
| Indgange | 4 x HDMI IN |
| Udgange | 4 x HDMI OUT, 4 x S/PDIF OUT (Digital) |
| Kontrolporte | 1 x RS232, 1 x IP CONTROL (RJ45), 1 x FW (Micro USB) |
| HDMI overensstemmelse | 4K Ultra HD, HDCP 2.2 compliant |
| Understøttelse af videoopløsning | VESA: 800x600 to 1920x1200; SMPTE: 720x576P to 4096x2160 |
| HDR-understøttelse | HDR 10, HLG, DOLBY VISION up to 4K60 444 |
| Downscaler | Built-in 4K-1080P downscaler |
| Maksimal datahastighed | 18 Gbps |
| Maksimalt Pixel-ur | 600 MHz |
| Lydformater (HDMI) | PCM 2.0/5.1/7.1, Dolby TrueHD, Dolby Atmos, DTS HD Master Audio, DTS:X |
| Audio Formats (S/PDIF) | PCM 2.0/5.1, Dolby Digital, DTS up to 5.1 Channel |
| ESD beskyttelse | ±8 kV (luftgabsudladning) / ±4 kV (kontaktudladning) |
| Overspændingsbeskyttelse | Voltage: ±1 Kv |
| Strømforsyning | DC 12V 2A |
| Strømforbrug (maks.) | 10.8W |
| Enhedens dimensioner (L x B x H) | 8.46 "x 4.73" x 1.65 "(21.49 cm x 12.01 cm x 4.19 cm) |
| Produktets vægt | 1.19 lbs (0.54 kg) |
10. Fejlfinding
Hvis du støder på problemer, henvises der til følgende almindelige problemer og løsninger:
- Ingen video/lydudgang:
- Sørg for, at alle HDMI-kabler er korrekt tilsluttet.
- Kontroller, at strømadapteren er korrekt tilsluttet, og at enheden er tændt.
- Check that the correct input source is selected for the desired output.
- Test med forskellige HDMI-kabler.
- Bypass the switcher to confirm source and display functionality.
- Check EDID settings, especially with mixed resolution displays.
- Intermitterende signal/flimren:
- Use high-quality, certified HDMI cables, especially for longer runs or 4K content.
- Ensure cables are not excessively bent or damaged.
- Check for potential electromagnetic interference from other devices.
- Fjernbetjeningen virker ikke:
- Ensure there are no obstructions between the remote and the switcher's IR receiver.
- Udskift fjernbetjeningens batterier.
- Verify the remote is pointed directly at the IR receiver.
- Web UI/IP Control Issues:
- Confirm the Ethernet cable is properly connected.
- Verify the switcher's IP address and ensure your computer is on the same network subnet.
- Kontrollér firewallindstillingerne på din computer eller dit netværk.
11. Vedligeholdelse
- Rensning: Brug en blød, tør klud til at rengøre enhedens yderside. Brug ikke flydende rengøringsmidler eller aerosoler.
- Ventilation: Ensure the ventilation openings are clear and not obstructed to prevent overheating.
- Opbevaring: If storing the unit for an extended period, disconnect power and store in a cool, dry place.
12. Garanti og support
AVARRO products are designed for reliability and performance. For specific warranty information, please refer to the warranty card included with your product or visit the official AVARRO webwebsted. For teknisk support, produktregistrering eller download af de nyeste drivere og firmware, besøg venligst www.avarrus.com or contact AVARRO customer service.
Ask a question about this manual
Ask about setup, troubleshooting, compatibility, parts, safety, or missing instructions. Manuals+ will review the question and use this page’s manual context to help answer it.