1. Introduktion
Thank you for choosing the ledmo LED Outdoor Up and Down Wall Light. This manual provides essential information for the safe installation, operation, and maintenance of your new lighting fixture. Please read these instructions thoroughly before installation and retain them for future reference.

Image 1.1: Four ledmo LED outdoor wall lights mounted on a dark brick wall, showcasing their modern design and the distinct up and down lighting effect they produce.
2. Sikkerhedsoplysninger
For at sikre sikker installation og drift skal du overholde følgende forholdsregler:
- Always turn off the power supply at the main circuit breaker before beginning any electrical work.
- Installationen skal udføres af en kvalificeret elektriker eller en person med tilstrækkelig elektrisk viden.
- Sørg for, at monteringsfladen er strukturelt solid og kan bære armaturets vægt.
- Use only approved connectors and wiring methods as per local electrical codes.
- Do not attempt to modify the fixture in any way, as this may void the warranty and create safety hazards.
- Hold armaturet væk fra brændbare materialer.
- This fixture is rated IP65 for outdoor use, providing protection against dust and water jets. However, avoid submerging the fixture in water.
3. Pakkens indhold
Verify that all components are present and undamaged before installation:
- ledmo LED Outdoor Up and Down Wall Light(s)
- Mounting Hardware (screws, wall anchors, wire nuts)
- Instruktionsmanual (dette dokument)
4. Specifikationer
| Feature | Specifikation |
|---|---|
| Mærke | ledmo |
| Modelnummer | Square Mirage Down Light |
| Materiale | Aluminium |
| Farve | Hvid |
| Produktdimensioner | 4.7 cm L x 4.7 cm B x 4.7 cm H |
| Wattage | 20 watt |
| Lysstyrke | 1800 lumen |
| Farvetemperatur | 6000 Kelvin (kold hvid) |
| Voltage | 120 volt |
| Vandmodstandsniveau | IP65 (Vandtæt) |
| Gennemsnitligt liv | 50,000 timer |
| Installationstype | Wall Mount (Hardwired) |
| Særlige funktioner | Anti-Rust, Energy Efficient, Adjustable Beam Angle |
5. Installationsvejledning
Follow these steps for proper installation of your ledmo wall light. Ensure power is OFF before proceeding.
- Forbered monteringsoverfladen: Ensure the electrical box is securely installed in the wall.
- Mount Metal Substrate: Attach the round universal mounting plate (metal substrate) to the wall electrical box using the provided locking screws. Ensure it is firmly secured.
- Tilslut ledninger: Carefully connect the live (black), ground (green/bare copper), and neutral (white) wires from the fixture to the corresponding wires from your electrical box using wire nuts. Ensure all connections are secure.
- Reparer Lamp Legeme: Juster lamp body with the mounting plate and secure it with the provided screws.
- Vedhæft Lamp Skygge: Placer lamp skygge på armaturet.
- Gendan strøm: Når installationen er færdig, skal strømmen til afbryderen genoprettes, og lyset testes.

Image 5.1: A visual guide illustrating the four main steps for installing the ledmo LED outdoor wall light, from mounting the bracket to securing the lamp skygge.
6. Betjeningsvejledning
The ledmo LED Outdoor Up and Down Wall Light is designed for straightforward operation and features an adjustable beam angle.
6.1. Tænd/sluk
The light is controlled by a standard wall switch connected to your electrical circuit. Flip the switch to turn the light on or off.
6.2. Justering af strålevinklen
This fixture features internal adjustable paddles that allow you to customize the up and down light beam angle. This enables various lighting effects to suit your preference.
- Fjern forsigtigt lamp skygge.
- Locate the adjustable paddles inside the fixture.
- Gently move the paddles to achieve the desired light spread (0-120 degrees).
- Udskift lamp skygge sikkert.
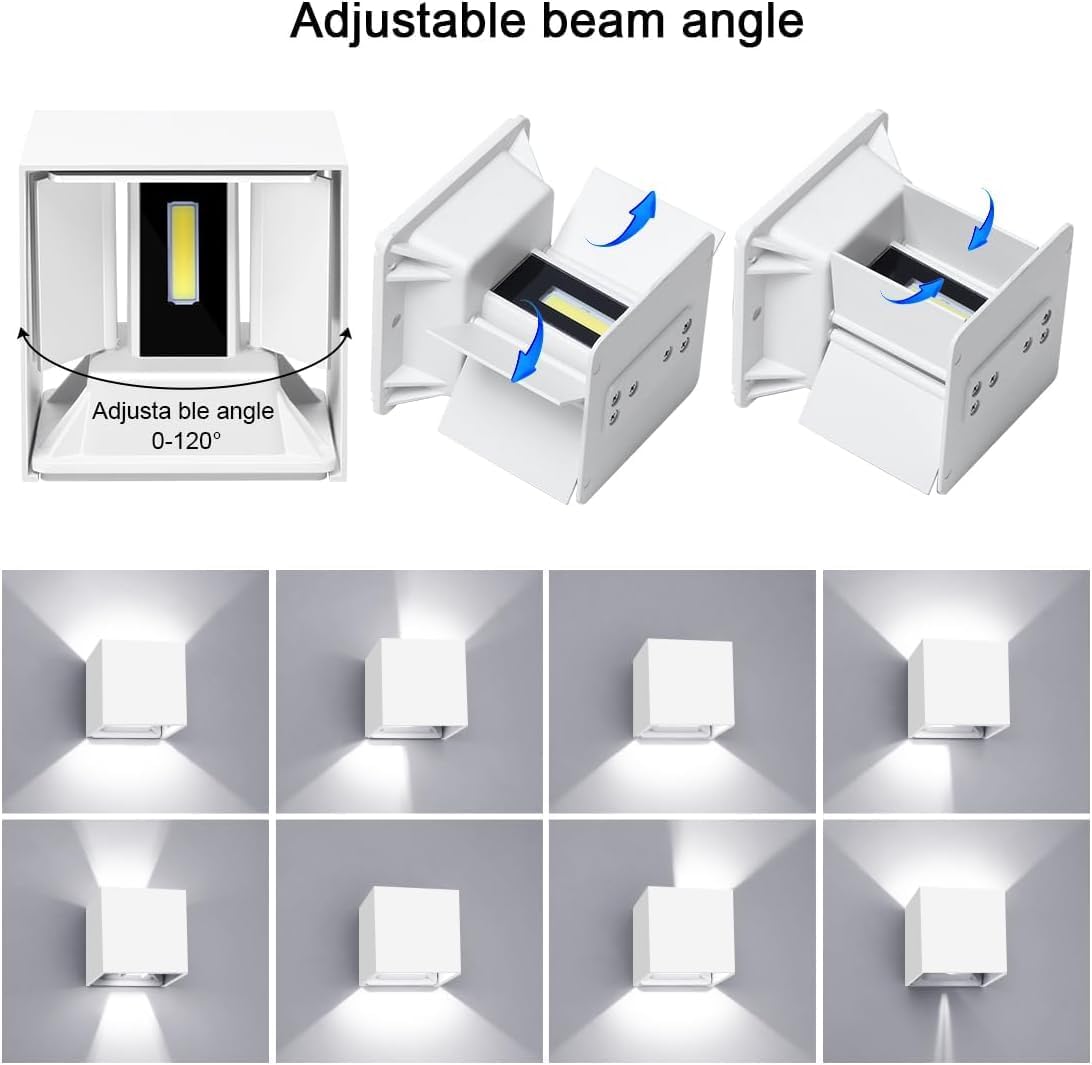
Image 6.1: A diagram illustrating the adjustable beam angle feature, showing how internal paddles can be manipulated to change the light distribution.
7. Vedligeholdelse
Regular maintenance ensures optimal performance and longevity of your ledmo wall light.
- Rensning: Afbryd strømmen før rengøring. Brug en blød, tør klud.amp cloth to wipe the exterior of the fixture. Avoid abrasive cleaners, solvents, or harsh chemicals, as these can damage the finish or internal components.
- Inspektion: Periodically check the fixture for any signs of damage, loose connections, or wear. If any issues are found, consult a qualified electrician.
- lysdioder: The integrated COB LED lamp beads are designed for long life and are not user-replaceable.
8. Fejlfinding
If you encounter issues with your ledmo wall light, refer to the following common problems and solutions:
| Problem | Mulig årsag | Løsning |
|---|---|---|
| Lyset tænder ikke | Ingen strømforsyning | Check circuit breaker and wall switch. Ensure power is restored. |
| Løs ledningsforbindelse | Sluk for strømmen, og kontroller og stram derefter alle ledningsforbindelser. | |
| Lyse flimrer | Ustabil strømforsyning | Sørg for stabil voltage. Consult an electrician if flickering persists. |
| Løs forbindelse | Turn off power, check and tighten all wire connections. | |
| Reduceret lysstyrke | Snavs eller rester på linsen | Clean the fixture's lens with a soft, damp cloth (power off). |
If the problem persists after attempting these solutions, please contact ledmo customer support.
9. Garanti og support
ledmo is committed to providing quality products and customer satisfaction.
- Garanti: This product comes with a 24-month warranty service from the date of purchase. This warranty covers defects in materials and workmanship under normal use.
- Ekskluderinger: The warranty does not cover damage caused by improper installation, misuse, accidents, unauthorized modifications, or acts of nature.
- Kundesupport: For any questions, concerns, or warranty claims, please contact our professional after-sales guarantee team. We aim to resolve issues positively within 24 hours.
For further assistance, please visit the official ledmo store or contact your retailer.
10. Officielle produktvideoer
Baseret på de angivne produktdata er der ingen officielle produktvideoer fra sælgeren tilgængelige til integration i denne manual.