Indledning
This manual provides detailed instructions for the safe installation, operation, and maintenance of your Keonjinn LED Bathroom Mirror with Lights (60 x 40 Inch). This mirror features dimmable LED lighting, an anti-fog function, and a waterproof design, crafted from high-definition tempered glass for durability and clarity.
Sikkerhedsoplysninger
Læs venligst alle instruktioner omhyggeligt inden installation og brug. Manglende overholdelse af disse instruktioner kan resultere i elektrisk stød, brand eller alvorlig personskade.
- Bær altid sikkerhedsbriller under installationen.
- Installation requires a minimum of two people due to the mirror's size and weight (approximately 60.9 pounds).
- It is recommended to consult a professional electrician for hardwired installations to ensure compliance with local electrical codes.
- Ensure the power supply is disconnected at the circuit breaker before any installation or maintenance.
- Do not attempt to repair or modify the mirror's electrical components yourself. Contact qualified personnel for service.
- The anti-fog function automatically turns off after one hour of continuous use to prevent overheating. Reactivate by pressing the defogging button.
- This mirror is designed for auxiliary lighting and is not recommended as the sole light source for a room.
Components & Installation Tools
Pakkeliste
- Spejl x 1
- Beslag x 2
- Screws x (4+2)
- Wall Anchors-A
- Wall Anchors-B
- Positioning Ruler x 1
Nødvendige installationsværktøjer
- Elektrisk boremaskine
- Hammer
- Marker Pen
- Niveau

Opsætning og installation
The Keonjinn LED Bathroom Mirror is designed for flexible installation, supporting both horizontal and vertical mounting. It can be connected via a standard plug or hardwired into your electrical system.
Installationstrin
- Pak spejlet ud: Carefully remove the mirror from its multi-layered packaging. Inspect for any damage.
- Determine Mounting Orientation: Decide whether to hang the mirror horizontally or vertically.
- Placering: Use the provided positioning ruler and a level to mark the desired location for the mounting brackets on the wall. Ensure the marks are level and correspond to the mirror's width.
- Bore huller: Using an electric drill, create holes at the marked spots.
- Indsæt vægankre: Gently tap the appropriate wall anchors into the drilled holes with a hammer.
- Monteringsbeslag: Fastgør monteringsbeslagene til væggen med de medfølgende skruer.
- Elektrisk tilslutning: Connect the mirror to the power supply. This can be done by plugging it into a suitable outlet or by hardwiring it into your electrical system. For hardwiring, it is recommended to consult a professional electrician.
- Hæng spejlet: With assistance, carefully lift the mirror and slot it onto the mounted brackets. Ensure it is securely seated.


Installationsvideoguide
Official video guide demonstrating the installation process for the Keonjinn LED Bathroom Mirror.
Betjeningsvejledning
Your Keonjinn LED Bathroom Mirror is equipped with intuitive touch controls for lighting and anti-fog functions.

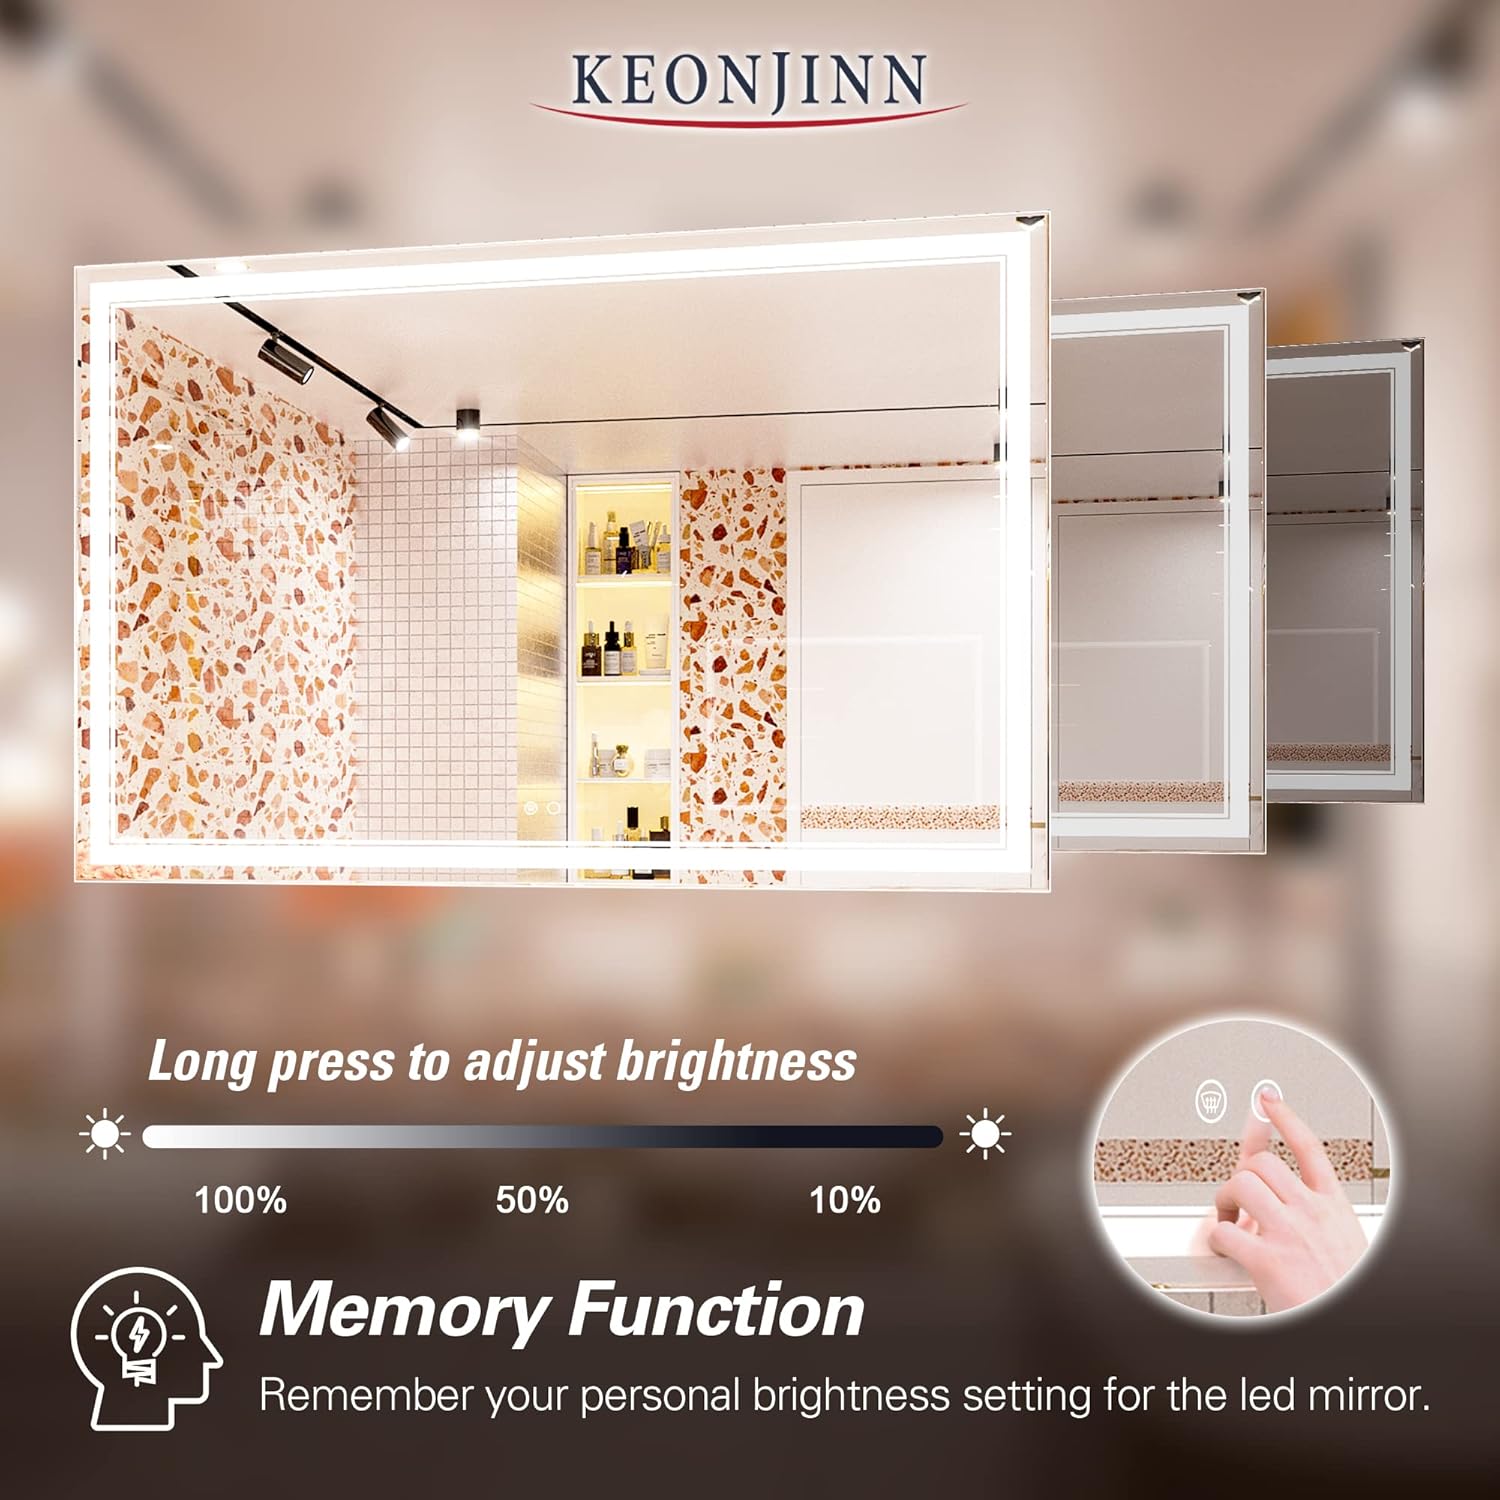
LED lysstyring
- Tænd/sluk: Lightly tap the power touch button on the mirror surface to turn the LED lights on or off.
- Adjust Brightness (Dimmable): Press and hold the power touch button to adjust the brightness level from 10% to 100%. Release the button when the desired brightness is reached.
- Hukommelsesfunktion: The mirror features a memory function that remembers your last brightness setting. When you turn the mirror back on, it will resume the previously set brightness level.

Anti-dug funktion
- Aktiver/deaktiver: Tap the anti-fog touch button (often depicted as a fan or steam icon) to turn the defogger on or off.
- Automatisk slukning: The anti-fog function will automatically turn off after one hour of continuous use to prevent overheating. If you require further defogging, simply press the button again to reactivate it.

Kontrol af vægkontakt
If hardwired, the mirror's light and defogger can be controlled by a standard wall switch. This allows for convenient integration with your existing bathroom lighting controls.
Feature Demonstration Videos
Officiel videoshowasing the dimmable and anti-fog features of the Keonjinn LED Bathroom Vanity Mirror.
Official video demonstrating the 6000K lighting of the Keonjinn bathroom mirror with lights.
Opretholdelse
Proper care and maintenance will ensure the longevity and optimal performance of your Keonjinn LED Bathroom Mirror.
Rengøring af spejloverfladen
- Brug en blød, fnugfri klud og et ikke-slibende glasrensemiddel.
- Spray the cleaner onto the cloth, not directly onto the mirror, to prevent liquid from seeping into the electrical components.
- Tør spejloverfladen forsigtigt af, indtil den er ren og stribefri.
- Avoid using harsh chemicals, abrasive pads, or acidic cleaners, as these can damage the mirror's finish or coatings.
Care for Electrical Components
- Ensure the mirror is disconnected from the power supply before cleaning any electrical parts.
- Do not spray water or cleaning solutions directly onto the back of the mirror or near electrical connections.
- Regularly check the power cord (if applicable) for any signs of damage. If damaged, discontinue use and contact customer support.
Fejlfinding
If you encounter any issues with your Keonjinn LED Bathroom Mirror, refer to the following common problems and solutions:
| Problem | Mulig årsag | Løsning |
|---|---|---|
| LED-lys tænder ikke. | No power supply; loose connection; faulty touch switch. | Check if the mirror is properly plugged in or hardwired. Ensure the circuit breaker is on. Verify all connections are secure. If the issue persists, contact customer support. |
| Anti-dug-funktionen virker ikke. | Function not activated; automatic shut-off; power issue. | Ensure the anti-fog button has been pressed. If it was on for over an hour, press the button again to reactivate. Check power supply. |
| Lights are flickering or dimming unexpectedly. | Ustabil strømforsyning; internt ledningsproblem. | Ensure the power supply is stable. If hardwired, check connections. Contact customer support if the problem continues. |
| Mirror is not responding to touch controls. | Power interruption; sensor malfunction. | Disconnect power for 30 seconds and reconnect to reset the system. Ensure the mirror surface is clean and dry. If unresponsive, contact customer support. |
For issues not listed here or if solutions do not resolve the problem, please contact Keonjinn customer support.
Specifikationer
| Feature | Detalje |
|---|---|
| Mærke | Keonjinn |
| Modelnummer | B0BWC5NZDR |
| Produktdimensioner | 40"L x 60"W (60 x 40 Inch) |
| Værelsestype | Badeværelse, soveværelse |
| Form | Rektangulær |
| Rammemateriale | Glas |
| Stil | Moderne |
| Monteringstype | Vægmontering |
| Finish Type | Poleret |
| Særlige funktioner | Frameless, Glass, Lighted, Touch Sensor, Dimmable, Anti-Fog |
| Materiale | 5mm High Quality Glass with Silver Coating |
| Montering påkrævet | Ja |
| Er oplyst | Ja |
| Varens vægt | 60.9 pund |
| Først tilgængelig | 21. februar 2023 |
Garanti & Support
Keonjinn is committed to providing high-quality products and excellent customer service.
Garantioplysninger
- 2-års garanti: Your Keonjinn mirror is covered by a 2-year warranty.
- Gratis reparation: Free mirror repair is provided within 3 years of purchase.
Returnering og udskiftning
- 30-Day No-Hassle Returns: Enjoy a 30-day easy return policy.
- Returnless and Free Replacement: For products that arrive in damaged condition, please send photos of the damaged mirror to customer support. A free replacement will be provided without requiring the return of the damaged item.
Kundesupport
Keonjinn offers 7x24 hours online customer support.
To contact support regarding Keonjinn products or orders, follow these steps:
- Locate the product on the Amazon page and click on the 'Keonjinn' seller name.
- Select "Ask a question" on the seller's page to access the Seller Messaging Assistant.
- In the chat window, follow the prompts to type your question and submit it. Please include any personal information, such as email address, physical address, phone numbers, or credit card numbers, within your message if requested.
