
Jebao AFD-6
Jebao AFD-6 Solar Automatic Pond Fish Feeder Instruction Manual
Model: AFD-6 | Mærke: Jebao
1. Introduktion
Thank you for choosing the Jebao AFD-6 Solar Automatic Pond Fish Feeder. This device is designed to provide convenient and consistent feeding for your pond fish, ensuring their health and well-being. With its solar-powered operation and weatherproof design, it offers a reliable solution for outdoor use without the need for complex wiring.
This manual provides essential information for the safe and efficient operation of your new feeder. Please read it thoroughly before installation and use, and retain it for future reference.

Figure 1: Jebao AFD-6 Solar Automatic Pond Fish Feeder and its retail packaging.
2. Sikkerhedsinstruktioner
To ensure safe operation and prevent damage to the product or injury, please observe the following safety precautions:
- Læs alle instruktioner: Before operating the feeder, read and understand all instructions in this manual.
- Kun udendørs brug: This feeder is designed for outdoor use. Ensure it is placed in a stable location where it will not be easily knocked over.
- Vandnærhed: While designed to be rainproof, avoid submerging the unit in water. Do not place it directly in the pond where it could fall in.
- Strømkilde: The feeder is primarily solar-powered. If using the power adapter for initial charging or troubleshooting, ensure it is connected to a suitable power outlet away from water sources.
- Børn og kæledyr: Keep the feeder out of reach of small children and pets to prevent accidental ingestion of fish food or damage to the unit.
- Opretholdelse: Disconnect any external power source before performing maintenance or cleaning.
- Temperatur: Do not expose the feeder to extreme temperatures outside its operating range.
- Ændringer: Do not attempt to modify or disassemble the feeder. Repairs should only be performed by qualified personnel.
- Madtype: Use only dry fish pellets or flakes suitable for automatic feeders. Do not use wet or sticky food, which can clog the dispenser.
3. Produktkomponenter
The Jebao AFD-6 feeder comes with the following main components:
- Main Feeder Unit with integrated solar panel and LED display
- Food Dispensing Funnel
- Power Adapter (for initial charging or backup)
- Internt batteri (forudinstalleret)
- Instruktionsmanual (dette dokument)

Figure 2: All components included with the Jebao AFD-6 Solar Automatic Pond Fish Feeder.
4. Opsætning
4.1 Placering
Choose a suitable location for the feeder near your pond. The location should:
- Modtage ampdirekte sollys hele dagen for optimal solopladning.
- Be stable and level to prevent the feeder from tipping over.
- Allow the dispensed food to fall directly into the pond without obstruction.
- Be easily accessible for refilling and maintenance.
4.2 Montering
- Attach the food dispensing funnel to the outlet port at the bottom front of the main feeder unit. Ensure it is securely fastened.
- If the internal battery is not pre-installed or needs to be connected, follow the instructions provided with the battery to connect it to the feeder's internal power port.
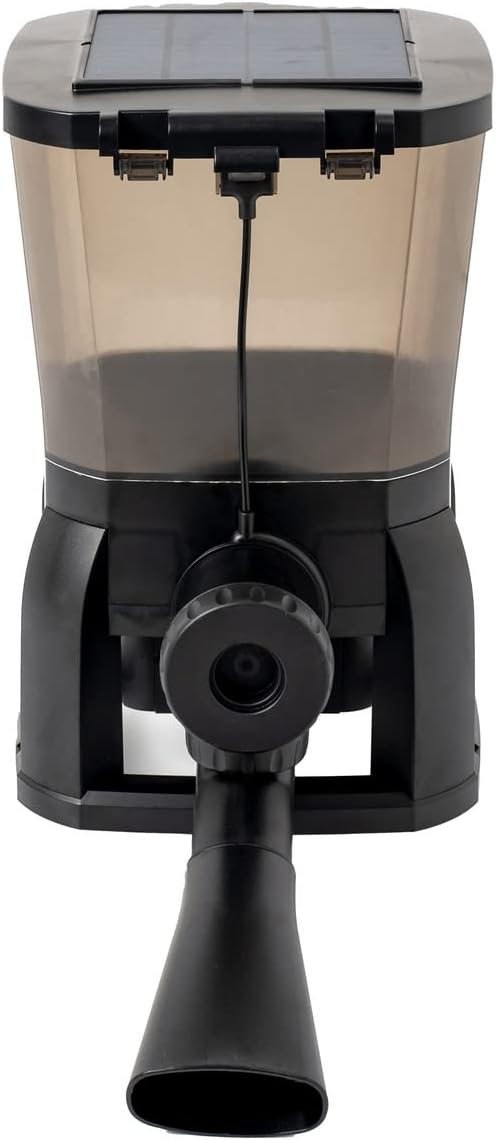
Figur 3: Forside view of the feeder with the dispensing funnel attached.
4.3 Initial Charging (Optional)
While the unit is solar-powered, it is recommended to fully charge the internal battery using the provided power adapter before first use, especially if the unit has been stored for a long time or if sunlight is limited.
- Connect the power adapter to the charging port on the feeder.
- Sæt adapteren i en almindelig stikkontakt.
- Allow the unit to charge for several hours until the battery indicator on the LED display shows a full charge.
4.4 Fyldning af foderautomaten
- Open the lid on top of the feeder unit.
- Pour dry fish pellets or flakes into the food tank. Do not overfill.
- Luk låget ordentligt for at bevare madens friskhed og forhindre fugt i at trænge ind.
5. Betjeningsvejledning
The Jebao AFD-6 features a clear LED display and intuitive buttons for programming.

Figure 4: LED display and control buttons for programming the feeder.
5.1 Knapfunktioner
- TIL/FRA: Tænder eller slukker for enheden.
- UR: Går i tidsindstillingstilstand.
- FODER: Manually dispenses food once.
- KØRSELSVEJLEDNING: Cycles through programming modes (e.g., setting feeding times, quantity).
- OP/NED-pile: Adjust values (time, quantity).
- SÆT: Confirms selection or saves settings.
5.2 Indstilling af aktuel tid
- Tryk på UR knappen. Timecifret vil blinke.
- Brug OP/NED pilene til at justere timetallet.
- Trykke UR again to move to the minute digit.
- Brug OP/NED arrows to adjust the minute.
- Trykke SÆT for at bekræfte og gemme det aktuelle klokkeslæt.
5.3 Programming Feeding Times and Quantity
The feeder allows up to 6 feeding times per day, with 9 different quantity options for each feeding.
- Tryk på MODE button to enter the feeding program setting. The display will show "1" (for the first feeding time) and the hour digit will flash.
- Brug OP/NED arrows to set the desired hour for the first feeding.
- Trykke MODE to move to the minute digit. Adjust with OP/NED pile.
- Trykke MODE again. The display will show the current food quantity setting (e.g., "P1" for quantity level 1).
- Brug OP/NED arrows to select the desired food quantity (P1 to P9, where P9 is the largest quantity).
- Trykke SÆT to confirm the settings for the first feeding time.
- Repeat steps 1-6 for additional feeding times (up to 6). After setting the 6th time, pressing MODE again will cycle back to the first setting or exit programming mode.
- To disable a specific feeding time, set its time to "--:--" or a similar indicator if available on the display, or simply do not set it.
5.4 Manuel fodring
To dispense food manually at any time, simply press the FODER button. The feeder will dispense a single portion of food according to the last set quantity.
5.5 Solopladning
The integrated solar panel on top of the unit continuously charges the internal battery when exposed to direct sunlight. Ensure the solar panel is clean and unobstructed for efficient charging.
6. Vedligeholdelse
Regular maintenance will ensure the longevity and optimal performance of your Jebao AFD-6 feeder.
- Cleaning the Food Tank: Periodically empty and clean the food tank to prevent mold or bacterial growth, especially if using different types of food. Use a damp cloth and mild detergent, then rinse thoroughly and ensure it is completely dry before refilling.
- Rengøring af dispenseren: Check the dispensing mechanism and funnel for any clogs or residue. Clean as needed to ensure smooth food delivery.
- Rengøring af solpaneler: Tør solpanelet regelmæssigt af med en blød kludamp klud til at fjerne støv, snavs eller affald, der kan reducere opladningseffektiviteten.
- Batteripleje: If the feeder will not be used for an extended period, fully charge the battery and store the unit in a cool, dry place. Avoid completely draining the battery frequently.
- Vinteropbevaring: In regions with freezing temperatures, it is recommended to bring the feeder indoors during winter months to prevent damage from ice and extreme cold.
7. Fejlfinding
If you encounter issues with your Jebao AFD-6 feeder, please refer to the following common problems and solutions:
| Problem | Mulig årsag | Løsning |
|---|---|---|
| Foderautomaten doserer ikke foder. |
|
|
| LED display freezes or is unresponsive. |
|
|
| Batteriet oplades ikke. |
|
|
| Food gets wet or moldy. |
|
|
8. Specifikationer
Key technical specifications for the Jebao AFD-6 Solar Automatic Pond Fish Feeder:
| Feature | Detalje |
|---|---|
| Mærke | Jebao |
| Modelnummer | AFD-6 |
| Målarter | Fisk |
| Anbefalet brug | Foderstation |
| Materiale | Plast |
| Særlige funktioner | Lightweight, Automatic, Weatherproof, Solar Powered |
| Produktmål (L x B x H) | 17.2 cm L x 9.7 cm B x 15.5 cm H |
| Strømkilde | Solcelledrevet |
| Inkluderede komponenter | Feeder, Power Adapter |
| Kapacitet | 10 Liters (approximate, based on 1E+1 Liters) |
| Farve | Sort |
| Varens vægt | 6.4 pund |
| Oprindelsesland | Kina |

Figure 5: Product dimensions of the Jebao AFD-6 Solar Automatic Pond Fish Feeder.
9. Garanti og support
For information regarding the product warranty, please refer to the warranty card included with your purchase or contact the retailer from whom you purchased the Jebao AFD-6 feeder.
If you require technical support or have questions not covered in this manual, please contact Jebao customer service or your local distributor. Please have your product model number (AFD-6) and purchase details ready when contacting support.
Bemærk: Produktspecifikationer og funktioner kan ændres uden forudgående varsel.
Ask a question about this manual
Ask about setup, troubleshooting, compatibility, parts, safety, or missing instructions. Manuals+ will review the question and use this page’s manual context to help answer it.