
1. Introduktion
Thank you for choosing the MARK ADLER Expert 6.2 Ergonomic Office Chair. This manual provides essential information for the safe assembly, operation, maintenance, and troubleshooting of your new office chair. Please read this manual thoroughly before assembly and retain it for future reference.

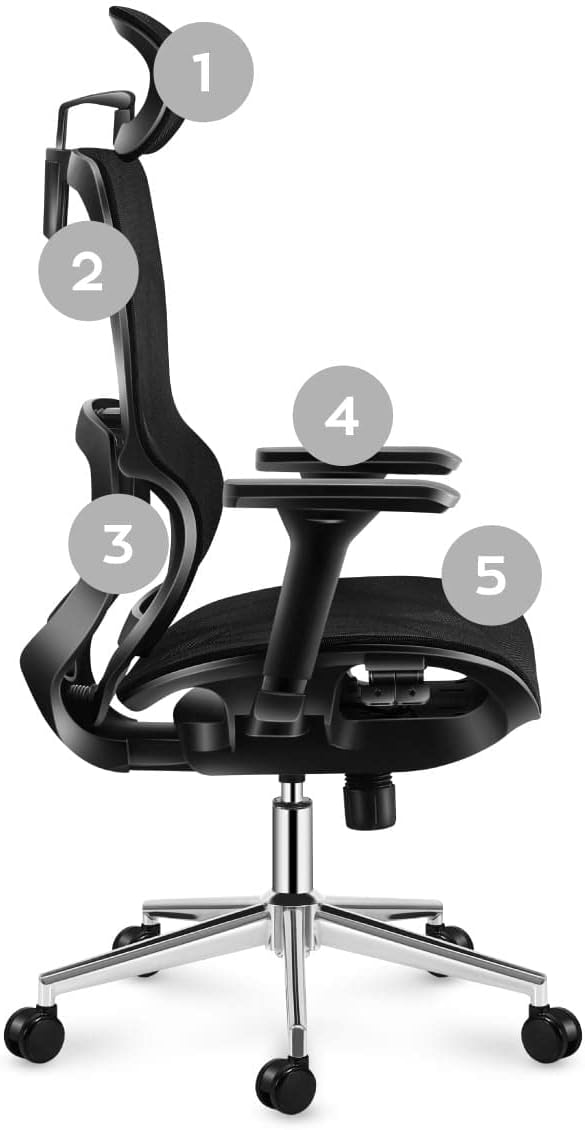
Image: The MARK ADLER Expert 6.2 ergonomic office chair.
2. Sikkerhedsoplysninger
- Sørg for, at alle dele er til stede og ubeskadigede før montering. Må ikke anvendes, hvis nogen af delene mangler eller er i stykker.
- Følg monteringsvejledningen nøje. Forkert montering kan føre til ustabilitet og skader.
- Stå ikke på stolen.
- Brug ikke stolen som skammel.
- Hold børn og kæledyr væk under montering. Små dele kan være en kvælningsfare.
- Overskrid ikke den maksimale vægtkapacitet på 150 kg (330 lbs).
- Regularly check all bolts and screws to ensure they are tightened. Retighten if necessary.
- Undgå at udsætte stolen for direkte sollys eller ekstreme temperaturer for at forhindre materialenedbrydning.
3. Pakkens indhold
Kontroller venligst, at alle komponenter er inkluderet i din pakke:
- Ryglænssamling
- Sædepudesamling
- Gas Lift cylinder
- Stjernebase
- Hjul (hjul)
- Armlæn (venstre og højre)
- Nakkestøtte
- Mounting Hardware (Screws, Washers, Allen Key)
Billede: Eksploderet view of chair components for assembly.
4. Monteringsvejledning
Follow these steps to assemble your MARK ADLER Expert 6.2 office chair:
- Fastgør hjul til basen: Sæt hjulene ind i hullerne for enden af hvert ben på stjernebasen. Tryk godt til, indtil de klikker på plads.
- Indsæt gasløft: Placer gasløftecylinderen i centerhullet på stjernebasen.
- Fastgør armlæn til sæde: Secure the armrests to the underside of the seat cushion using the provided screws. Ensure they are oriented correctly (left and right).
- Fastgør ryglænet til sædet: Align the backrest with the seat mechanism and secure it with screws.
- Fastgør nakkestøtten: Skub nakkestøtten ind i de dertil beregnede huller øverst på ryglænet.
- Tilslut sædeenheden til gasliften: Carefully place the assembled seat and backrest onto the gas lift cylinder. Press down firmly to secure.
- Endelig kontrol: Sørg for, at alle skruer er spændt, og at stolen er stabil, før den tages i brug.
5. Betjeningsvejledning
Your MARK ADLER Expert 6.2 chair offers several adjustment features for optimal comfort and ergonomics:
- Stolens højdejustering: Locate the lever on the right side, under the seat. Pull the lever up to raise the chair (when no weight is on it) or lower it (when seated). Release the lever to lock the height.
- Backrest Recline and Lock (SeatRest Mulitlock-Funktion): The mechanism allows the backrest to tilt to any desired position. Pull the recline lever (typically on the left side, under the seat) to unlock the recline. Lean back to your desired angle, then push the lever down to lock the backrest in place.
- Justerbar hovedstøtte: The headrest can be adjusted vertically to provide proper support for your neck and head. Simply slide it up or down to your preferred height.
- Lændestøtte: The flexible, ergonomic lumbar support is designed to provide adequate support to your spine. This feature automatically adjusts with your posture to maintain spinal alignment.
- Justering af armlæn: The armrests are adjustable. Look for a button or lever on the side of the armrest to adjust their height.

Image: Detail of the chair's recline and headrest adjustment.
6. Vedligeholdelse og pleje
To ensure the longevity and optimal performance of your MARK ADLER Expert 6.2 office chair, follow these maintenance guidelines:
- Rensning: For the mesh and fabric parts, use a soft cloth dampened with mild soap and water. Avoid harsh chemicals or abrasive cleaners. For the metal parts, wipe with a dry or slightly damp klæde.
- Regelmæssig inspektion: Kontrollér regelmæssigt alle skruer, bolte og forbindelser for at sikre, at de er stramme. Spænd eventuelle løse fastgørelseselementer for at opretholde stabilitet og sikkerhed.
- Hjulpleje: Clean the casters regularly to remove hair, dust, and debris that can impede smooth movement.
- Undgå overbelastning: Do not exceed the chair's maximum weight capacity.
- Miljøforhold: Keep the chair away from direct sunlight, excessive heat, or humidity, which can damage the materials.
7. Fejlfinding
Hvis du støder på problemer med din stol, kan du se følgende almindelige problemer og løsninger:
| Problem | Mulig årsag | Løsning |
|---|---|---|
| Stolen justerer ikke højden | Gas lift cylinder malfunction or lever issue. | Ensure the lever is fully engaged. If the problem persists, the gas lift may need replacement. |
| Stolen er vaklende eller ustabil | Løse skruer eller forkert montering. | Kontrollér og spænd alle monteringsskruer, især dem, der forbinder sæde, ryglæn og armlæn. |
| Hjulene ruller ikke jævnt | Affald sidder fast i hjulene eller er beskadigede hjul. | Fjern hår eller snavs fra hjulene. Udskift hjulene, hvis de er beskadigede. |
| Knirkende lyde | Løse forbindelser eller friktion mellem dele. | Tighten all screws. Apply a small amount of silicone lubricant to moving parts if necessary, avoiding contact with mesh or fabric. |
8. Specifikationer
| Feature | Detalje |
|---|---|
| Mærke | MARK ADLER |
| Modelnavn | Expert 6.2 |
| Produktmål (L x B x H) | 49 x 70 x 131 cm (ca. 19.3 x 27.6 x 51.6 tommer) |
| Varens vægt | 17 kilogram (ca. 37.5 lbs) |
| Farve | Sort |
| Materiale | Air Mesh HD Material |
| Maksimal vægtkapacitet | 150 kg (ca. 330 lbs) |
| Særlige funktioner | Adjustable Headrest, Lumbar Support, Reclining Backrest with Lock, Breathable Mesh |

Image: MARK ADLER Expert 6.2 chair with key dimensions.
9. Garanti og support
For warranty information or technical support, please refer to the documentation provided with your purchase or visit the official MARK ADLER webwebsted. Du kan også kontakte sælgeren direkte for at få hjælp.