1. Introduktion
Welcome to the instruction manual for your Eufy Clean X9 Pro with Auto-Clean Station. This advanced robot vacuum is designed to provide a comprehensive cleaning experience, combining powerful suction with effective mopping. It features a pressurized dual rotating mop system, an auto-lift mop for carpets, and an innovative auto-clean station that washes and dries the mops automatically. With 5500Pa suction power and AI.See obstacle avoidance, your home will be meticulously cleaned with minimal effort.
This manual will guide you through the setup, operation, maintenance, and troubleshooting of your device, ensuring optimal performance and longevity.
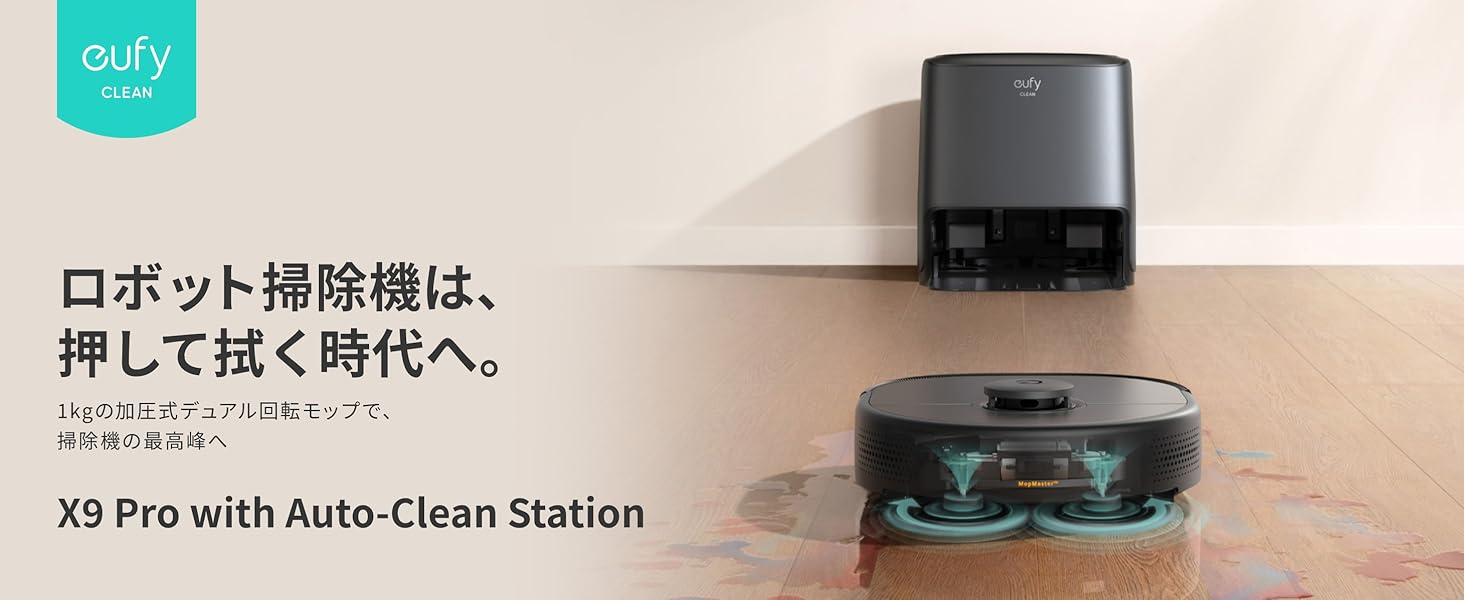
Image: The Eufy Clean X9 Pro robot vacuum with its Auto-Clean Station, illustrating the transition to a new era of robot cleaning that presses and wipes.
2. Opsætning
2.1 Pakkens indhold
Før du begynder, skal du sørge for at alle elementer er til stede:
- Eufy Clean X9 Pro Robot Vacuum
- Auto-Clean Station
- Strømledning
- Udskiftningsfilter
- Instruktionsmanual
2.2 Station Placement
Place the Auto-Clean Station on a hard, flat surface against a wall. Ensure there is at least 0.5 meters (1.6 feet) of clear space on both sides and 1.5 meters (4.9 feet) in front of the station for optimal robot navigation.
2.3 Initial Charging & Water Tank Setup
Connect the power cord to the Auto-Clean Station and plug it into a wall outlet. Place the robot vacuum onto the charging contacts. While charging, fill the clean water tank with fresh water and ensure the dirty water tank is empty. The station will automatically manage water for mop washing.
2.4 App-forbindelse
Download the Eufy Clean app from your smartphone's app store. Follow the in-app instructions to connect your robot vacuum to your home Wi-Fi network. The app allows for advanced control, mapping, and customization of cleaning settings.
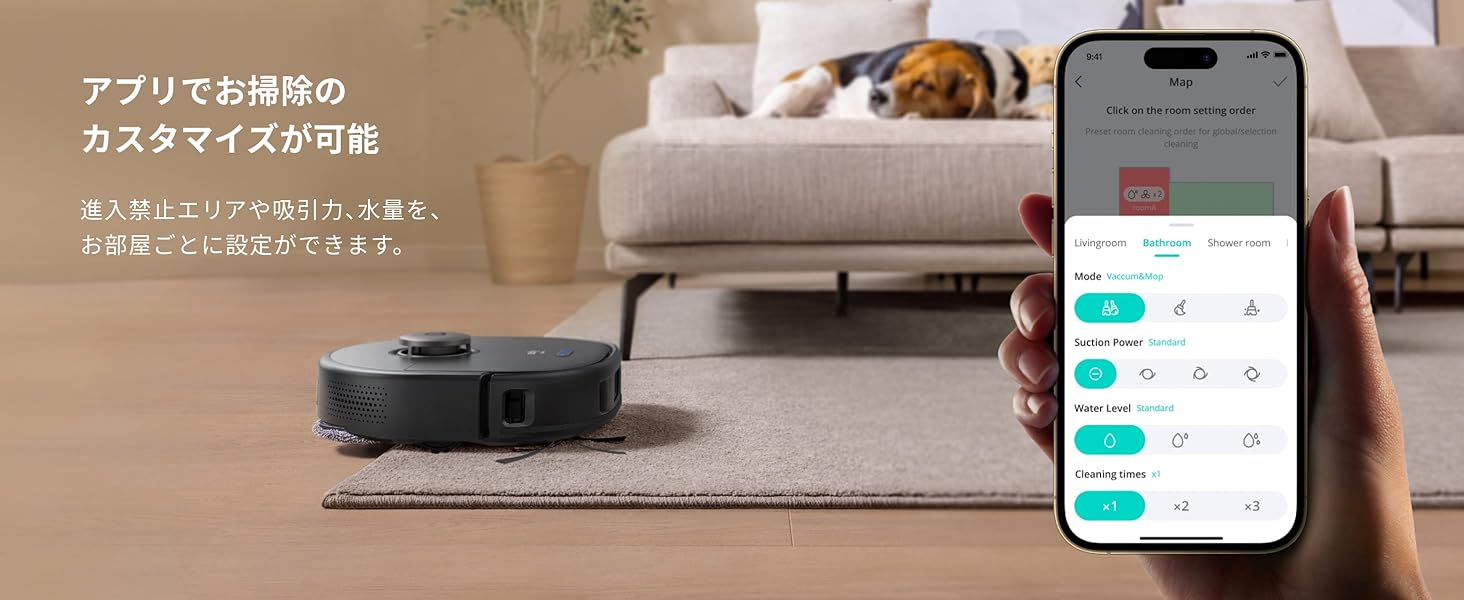
Image: The Eufy Clean app interface, demonstrating how cleaning can be customized, including setting no-go zones, suction power, and water levels per room.
3. Betjening af din robotstøvsuger
3.1 Start og stop af rengøring
You can start or stop a cleaning cycle using the button on the robot, the Eufy Clean app, or voice commands via Amazon Alexa.
3.2 Rengøringstilstande
The Eufy Clean X9 Pro offers various cleaning modes:
- Kun støvsuger: Til tørt snavs på alle gulvtyper.
- Kun moppe: For wet cleaning on hard floors.
- Støvsuger og mopper: Samtidig støvsugning og mopping.
Select your preferred mode via the Eufy Clean app.
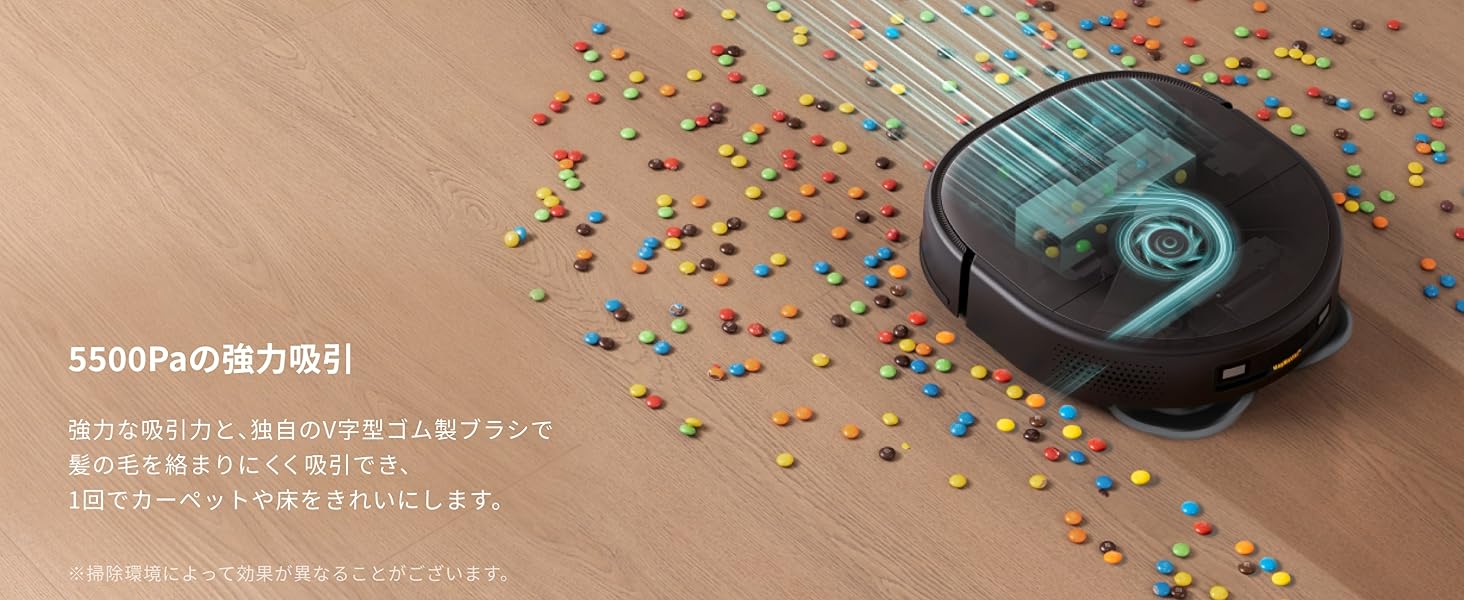
Image: The robot vacuum powerfully sucking up debris, highlighting its 5500Pa suction capability.
3.3 Carpet Detection and Mop Lift
The robot automatically detects carpets and lifts its mops by approximately 12mm to prevent wetting. It will then switch to vacuum-only mode on carpets.
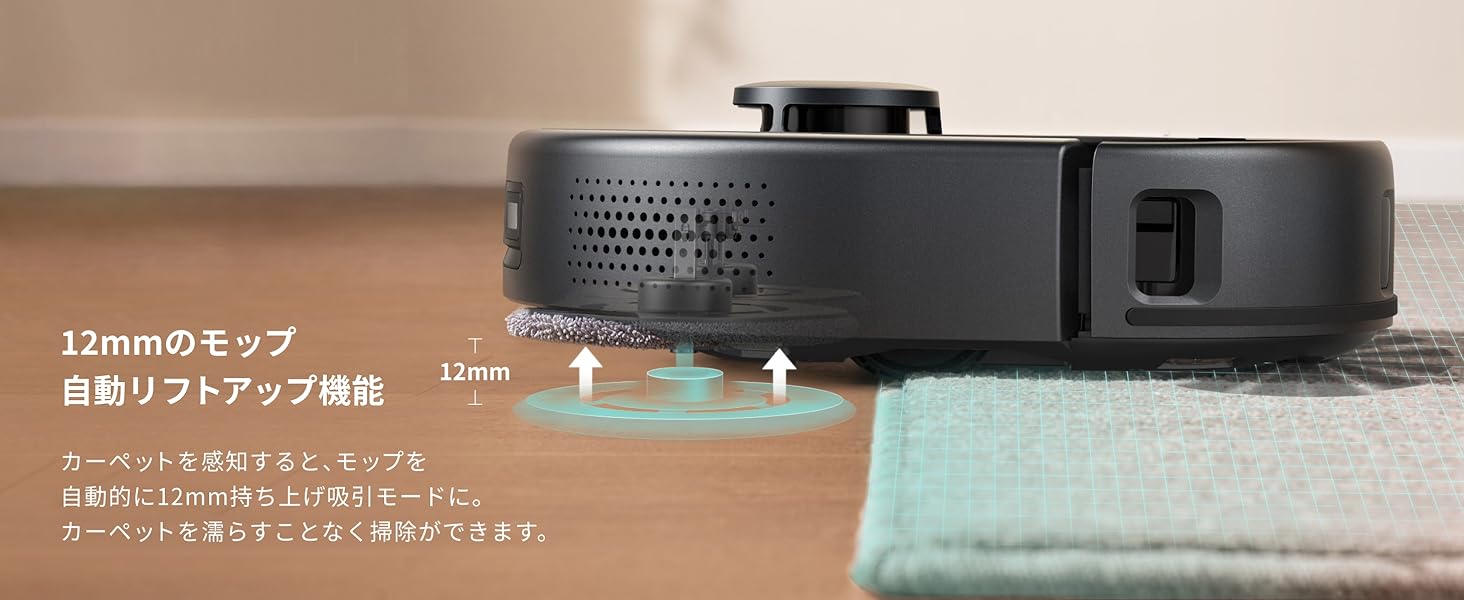
Image: The robot vacuum's mop automatically lifting by 12mm upon detecting a carpet, preventing the carpet from getting wet.
3.4 AI.See Obstacle Avoidance
Equipped with a 3D ToF sensor and AI camera, the AI.See system accurately recognizes and avoids common household obstacles such as cables, slippers, and furniture, ensuring an uninterrupted cleaning path.
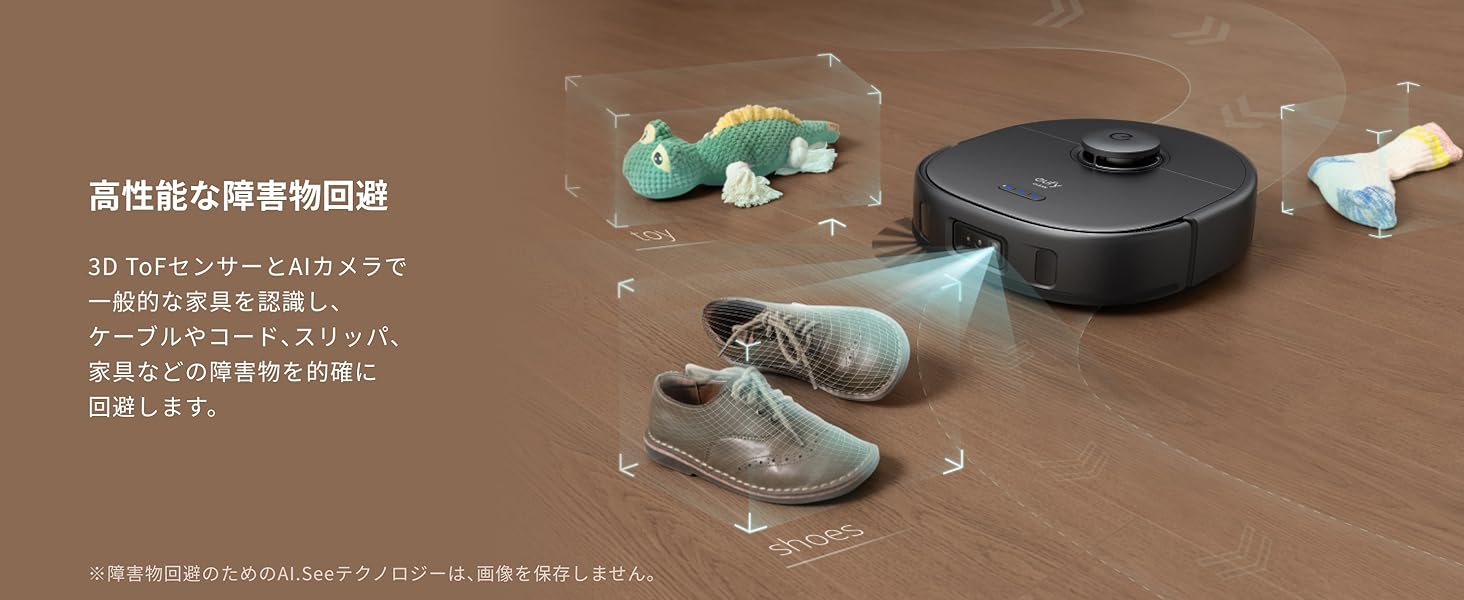
Image: The robot vacuum using its AI.See system to detect and avoid various obstacles on the floor, such as cables and shoes.
3.5 AI.Map 3.0 Technology
The AI.Map 3.0 technology allows for multi-floor mapping, storing up to 5 floor plans. You can select specific rooms or areas to clean, and the app displays detected obstacles on the map for precise cleaning management.
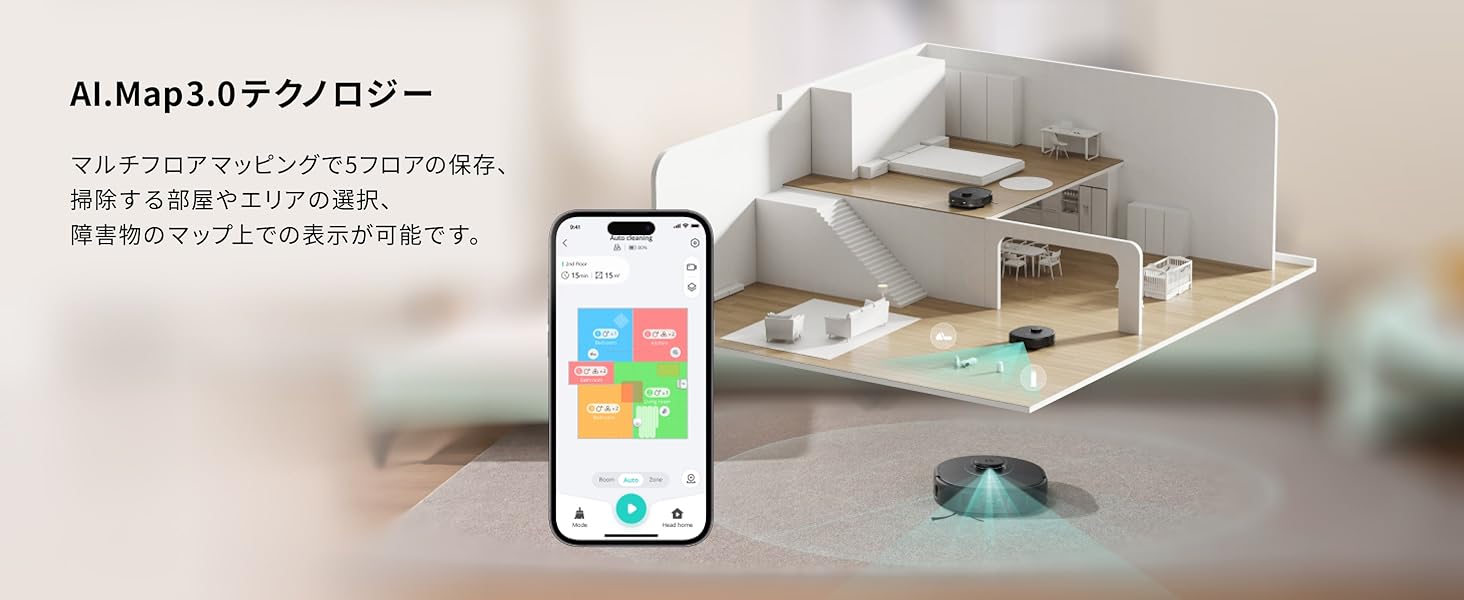
Image: The Eufy Clean app showing a detailed floor map created by AI.Map 3.0 technology, allowing users to customize cleaning zones.
4. Vedligeholdelse
4.1 Auto-Clean Station Maintenance
The Auto-Clean Station automatically washes and dries the mops after each cleaning cycle using warm air, preventing odors and manual effort. It also features automatic dust collection, reducing the frequency of manual dustbin emptying.
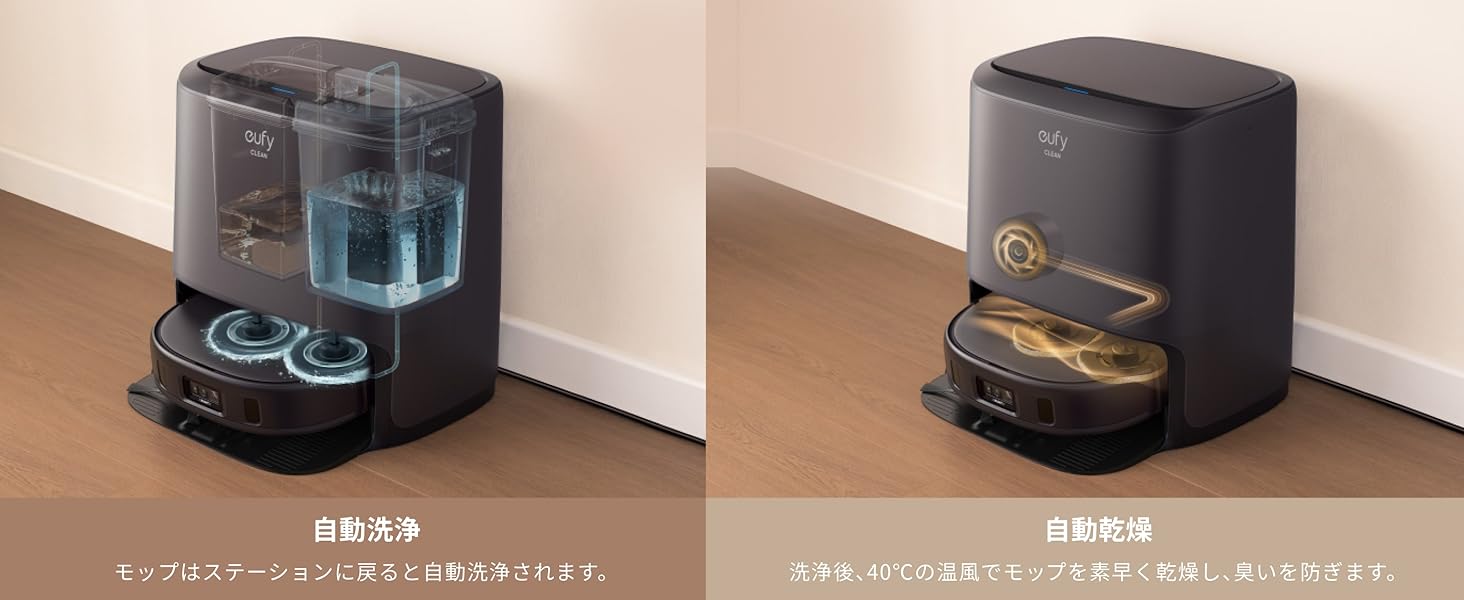
Image: The Auto-Clean Station automatically washing and drying the robot's mops, eliminating manual cleaning tasks.
4.2 Vedligeholdelse af vandtank
Regularly check and refill the clean water tank. Empty and clean the dirty water tank to prevent mold and odors. The frequency depends on usage.
4.3 Rengøring af børster
The robot features a unique V-shaped rubber brush designed to prevent hair tangles. Periodically remove the main brush and clean any accumulated hair or debris. A cleaning tool is usually provided for this purpose.
4.4 Filterudskiftning
Replace the filter as recommended in the app or every 3-6 months, depending on usage, to maintain optimal suction performance.
4.5 Sensorrensning
Wipe the sensors on the robot and the charging contacts on both the robot and the station with a dry cloth to ensure proper navigation and charging.
4.6 Videodemonstrationer
5. Fejlfinding
5.1 Fælles problemer
- Robotten sidder fast: Clear any obstacles around the robot. Check if the wheels or brushes are tangled.
- Ingen sugeevne/dårlig rengøring: Empty the dustbin, clean the main brush, and replace the filter if necessary.
- Moppen rengør ikke effektivt: Ensure the clean water tank is filled and the dirty water tank is empty. Clean the mops or replace them if worn.
- Robotten oplader ikke: Ensure the charging contacts on both the robot and the station are clean and free of debris. Check if the power cord is securely connected.
5.2 Fejlmeddelelser
If the robot displays an error message or indicator light, refer to the Eufy Clean app for specific instructions and troubleshooting steps. The app provides detailed explanations and solutions for most issues.
6. Specifikationer
| Mærke | Eufy |
| Modelnavn | X9 Pro with Auto-Clean Station |
| Modelnummer | T2320 |
| Sugekraft | 5500 Pa |
| Moppetype | Pressurized Dual Rotating Mops |
| Moppeløftehøjde | Ca. 12 mm |
| Forhindring af hindringer | 3D ToF Sensor, AI Camera (AI.See) |
| Kortlægningsteknologi | AI.Map 3.0 (up to 5 floor plans) |
| Batterisammensætning | Lithium-ion |
| Produktmål (L x B x H) | 35.3 x 32.7 x 11.4 cm (13.9 x 12.9 x 4.5 tommer) |
| Produktets vægt | 4.68 kg (10.32 lbs) |
| Controller type | App, Amazon Alexa |
| UPC | 194644122355 |
7. Garanti
Your Eufy Clean X9 Pro with Auto-Clean Station comes with a maximum 24-month warranty from the date of purchase. Please retain your proof of purchase for warranty claims. The warranty covers manufacturing defects and malfunctions under normal use. For detailed terms and conditions, please refer to the official Eufy webwebsted eller kontakt kundesupport.
8. Support
For further assistance, technical support, or to report any issues, please contact Eufy Customer Support through the following channels:
- Eufy Clean App: Access the support section within the app for FAQs and direct contact options.
- Eufy Officiel Webwebsted: Besøg www.eufylife.com for produktinformation, ofte stillede spørgsmål og kontaktoplysninger.
- E-mail support: Refer to your product packaging or the Eufy website for the appropriate email address.
Please have your model number (T2320) and purchase information ready when contacting support.