1. Introduktion
This manual provides comprehensive instructions for the setup, operation, maintenance, and troubleshooting of your Vrriis 900S Wireless Video Transmission System. Please read this manual thoroughly before using the product to ensure proper functionality and to prevent damage.
2. Pakkens indhold
Verify that all items listed below are included in your product package. If any items are missing or damaged, please contact Vrriis customer support.
- Sender (TX) x 1
- Modtager (RX) x 1
- USB-C-kabel x 2
- Strømadapter x 2
- Antenne x 4
- Infrared (IR) Cable x 2
3. Produktet er slutview
The Vrriis 900S is a high-performance wireless video transmission system designed for professional and enthusiast use. It offers reliable 1080p video and audio transmission with ultra-low latency, making it suitable for various applications including outdoor shooting, live broadcasts, and presentations.
3.1 Nøglefunktioner
- 0.06S Low Latency: Ensures minimal delay between source and display, crucial for real-time monitoring.
- 820FT (250M) Transmission Range: Provides extensive line-of-sight coverage for flexible setups.
- Full HD 1080p @60Hz Support: Delivers high-quality video and audio for excellent visual enjoyment.
- Local Loop-out: Allows simultaneous monitoring at the transmitter end.
- IR Return Functionality: Enables remote control of the source device from the receiver end.
- One-to-Many Support: Connects one transmitter to up to four receivers (additional receivers sold separately).
- Dual Antenna, Dual-Band Transmission: Utilizes 2.4GHz & 5.8GHz frequencies for strong, stable, and reliable signal transmission, capable of passing through walls within a certain range.
- Flere strømindstillinger: Compatible with NP-F Series batteries (F970, F750, F550), 5V2A Type-C adapters, and 5V2A portable rechargeable power banks.
3.2 Komponentidentifikation

Figur 1: Forside og bagside view of the Vrriis 900S Transmitter and Receiver units. The front shows the Vrriis logo and a carbon fiber texture, while the back reveals the battery plate, ports, and indicator lights.

Figure 2: Diagram illustrating the local loop-out feature, showing the transmitter connected to both a source device and a local display.

Figure 3: Diagram demonstrating the IR pass-back functionality, allowing remote control of the source device from the receiver's location.
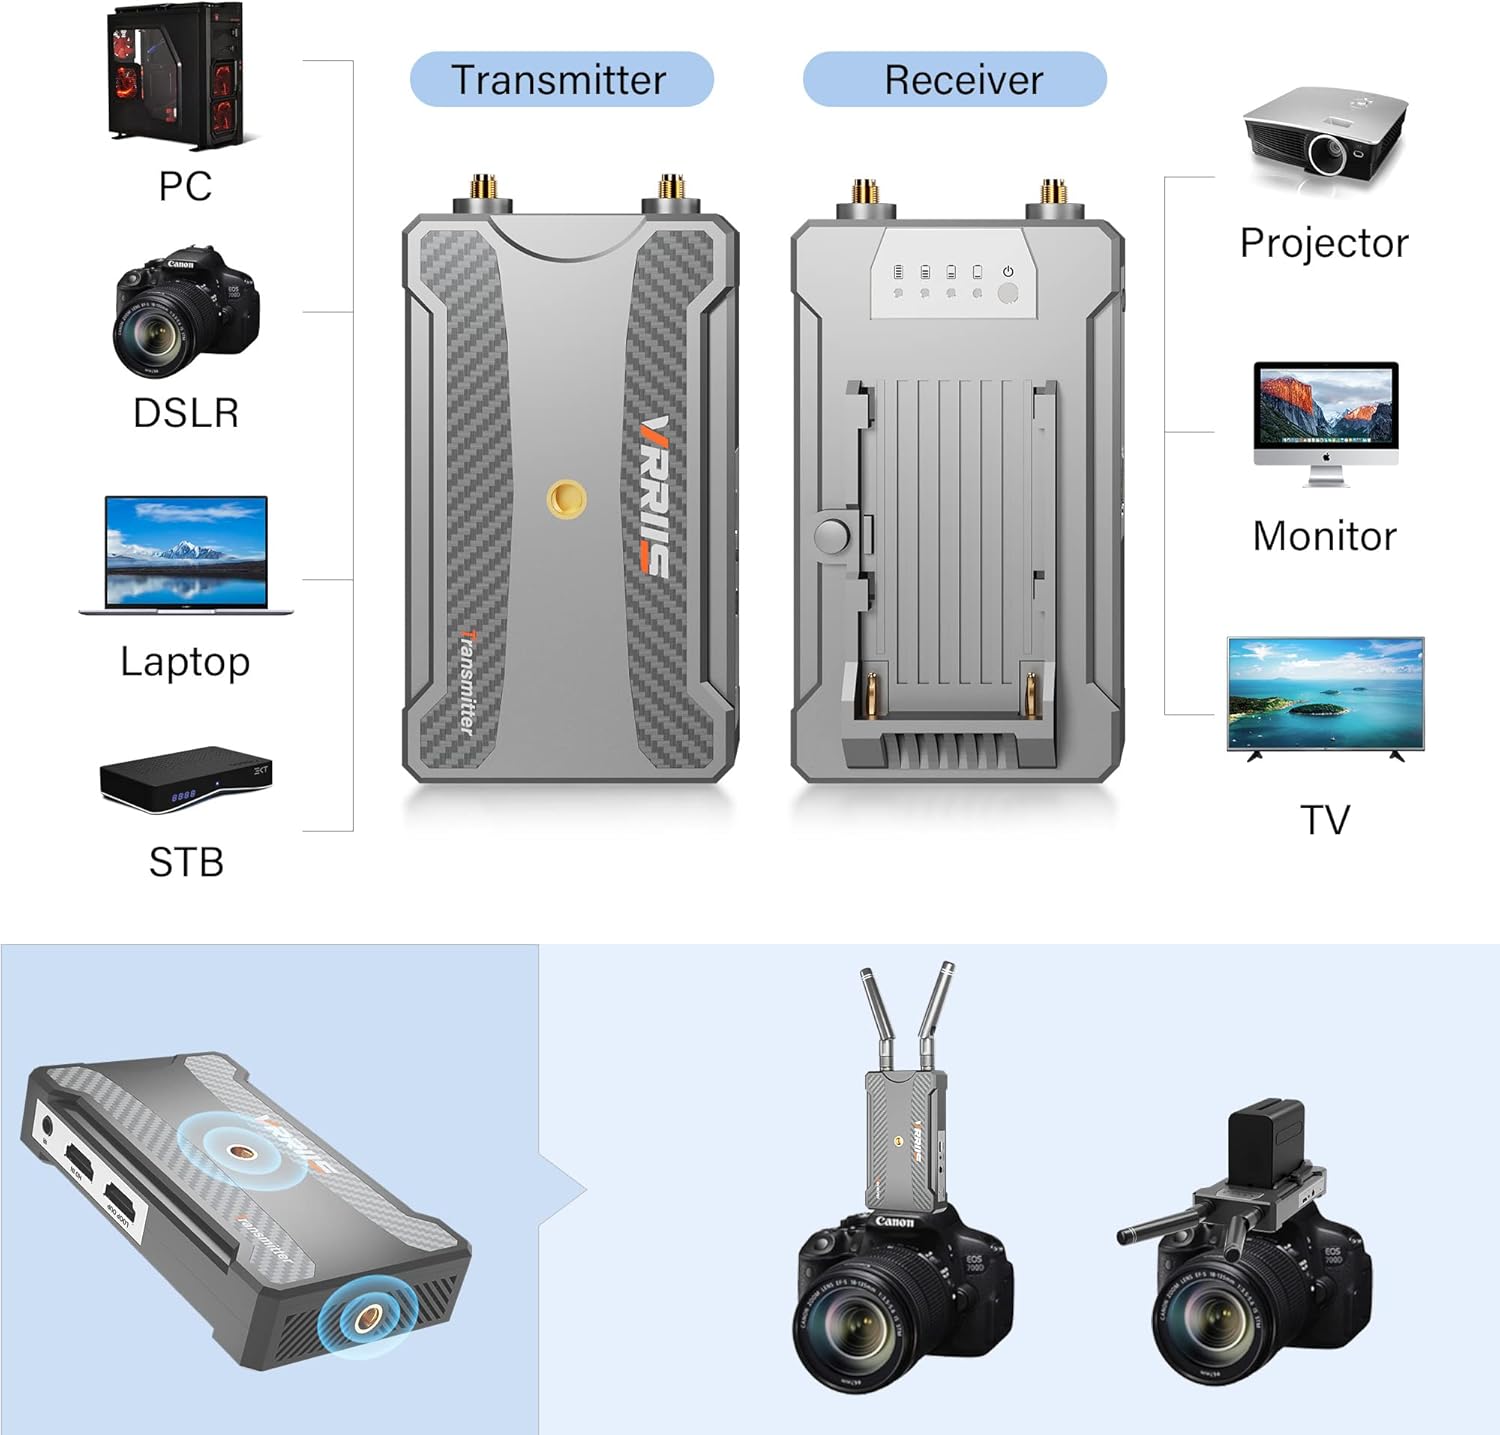
Figure 4: Visual representation of compatible devices such as PCs, DSLRs, Laptops, STBs, Projectors, Monitors, and TVs, along with setup examples for the transmitter and receiver.
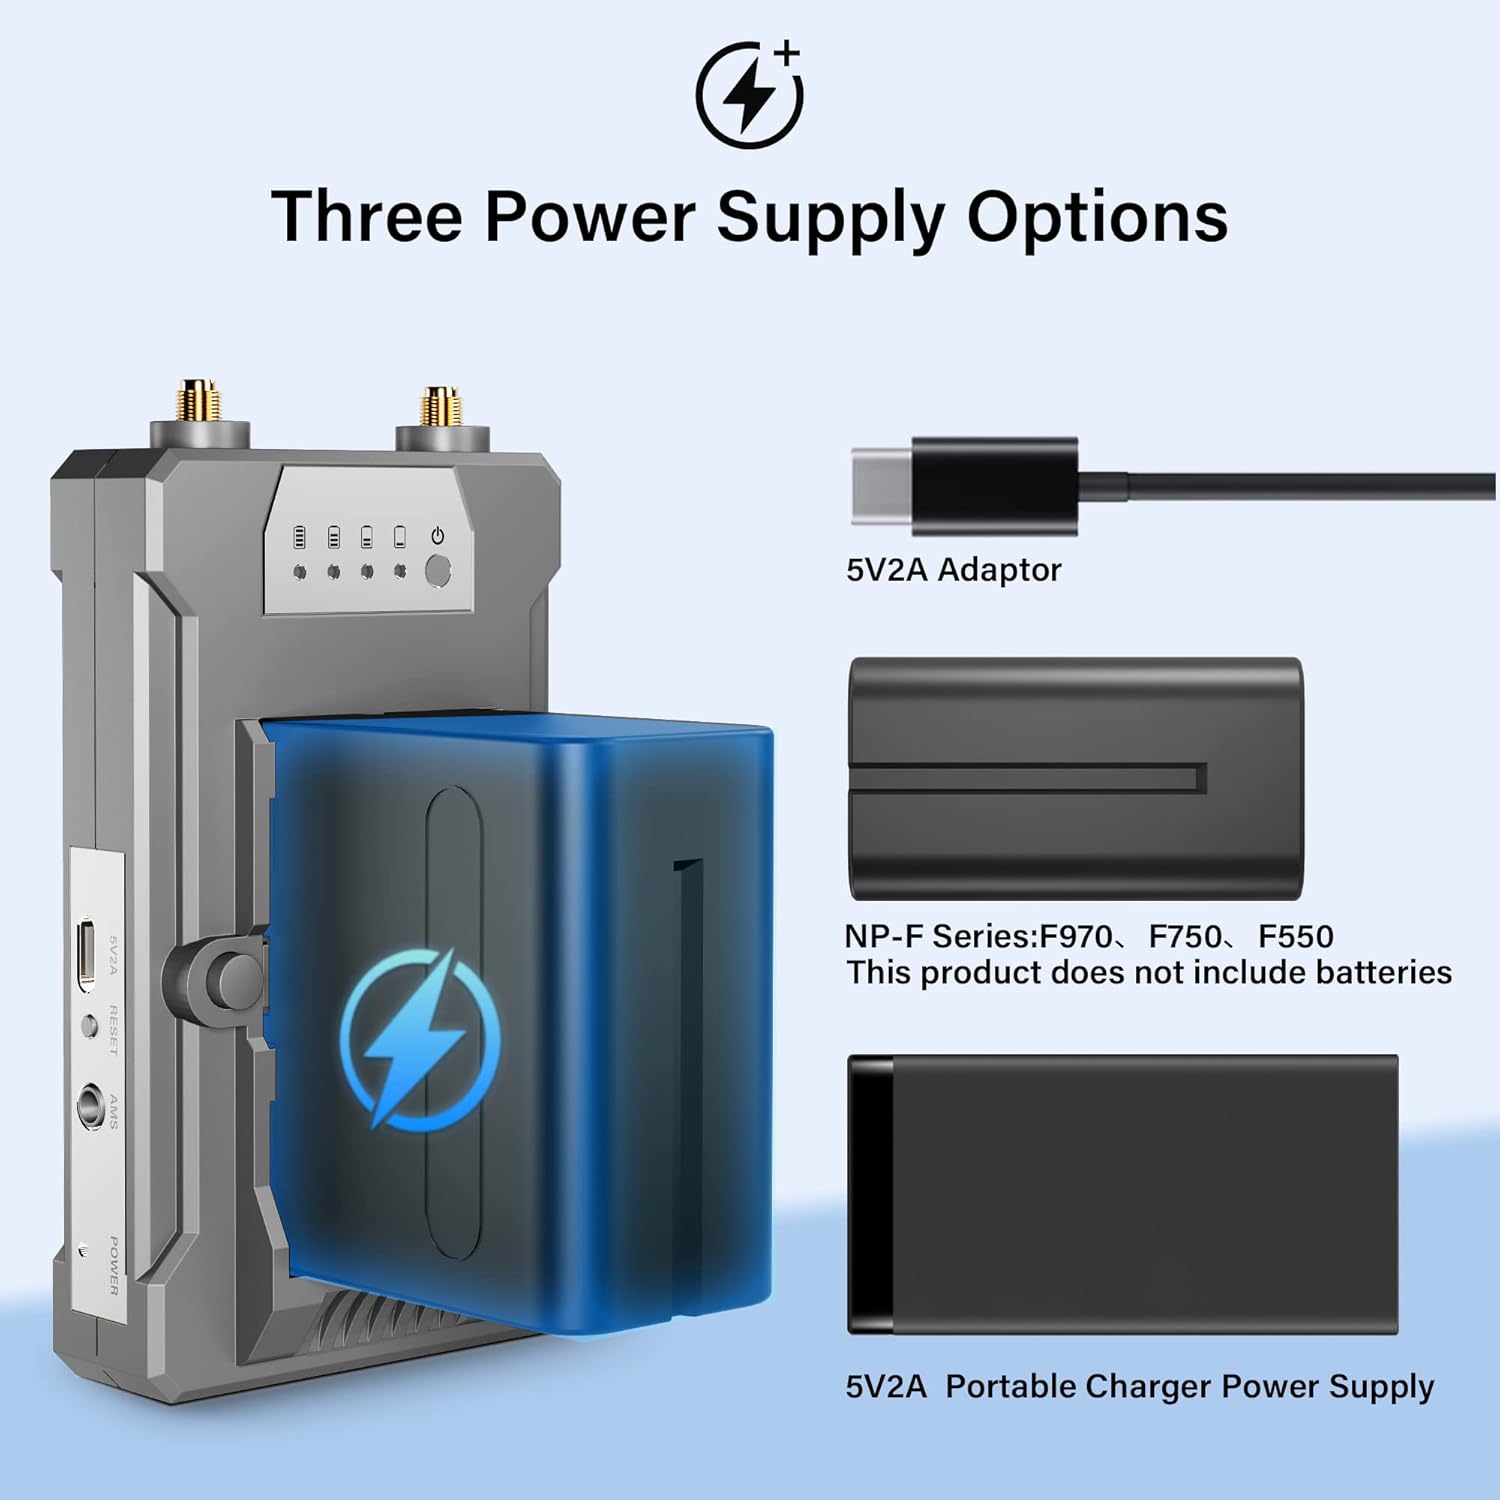
Figure 5: Illustration of the three power supply options: 5V2A adapter, NP-F series batteries (F970, F750, F550), and 5V2A portable charger power supply.
4. Opsætningsvejledning
- Strømforsyning til enhederne:
- Connect the Transmitter (TX) and Receiver (RX) to a 5V2A power adapter using the provided USB-C cables. The red light on the units will illuminate, indicating power.
- Alternatively, attach a compatible NP-F series battery (F970, F750, F550) to the battery plate on the back of each unit. Ensure the battery is securely latched.
- For portable use, connect a 5V2A portable rechargeable power bank to the USB-C port.
- Connecting the Transmitter (TX):
- Connect your HDMI source device (e.g., PC, DSLR, Laptop, STB) to the HD IN port on the Transmitter using an HDMI cable.
- (Optional) For local monitoring, connect an HDMI cable from the Loop-out port on the Transmitter to a local display (e.g., monitor, TV).
- (Optional) If using IR remote control, connect the IR cable to the IR port on the Transmitter and position the IR emitter near the IR receiver of your source device.
- Connecting the Receiver (RX):
- Tilslut et HDMI-kabel fra HD UD port on the Receiver to your display device (e.g., TV, Projector, Monitor).
- (Optional) If using IR remote control, connect the IR cable to the IR port on the Receiver and position the IR receiver in a location where your remote control can easily send signals to it.
- Montering af antenner:
- Screw the four provided antennas securely onto the antenna ports of both the Transmitter and Receiver units. Ensure they are tightened but do not overtighten.

Figure 6: The Transmitter and Receiver units with antennas attached, ready for operation.
5. Betjeningsvejledning
- Tænd: Once all connections are made and power is supplied, the units will automatically power on. The indicator lights will show their status.
- Parring:
- The Transmitter and Receiver units are typically pre-paired from the factory. Upon powering on, they should automatically establish a connection.
- If pairing is not successful, press and hold the reset button on both the Transmitter and Receiver for 2 seconds. The light will turn green when pairing is successful. Repeat if necessary.
- Signaloverførsel:
- Ensure your HDMI source device is powered on and outputting a signal.
- The display connected to the Receiver should now show the video and audio from your source device.
- For optimal performance, ensure a clear line of sight between the Transmitter and Receiver. While the system can transmit through walls, performance may vary depending on wall materials and thickness.
- IR-fjernbetjening (valgfrit):
- With the IR cables connected as described in the setup section, you can use your source device's remote control from the receiver's location. Point the remote at the IR receiver connected to the RX unit. The signal will be transmitted back to the TX unit and then to your source device.
- En-til-mange-tilstand:
- To use multiple receivers (up to 4), simply power on and pair each additional receiver with the single transmitter.
- Note that adding more receivers may slightly reduce the maximum transmission distance.

Figure 7: Quick matching guide for the Vrriis 900S system, detailing the pairing process.
6. Vedligeholdelse
- Hold enhederne rene og fri for støv. Brug en blød, tør klud til rengøring.
- Undgå at udsætte enhederne for ekstreme temperaturer, fugtighed eller direkte sollys.
- Do not disassemble the units. This will void the warranty and may cause damage.
- Ensure proper ventilation around the units during operation to prevent overheating.
7. Fejlfinding
| Problem | Mulig årsag | Løsning |
|---|---|---|
| Intet signal på displayet. |
|
|
| Poor video quality/flickering. |
|
|
| IR-fjernbetjeningen virker ikke. |
|
|
| Low battery warning (red light flashing). |
|
|
8. Specifikationer
| Feature | Detalje |
|---|---|
| Produktdimensioner | 4.74 x 2.75 x 1.8 tommer |
| Varens vægt | 10.2 ounce |
| Varemodelnummer | 900S |
| Mærke | Vrriis |
| Forbindelsesteknologi | Trådløs |
| Controller type | IR FJERNBETJENING |
| Speciel funktion | trådløs |
| Kompatible enheder | PC, TV,DSLR, Projector, laptop |
| Total HDMI-porte | 3 |
| Connector Type | HDMI |
| Lydudgangstilstand | Stereo, Surround |
| Surround Sound Kanalkonfiguration | 4 |
| Video kodning | AVI/MPEG/DivX/MOV/ASF/WMV/RMVB/QuickTime |
9. Garanti og support
The Vrriis 900S Wireless Video Transmission System is backed by a 1 års begrænset garanti. For any questions, concerns, or technical assistance, please contact Vrriis customer support directly. You can typically find contact information on the official Vrriis webwebsted eller via din købsplatform.
For further assistance, please visit the official Vrriis Store: Vrriis Store on Amazon.