
Advance Paris A12 Classic (Model 6802367)
Advance Paris A12 Classic Stereo Hi-Fi Amplivligere
Brugermanual - Model 6802367
1. Introduktion
Thank you for choosing the Advance Paris A12 Classic Stereo Hi-Fi Amplifier. Denne high-fidelity amplifier is designed to deliver exceptional audio performance with its powerful amplification, sophisticated tube pre-amplifikation stage, and extensive connectivity options. To ensure optimal performance and longevity of your device, please read this manual thoroughly before operation.
Vigtige sikkerhedsinstruktioner
- Læs instruktionerne: Alle sikkerheds- og betjeningsinstruktioner skal læses, før produktet tages i brug.
- Gem instruktionerne: Sikkerheds- og betjeningsvejledningen skal opbevares til fremtidig reference.
- Vær opmærksom på advarsler: Alle advarsler på produktet og i betjeningsvejledningen skal overholdes.
- Følg instruktionerne: Alle betjenings- og brugsanvisninger skal følges.
- Rensning: Tag dette produkt ud af stikkontakten før rengøring. Brug ikke flydende rengøringsmidler eller aerosolrens. Brug annonceamp klud til rengøring.
- Vand og fugt: Brug ikke dette produkt i nærheden af vand - f.eksample, nær et badekar, vaskeskål, køkkenvask, vaskekar, i en våd kælder eller nær en swimmingpool.
- Ventilation: Slidser og åbninger i kabinettet er tilvejebragt til ventilation og for at sikre pålidelig drift af produktet og for at beskytte det mod overophedning. Disse åbninger må ikke blokeres eller tildækkes.
- Strømkilder: Dette produkt bør kun betjenes fra den type strømkilde, der er angivet på mærkatet. Hvis du ikke er sikker på typen af strømforsyning til dit hjem, skal du kontakte din produktforhandler eller det lokale elselskab.
- Strømkabelbeskyttelse: Strømforsyningsledninger skal placeres, så de ikke er tilbøjelige til at blive trådt på eller klemt af genstande, der er placeret på eller imod dem, og vær særlig opmærksom på ledninger ved stik, stikkontakter og det sted, hvor de kommer ud af produktet.
- Lyn: For yderligere beskyttelse af dette produkt under tordenvejr, eller når det efterlades uden opsyn og ubrugt i længere perioder, skal du tage det ud af stikkontakten og afbryde antennen eller kabelsystemet. Dette vil forhindre skader på produktet på grund af lynnedslag og overspænding i strømforsyningen.
- Overbelastning: Overbelast ikke stikkontakter, forlængerledninger eller integrerede stikkontakter, da dette kan medføre risiko for brand eller elektrisk stød.
- Objekt og væskeindgang: Skub aldrig genstande af nogen art ind i dette produkt gennem åbninger, da de kan røre ved farlig voltage punkter eller kortslutte dele, der kan resultere i brand eller elektrisk stød. Spild aldrig væske af nogen art på produktet.
- Service: Forsøg ikke selv at servicere dette produkt, da åbning eller fjernelse af dæksler kan udsætte dig for farlig voltage eller andre farer. Overlad al service til kvalificeret servicepersonale.
2. Produktet er slutview
Frontpanel
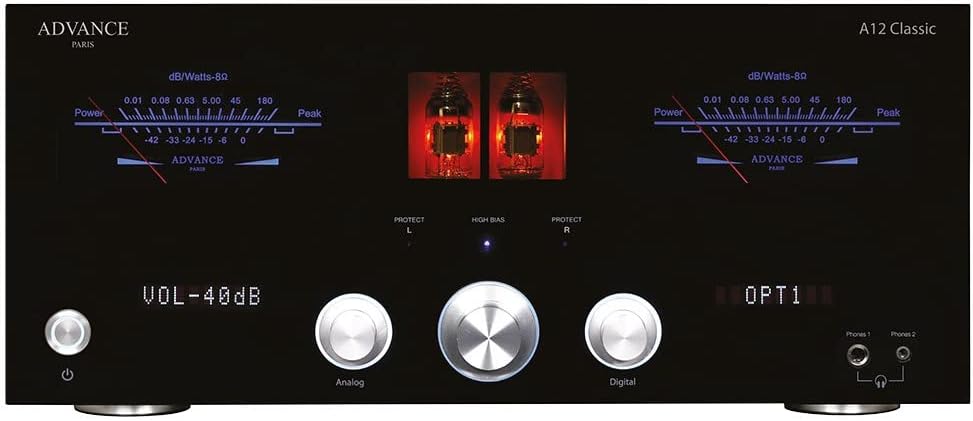
Figur 2.1: Front view of the Advance Paris A12 Classic amplifier. The front panel features a sleek black finish with a central display indicating volume and selected input. Two prominent VU meters provide visual feedback on output levels, while illuminated windows showcase the pre-amplification tubes. Controls include a large central volume knob, input selection buttons, and a power button.
Bagpanel

Figur 2.2: Bag view of the Advance Paris A12 Classic amplifier. The rear panel is equipped with a comprehensive selection of input and output terminals. These include balanced XLR inputs, multiple RCA analog inputs, digital inputs (optical, coaxial, USB-B), HDMI ARC, and a phono input with MM/MC selection. Speaker binding posts are robust and clearly labeled for left and right channels. A voltage selector switch is also visible.
Indvendigt design
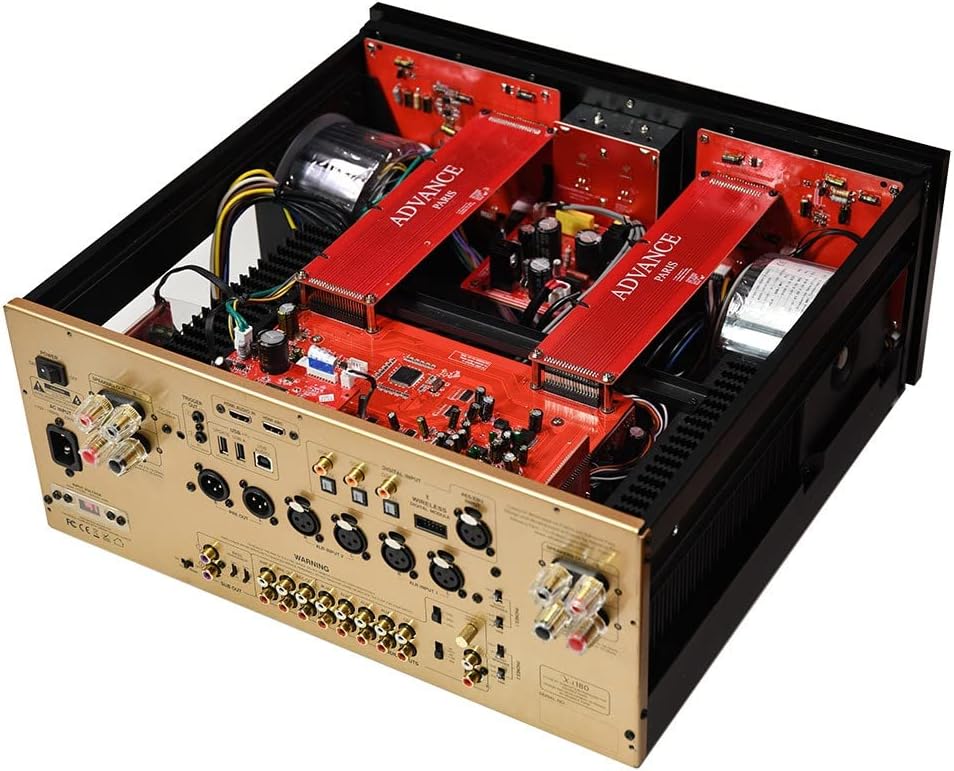
Figur 2.3: Vinklet indvendig view of the Advance Paris A12 Classic amplifier. This image highlights the amplifier's robust internal construction, featuring a dual-mono design. Two large toroidal transformers are visible, positioned on either side of the chassis, indicating dedicated power supplies for each channel. The red circuit boards are neatly arranged, showcasing the high-quality components and meticulous engineering.
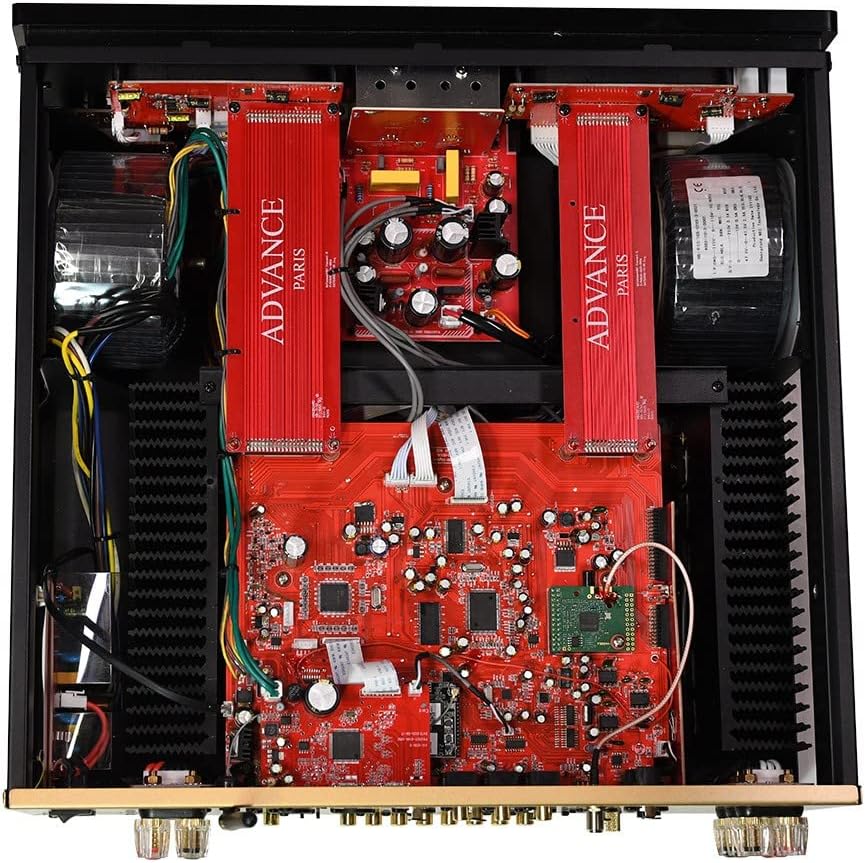
Figur 2.4: Top-down internal view of the Advance Paris A12 Classic amplifier. This perspective clearly shows the symmetrical layout of the internal components, reinforcing the dual-mono architecture. Large heat sinks are visible along the sides, ensuring efficient thermal management. The intricate network of circuit boards and wiring demonstrates the complex yet organized design aimed at delivering high-fidelity audio.
3. Opsætning
3.1 Udpakning
- Fjern forsigtigt ampfjerner fra emballagen.
- Retain all packaging materials for future transport or servicing.
- Undersøg amplifier for any signs of damage. If damage is present, do not connect the unit and contact your dealer.
3.2 Placering
- Placer amplifier on a stable, level surface away from direct sunlight, heat sources, or excessive moisture.
- Ensure adequate ventilation around the unit. Do not block the ventilation openings on the top or sides. Allow at least 10 cm (4 inches) of clear space above and around the amplivligere.
- Undgå at placere amplifier near strong electromagnetic fields, such as those generated by large transformers or motors, which could introduce hum or interference.
3.3 Tilslutning af højttalere
- Sørg for ampApparatet er slukket og frakoblet strømnettet.
- Connect your speakers to the corresponding speaker terminals on the rear panel. Ensure correct polarity: connect the positive (+) terminal of the amptil den positive (+) terminal på højttaleren, og den negative (-) terminal på amptil højttalerens negative (-) terminal.
- The A12 Classic supports speakers with an impedance of 4 to 8 Ohms. Ensure your speakers' impedance is within this range.
- Use high-quality speaker cables for optimal sound transmission.
3.4 Tilslutning af lydkilder
The A12 Classic offers a wide range of input options:
- Analog Inputs (RCA/XLR): Connect your CD player, tuner, or other analog sources to the RCA (CD, AUX1, AUX2, AUX3) or balanced XLR (XLR1, XLR2) inputs.
- Phono-indgang (MM/MC): Connect your turntable to the PHONO input. Use the switch next to the input to select between Moving Magnet (MM) or Moving Coil (MC) cartridge types, matching your turntable's cartridge.
- Digital Inputs (Optical/Coaxial/USB-B): Connect digital sources like a network streamer, TV, or computer to the OPTICAL (OPT1, OPT2, OPT3), COAXIAL (COAX1, COAX2), or USB-B inputs. The integrated DAC supports PCM streams up to 32 Bits / 384 kHz.
- HDMI ARC: Connect your TV's HDMI ARC output to the amplifier's HDMI ARC input for audio return channel functionality.
- USB-A (Update/Audio): The USB-A ports are primarily for firmware updates and potentially for connecting USB storage devices for audio playback (refer to future firmware updates for full functionality).
3.5 Strømtilslutning
- Før du tilslutter netledningen, skal du sørge for at lydstyrken er korrekt.tage selector switch on the rear panel is set to your local mains voltage (115V eller 230V).
- Connect the supplied power cord to the AC INLET on the rear panel of the ampog derefter til en passende stikkontakt.
- Do not power on the unit until all other connections are made.
4. Betjening
4.1 Grundlæggende kontroller
- Tænd/sluk: Tryk på tænd/sluk-knappen på frontpanelet eller fjernbetjeningen for at tænde amplivligere til eller fra.
- Lydstyrkekontrol: Rotate the large central knob on the front panel or use the volume buttons on the remote control to adjust the listening volume.
- Valg af input: Use the input selection buttons on the front panel or the remote control to cycle through the available audio sources (Analog, Digital, Phono, HDMI). The selected input will be displayed on the front panel.
4.2 Avancerede funktioner
- High Bias Mode: The A12 Classic features a 'High Bias' switch on the rear panel. When activated, this mode allows the amplifier to operate in Class A for the first few watts of output, providing a purer and more refined sound quality, especially at lower listening levels.
- Integreret DAC: The built-in Digital-to-Analog Converter (DAC) allows you to connect digital audio sources directly to the amplifier, bypassing the need for an external DAC. It supports high-resolution audio files, ensuring excellent sound reproduction from your digital library.
- Pre-Out/Sub Out: De amplifier includes pre-out connections for connecting an external power amplifier or active subwoofer, offering flexibility for system expansion.
5. Vedligeholdelse
- Rensning: Træk altid stikket ud amplifier from the power outlet before cleaning. Use a soft, dry, lint-free cloth to wipe the surfaces. For stubborn marks, a slightly damp cloth can be used, but ensure no moisture enters the unit. Avoid using abrasive cleaners, solvents, or chemical sprays.
- Ventilation: Periodically check that the ventilation openings are clear of dust and debris. Use a soft brush or a vacuum cleaner with a brush attachment to gently remove any accumulation.
- Rørpleje: Pre-amplification tubes have a finite lifespan. If you notice a degradation in sound quality or unusual noise, the tubes may need replacement. This should be performed by qualified service personnel.
- Forbindelser: Kontrollér lejlighedsvis alle kabelforbindelser for at sikre, at de er fastgjorte og fri for korrosion.
6. Fejlfinding
If you experience any issues with your Advance Paris A12 Classic amplifier, please consult the table below for common problems and their solutions. If the problem persists, contact your dealer or qualified service personnel.
| Problem | Mulig årsag | Løsning |
|---|---|---|
| Ingen strøm | Netledning ikke tilsluttet; Stikkontakt defekt; Amplifier i standbytilstand. | Ensure power cord is securely connected. Try a different power outlet. Press the power button on the front panel or remote. |
| Ingen lyd | Incorrect input selected; Speaker cables disconnected or incorrectly connected; Volume too low; Mute function activated; Source device not playing. | Select the correct input. Check all speaker cable connections for correct polarity. Increase volume. Deactivate mute. Ensure source device is playing audio. |
| Forvrænget lyd | Input signal too strong; Speaker impedance mismatch; Faulty cables; Damaged speakers. | Reduce volume on source device. Verify speaker impedance (4-8 Ohms). Check and replace faulty cables. Test with different speakers if possible. |
| Brummen eller støj | Ground loop; Interference from other electronics; Faulty cables. | Ensure all components are properly grounded. Move amplifier away from other electronic devices. Replace suspect cables. |
| Fjernbetjening virker ikke | Batteries depleted; Obstruction between remote and ampFjernbetjeningssensor blokeret. | Replace batteries. Remove any obstructions. Ensure remote sensor on amplifer er klar. |
7. Specifikationer
| Feature | Specifikation |
|---|---|
| Mærke | Advance Paris |
| Modelnummer | 6802367 |
| Strømudgang | 2 x 190 Watts (into 8 Ohms) |
| før-amplifikation Stage | Tube-based |
| DAC-kompatibilitet | PCM up to 32 Bits / 384 kHz |
| Analoge indgange | RCA, XLR, Phono (MM/MC) |
| Digitale indgange | Optical, Coaxial, USB-B, HDMI ARC |
| Højttalerimpedans | 4 - 8 ohm |
| Strømforsyning | Dual Toroidal Transformers |
| Class Operation | Class AB with High Bias (Class A on first watts) |
| ASIN | B0BKS5119B |
| Udgivelsesdato på Amazon.com.be | 19. januar 2023 |
8. Garanti og support
Advance Paris products are designed and manufactured to the highest quality standards. For information regarding your product's warranty, please refer to the warranty card included with your purchase or contact your authorized Advance Paris dealer. For technical support or service inquiries, please reach out to your point of purchase or visit the official Advance Paris webwebsted for kontaktoplysninger.
Ask a question about this manual
Ask about setup, troubleshooting, compatibility, parts, safety, or missing instructions. Manuals+ will review the question and use this page’s manual context to help answer it.