Indledning
This manual provides essential information for the safe and effective use of your YATO Angle Grinder Dust Shroud, model YT-82988. This accessory is designed to collect dust and debris generated during grinding and cutting operations with compatible angle grinders, improving workplace safety and cleanliness. Please read these instructions carefully before assembly, operation, or maintenance.
Sikkerhedsinstruktioner
Always observe general power tool safety rules when using this dust shroud. Failure to follow these instructions may result in serious injury or property damage.
- Personligt beskyttelsesudstyr (PPE): Always wear appropriate PPE, including safety glasses, hearing protection, dust mask, and gloves.
- Arbejdsområde: Sørg for, at dit arbejdsområde er rent, godt oplyst og fri for forhindringer. Hold tilskuere og børn væk.
- Værktøjskompatibilitet: Only use this dust shroud with angle grinders that meet the specified compatibility requirements (M14 spindle thread, 28-36mm collar diameter, max 125mm disc diameter).
- Sikker vedhæftning: Sørg for, at støvdækslet er sikkert fastgjort til vinkelsliberen før brug.
- Støvsugning: Connect the dust shroud to a suitable vacuum cleaner or dust extractor for optimal dust collection.
- Inspektion: Before each use, inspect the dust shroud for any damage or wear. Do not use if damaged.
- Opretholdelse: Keep the dust shroud clean and free of debris to ensure proper function.
Produkt overview
The YATO YT-82988 dust shroud is designed for efficient dust extraction during angle grinding tasks. It features a robust construction and adjustable components for versatile use.
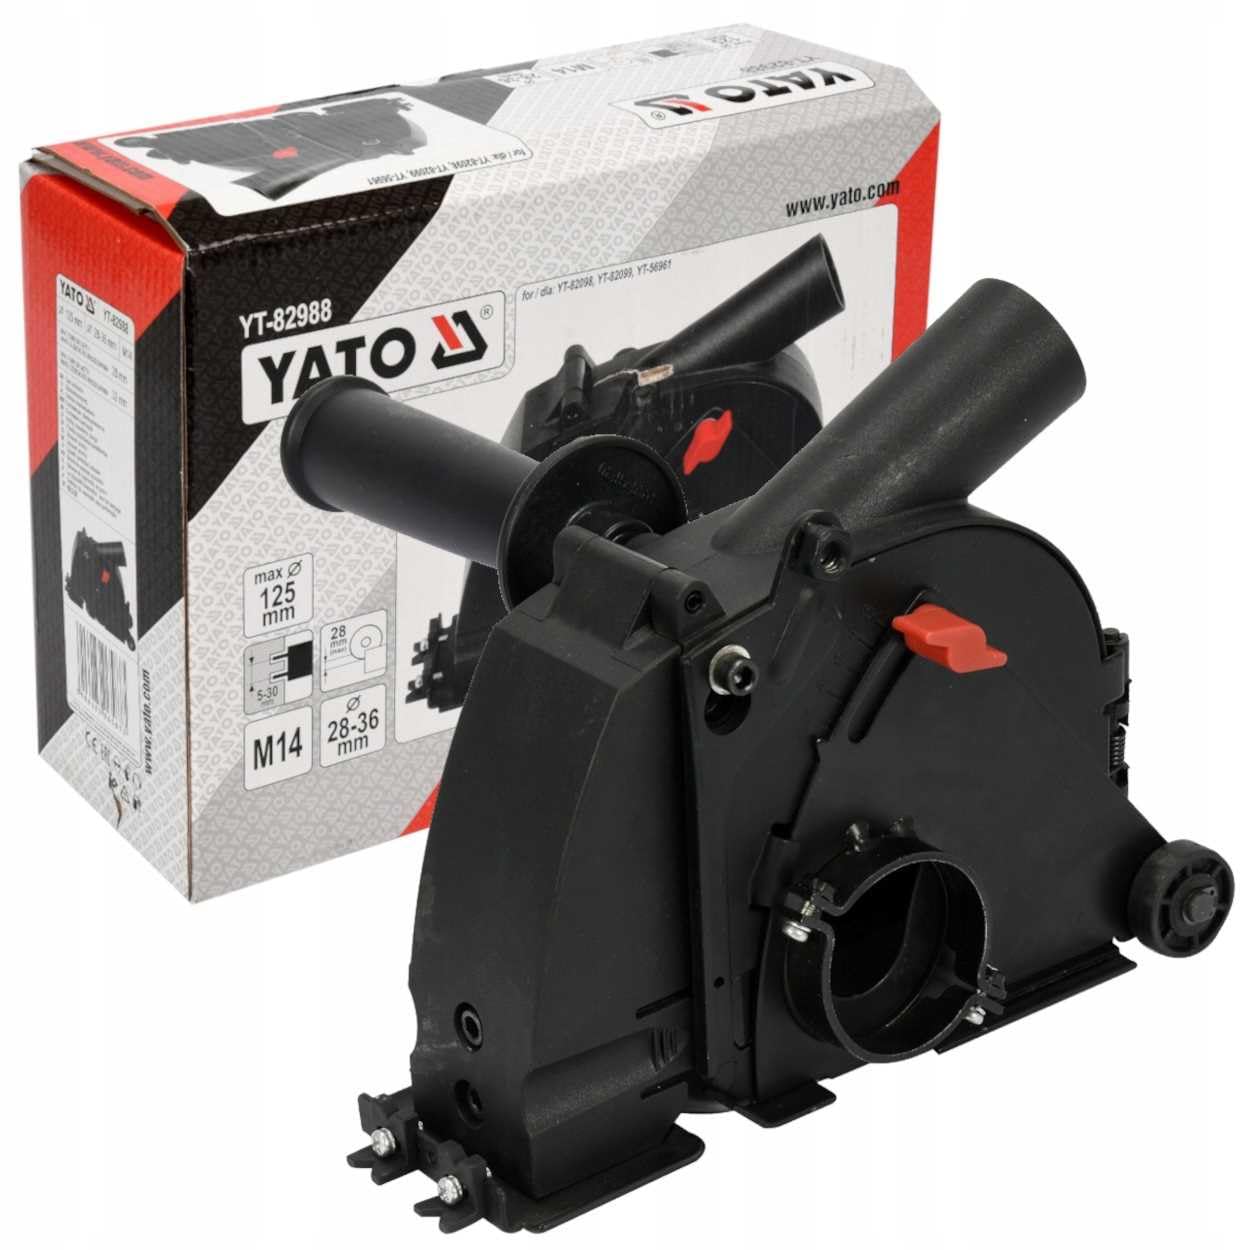
Figur 1: Samlet set view of the YATO Angle Grinder Dust Shroud YT-82988, showing the main body and auxiliary handle attachment point.

Figur 2: Side view of the dust shroud, highlighting the integrated wheels for smooth operation and the dust extraction port.
Nøglekomponenter:
- Hoveddel: Encloses the grinding disc to contain dust.
- Støvudsugningsport: Connects to a vacuum cleaner or dust extractor.
- Adjustable Depth Mechanism: Allows setting the cutting/grinding depth.
- Hjælpehåndtagsfastgørelse: Provides a secure grip during operation.
- Hjul: Facilitate smooth movement across the work surface.
Opsætning
Follow these steps to properly attach the dust shroud to your angle grinder.
- Prepare Angle Grinder: Ensure your angle grinder is unplugged and the grinding disc is removed. The angle grinder must have an M14 spindle thread and a collar diameter between 28-36mm.
- Attach Shroud: Løsn clamping mechanism on the dust shroud. Carefully slide the dust shroud over the angle grinder's gear housing until it sits firmly. Tighten the clampmekanisme sikkert.
- Install Grinding Disc: Install the appropriate grinding or cutting disc (maximum 125mm diameter) onto the angle grinder spindle, ensuring it is correctly seated and tightened.
- Fastgør hjælpehåndtag: Screw the auxiliary handle into the designated attachment point on the dust shroud. Ensure it is tightened firmly for safe operation.

Figure 3: Auxiliary handle securely attached to the dust shroud.
- Juster skæredybde: Use the red lever and scale on the side of the shroud to adjust the desired cutting or grinding depth. Ensure the adjustment is locked in place before use.

Figure 4: Detail of the red lever and scale for adjusting cutting depth.
- Connect Dust Extractor: Connect a suitable vacuum cleaner hose to the dust extraction port on the shroud. Ensure a tight connection for effective dust collection.
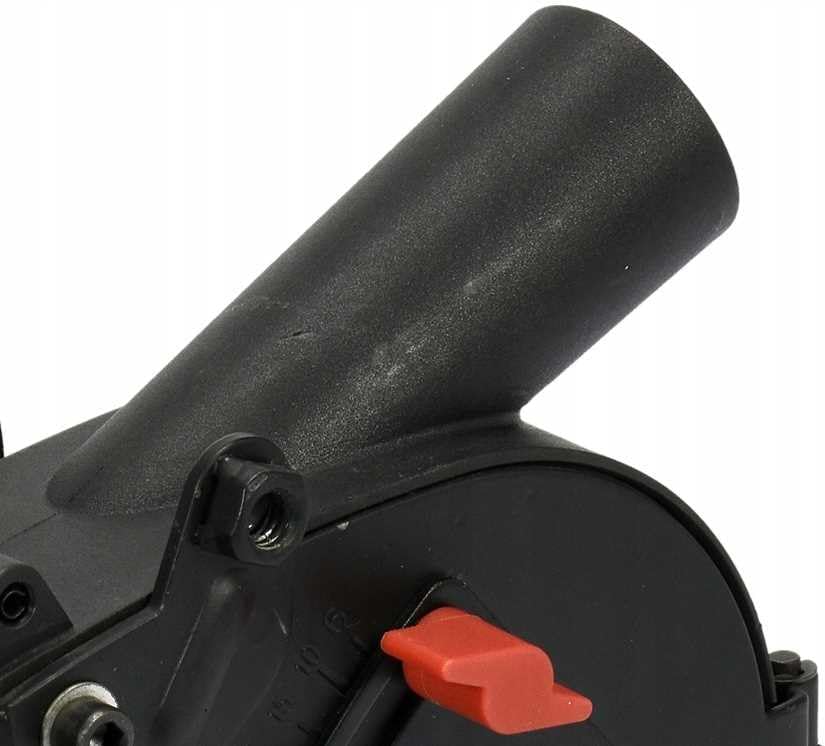
Figure 5: Dust extraction port for connecting a vacuum cleaner.
Betjeningsvejledning
Once the dust shroud is securely attached and the dust extractor is connected, you can begin operation.
- Tænd: Turn on the vacuum cleaner/dust extractor first, then switch on the angle grinder.
- Start arbejdet: Gently place the dust shroud onto the workpiece. The integrated wheels will help guide the tool smoothly. Apply even pressure and move the angle grinder steadily across the material.
- Bevar kontrol: Always maintain a firm grip on the angle grinder and auxiliary handle.
- Opsamling af skærmstøv: Periodically check the dust extractor to ensure it is functioning correctly and collecting debris.
- Afslut arbejde: Once the task is complete, lift the angle grinder from the workpiece, then switch off the angle grinder, followed by the vacuum cleaner/dust extractor.
Note: For edge grinding or cutting close to walls, the front segment of the shroud can be opened or removed (if applicable to your model) to allow closer access.

Figure 6: Front segment of the dust shroud opened for edge work.
Opretholdelse
Regelmæssig vedligeholdelse sikrer din støvskærms levetid og optimale ydeevne.
- Rensning: After each use, disconnect the dust shroud from the angle grinder and clean it thoroughly. Remove any accumulated dust or debris from the interior, dust port, and adjustable mechanisms. Use a brush or compressed air if necessary.
- Inspektion: Periodically inspect the shroud for cracks, damage, or excessive wear, especially on the wheels and clamping mechanism. Replace any damaged parts immediately.
- Opbevaring: Store the dust shroud in a clean, dry place, away from direct sunlight and extreme temperatures.
Fejlfinding
| Problem | Mulig årsag | Løsning |
|---|---|---|
| Dårlig støvopsamling | Dust port clogged; vacuum cleaner not powerful enough; hose connection loose; shroud not sealed properly. | Clean dust port and shroud interior; use a more powerful vacuum; ensure hose is tightly connected; check shroud attachment for gaps. |
| Shroud difficult to attach/remove | Clamping mechanism too tight/loose; angle grinder collar diameter incompatible; debris in clamping område. | Juster clamping mechanism; verify angle grinder compatibility (28-36mm collar); clean clamping område. |
| Uneven cutting depth | Depth adjustment not locked; wheels worn or damaged; uneven pressure during operation. | Ensure depth adjustment is securely locked; inspect and replace worn wheels; apply consistent pressure. |
Specifikationer
| Feature | Specifikation |
|---|---|
| Modelnummer | YT-82988 |
| Mærke | YATO |
| Compatible Disc Diameter (Max) | 125 mm |
| Compatible Angle Grinder Spindle Thread | M14 |
| Compatible Angle Grinder Collar Diameter | 28-36 mm |
| Varens vægt | 1.82 kg |
| Stil | Buet |
Garanti og support
For warranty information or technical support regarding your YATO Angle Grinder Dust Shroud YT-82988, please refer to the documentation provided with your purchase or contact YATO customer service directly. Keep your proof of purchase for warranty claims.