
1. Introduktion
This manual provides detailed instructions for the installation, operation, and maintenance of your Fractal Design Define 7 Nano Black Solid Mini ITX PC Case. Please read this manual thoroughly before beginning assembly to ensure proper installation and to maximize the performance and longevity of your system.
The Define 7 Nano is a compact Mini ITX case designed for silent operation and flexible component support, offering a balance of size and functionality for small form factor builds.

Figur 1: Forside view of the Fractal Design Define 7 Nano Black Solid Mini ITX PC Case.
2. Sikkerhedsoplysninger
Overhold følgende sikkerhedsforanstaltninger under installation og drift:
- Afbryd altid strømforsyningen fra stikkontakten, før du installerer eller fjerner komponenter.
- Brug en antistatisk håndledsrem for at forhindre elektrostatisk udladning (ESD) på følsomme komponenter.
- Håndter komponenterne forsigtigt for at undgå fysisk skade.
- Sørg for tilstrækkelig ventilation omkring pc-kabinettet for at forhindre overophedning.
- Hold etuiet væk fra væsker og for høj luftfugtighed.
- Do not attempt to modify the case structure, as this may void your warranty and pose safety risks.
3. Pakkens indhold
Bekræft at alle komponenter er til stede i pakken:
- Fractal Design Define 7 Nano PC Case
- Accessory Box (screws, zip ties, standoffs, cleaning cloth)
- Brugervejledning (dette dokument)
- Pre-installed fans (Dynamic X2 GP-12/GP-14, quantity may vary)

Figur 2: Eksploderet view showing the various removable components of the Define 7 Nano case.
4. Opsætning og komponentinstallation
4.1. Forberedelse
- Pak etuiet ud: Tag forsigtigt etuiet ud af emballagen.
- Fjern sidepaneler: The side panels are secured with captive thumbscrews. Loosen the thumbscrews and slide the panels backward to remove them.
- Remove Top Panel (Optional): The top panel can be removed for easier access during installation or for enhanced airflow. Press the release button at the rear of the top panel and lift it off.
- Remove Front Panel (Optional): The front panel can be carefully pulled off from the bottom for access to front fan mounts and dust filters.
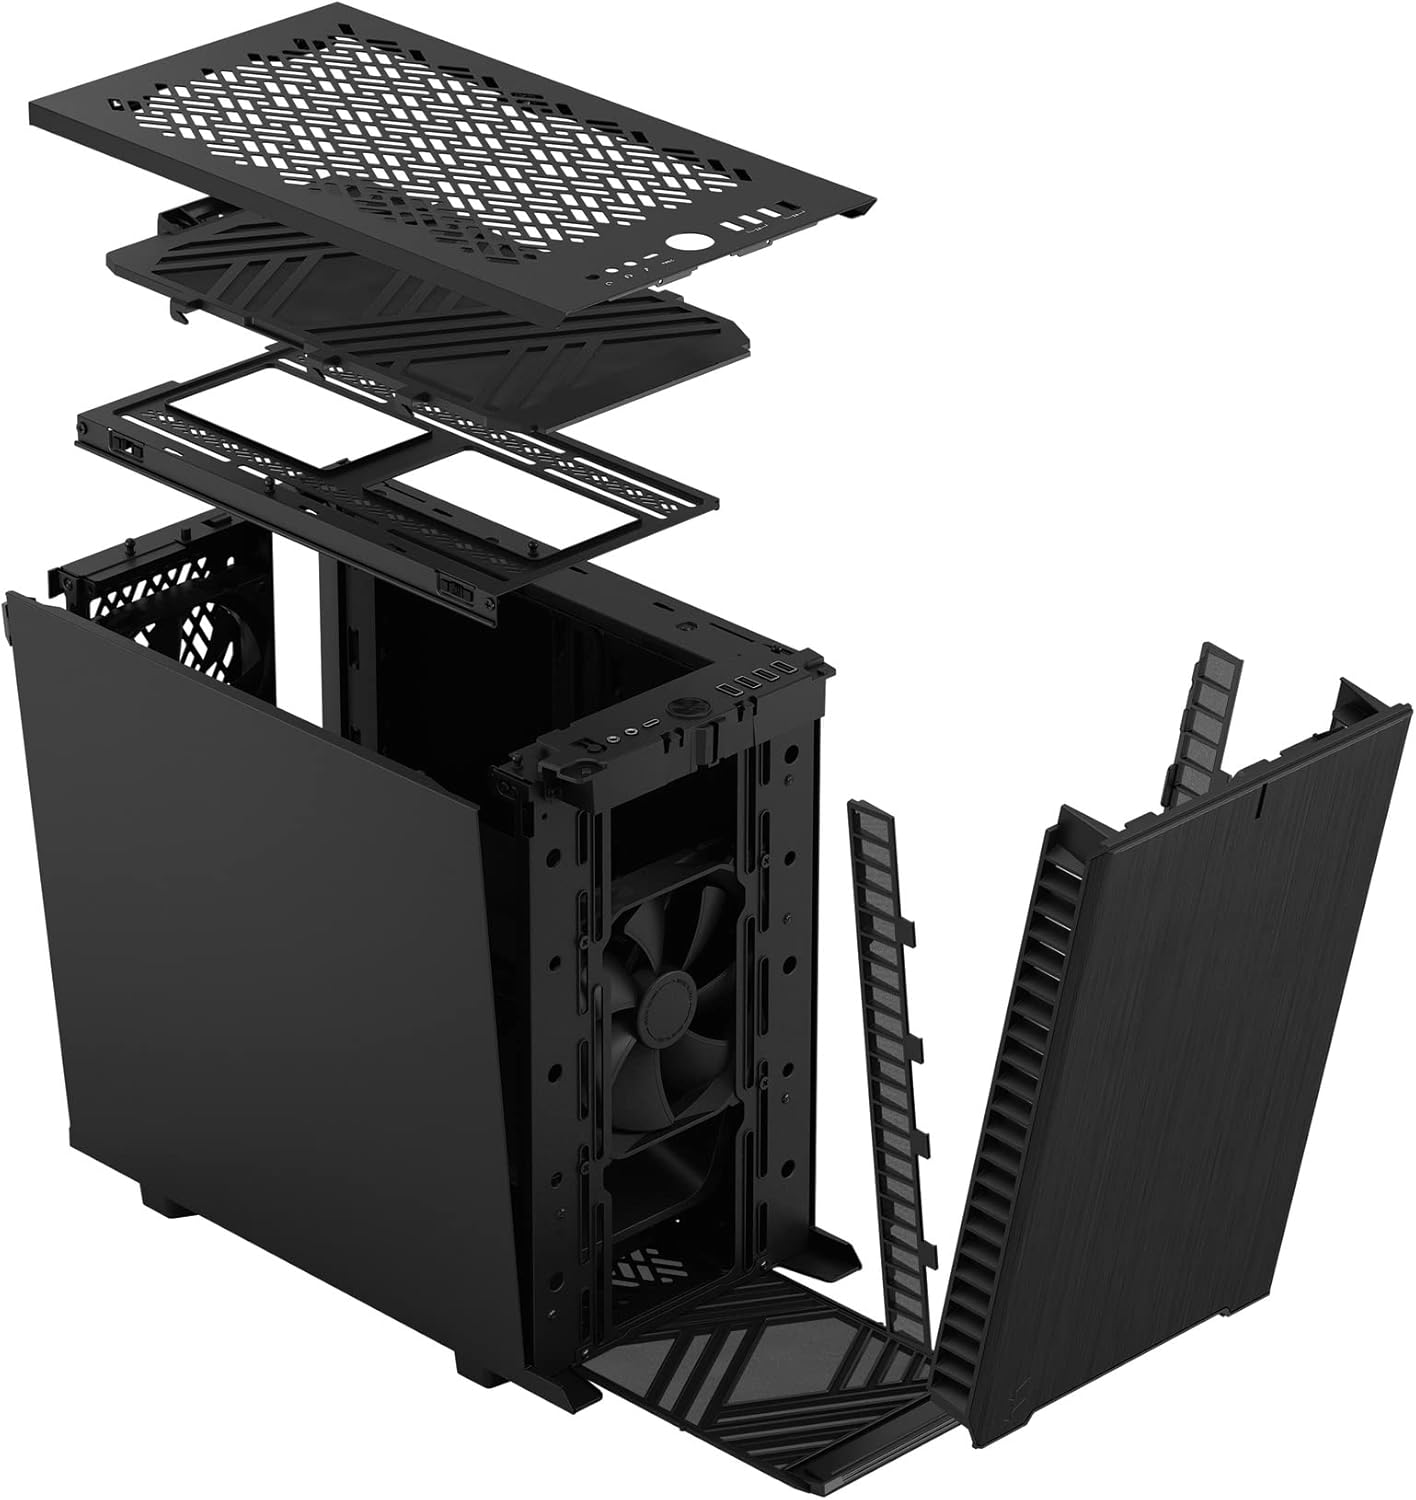
Figur 3: Eksploderet view illustrating the removal process for the front and top panels.
4.2. Installation af bundkort
The Define 7 Nano supports Mini ITX motherboards.
- Installer I/O-skjold: If your motherboard requires an I/O shield, install it into the rear opening of the case before mounting the motherboard.
- Placering af bundkort: Align your Mini ITX motherboard with the pre-installed standoffs inside the case.
- Sikkert bundkort: Use the provided screws from the accessory box to secure the motherboard to the standoffs.
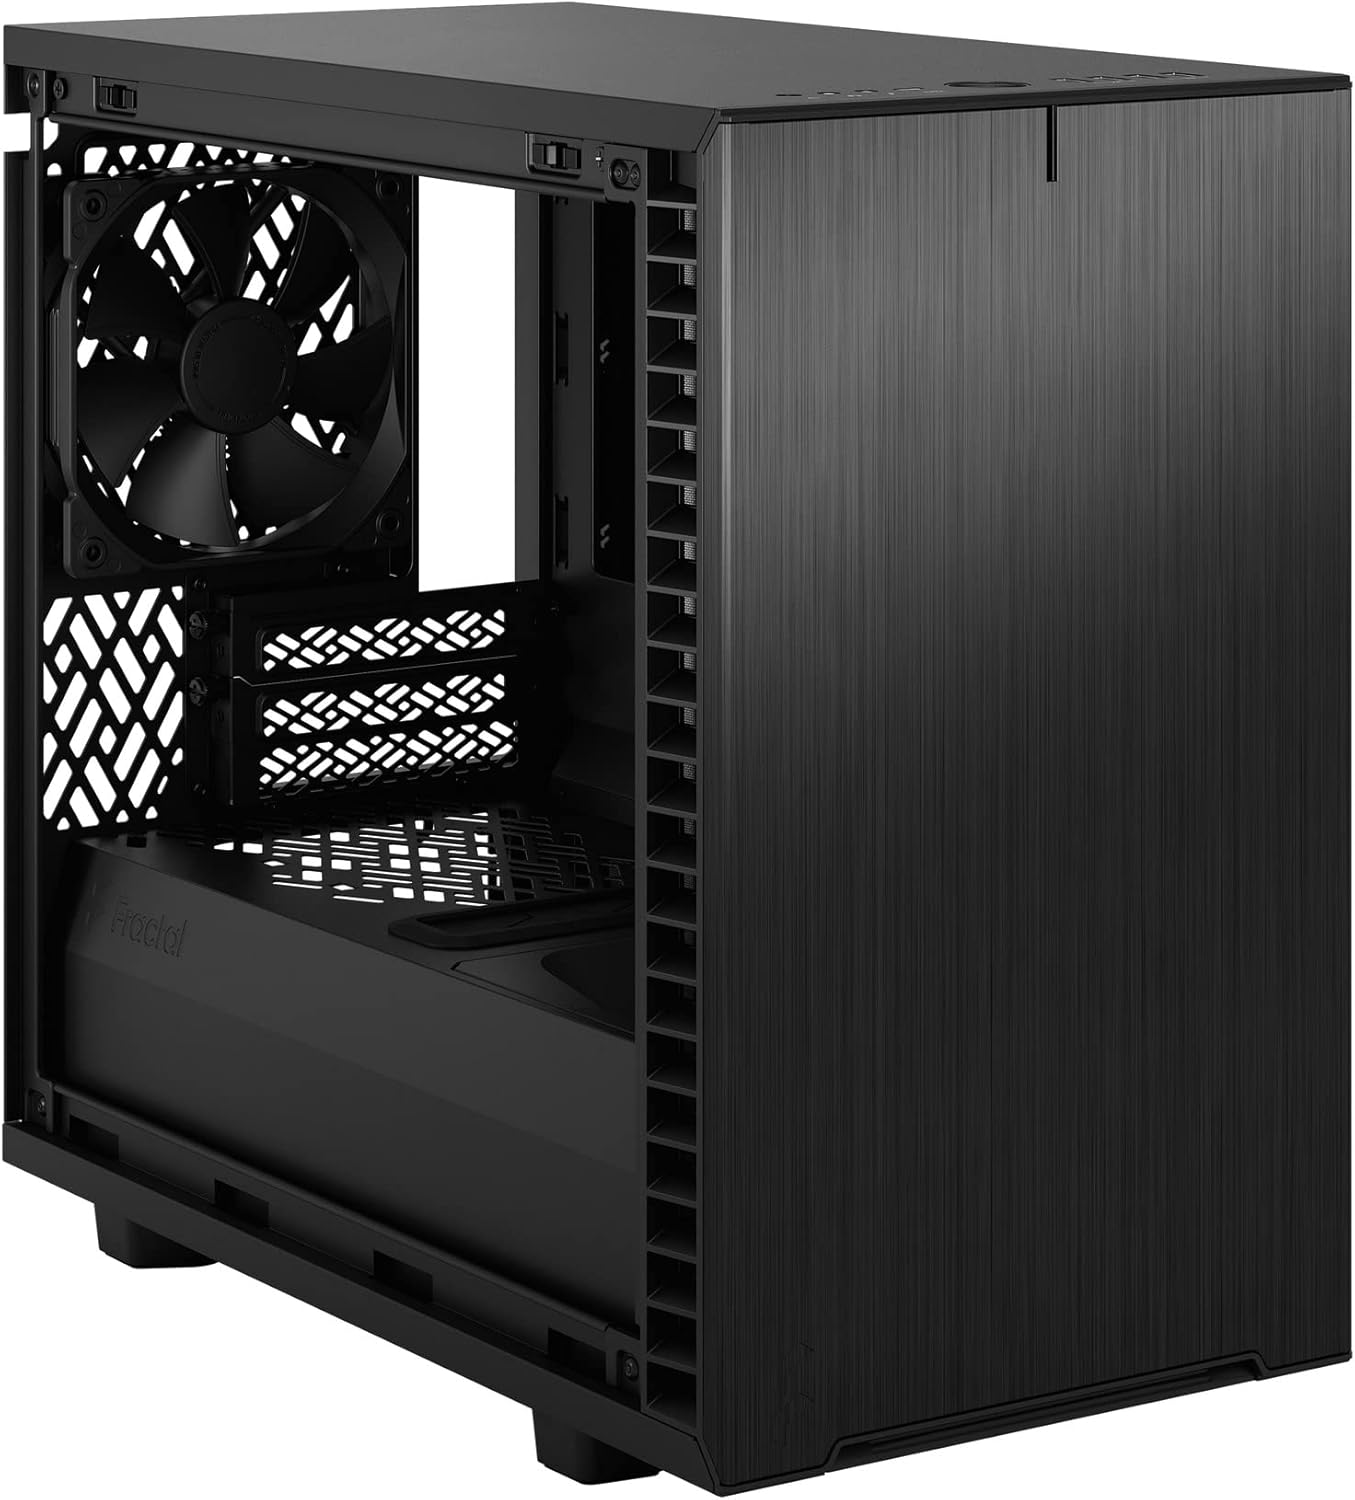
Figur 4: Interiør view of the case, highlighting the motherboard mounting area and fan locations.
4.3. Installation af strømforsyningsenhed (PSU)
The Define 7 Nano supports ATX PSUs.
- Mount PSU Bracket: Attach the PSU mounting bracket to your power supply using the screws provided with the PSU.
- Slide PSU into Case: Slide the PSU with the attached bracket into the rear of the case.
- Sikker strømforsyning: Secure the PSU bracket to the case using the thumbscrews.
4.4. Installation af lagerdrev
The case supports 2.5" SSDs and 3.5" HDDs.
- 2.5" Drives: Mount 2.5" drives to the dedicated SSD brackets located behind the motherboard tray or on the PSU shroud. Secure with screws.
- 3.5" Drives: Install 3.5" drives into the drive cage located beneath the PSU shroud. Secure with screws.
4.5. Installation af grafikkort (GPU)
- Fjern PCIe-slotdæksler: Fjern de nødvendige PCIe-slotdæksler fra bagsiden af kabinettet.
- Indsæt GPU: Carefully insert your graphics card into the primary PCIe slot on the motherboard.
- Sikker GPU: Secure the graphics card to the case using the thumbscrews or standard screws.
4.6. Cooling System Installation (Fans/Radiators)
The Define 7 Nano offers flexible cooling options.
- Frontventilatorer: Up to two 120/140mm fans or a 240/280mm radiator can be installed at the front.
- Topfans: Up to two 120/140mm fans or a 240mm radiator can be installed at the top (requires removing the solid top panel and installing the ventilated top panel).
- Bagventilator: One 120mm fan can be installed at the rear.
- Bottom Fan: One 120mm fan can be installed at the bottom.
Ensure fans are oriented correctly for optimal airflow (intake or exhaust).
4.7. Kabelforvaltning
The case features routing channels and Velcro straps behind the motherboard tray for organized cable management.
- Rute kabler: Pass power and data cables through the rubber grommets to the back of the motherboard tray.
- Sikre kabler: Use the pre-installed Velcro straps and included zip ties to bundle and secure cables.

Figur 5: Bageste interiør view demonstrating the cable management system with Velcro straps.
4.8. Tilslutninger på frontpanelet
Connect the front panel cables to the corresponding headers on your motherboard:
- Power Button (PWR SW)
- Reset Button (RESET SW)
- Power LED (PWR LED)
- HDD Activity LED (HDD LED)
- USB 3.0 header
- USB Type-C Header (if applicable)
- HD Audio Header
Refer to your motherboard manual for exact header locations.
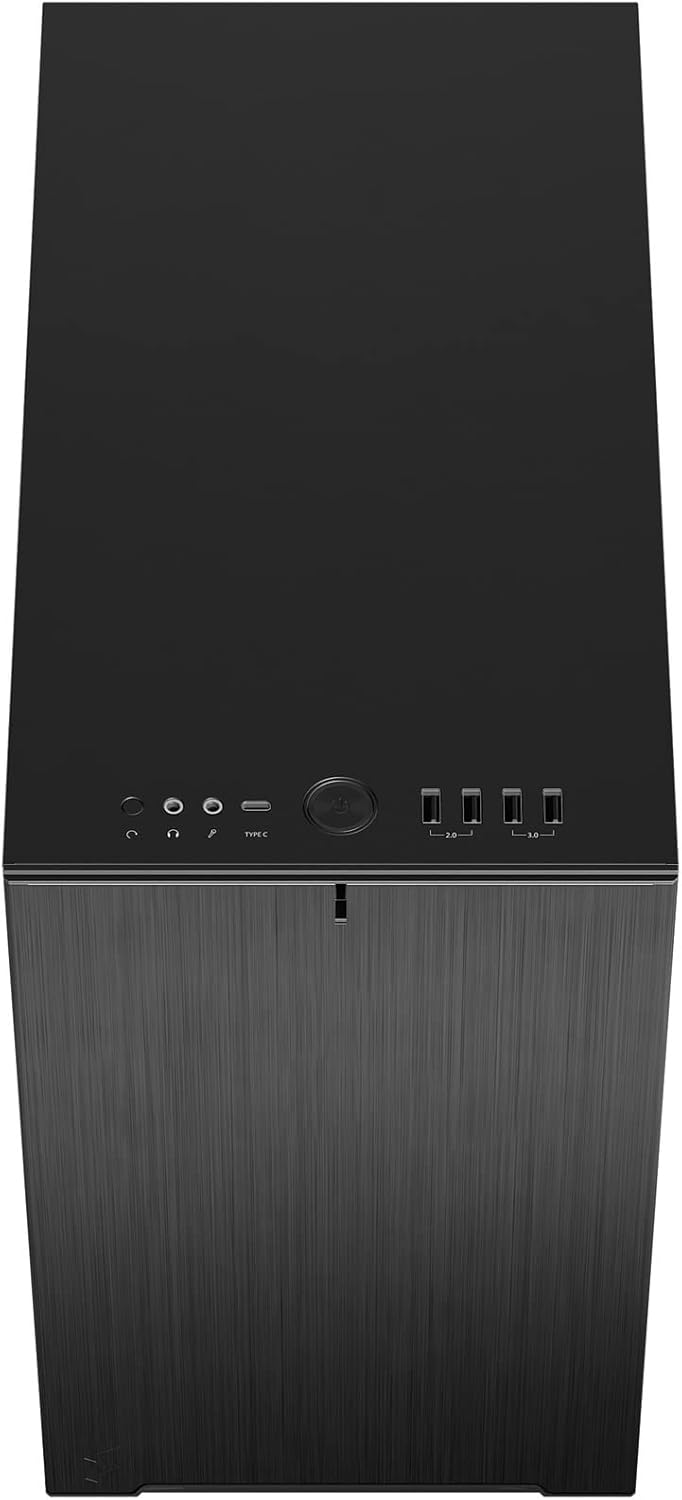
Figur 6: Top-front view displaying the front I/O panel with USB ports, audio jacks, and power button.
5. Betjeningsvejledning
5.1. Tænd/sluk
- Tænd: Press the power button located on the front I/O panel.
- Sluk: Initiate a shutdown from your operating system. Alternatively, press and hold the power button for 5 seconds for a forced shutdown.
5.2. Using Front Panel Ports
Det forreste I/O-panel giver nem adgang til:
- USB 3.0-porte: Til højhastigheds dataoverførsel med kompatible enheder.
- USB Type-C-port: For modern devices requiring a Type-C connection.
- Lydstik: Til tilslutning af hovedtelefoner og mikrofoner.
6. Vedligeholdelse
Regelmæssig vedligeholdelse er med til at sikre optimal ydeevne og levetid for dine pc-komponenter.
6.1. Rengøring af støvfilter
The Define 7 Nano is equipped with easily removable dust filters to prevent dust buildup inside the case.
- Frontfilter: Can be accessed by removing the front panel.
- Topfilter: Located beneath the ventilated top panel (if installed).
- Bundfilter: Slides out from the front of the case.
Clean filters regularly (e.g., monthly) by rinsing them with water and allowing them to dry completely, or by using a soft brush or compressed air.
6.2. Generel rengøring
- Brug en blød, damp cloth to wipe down the exterior surfaces of the case.
- Undgå at bruge skrappe kemikalier eller slibende materialer, der kan beskadige finishen.
- For interior cleaning, use compressed air to remove dust from components. Ensure the system is powered off and unplugged.
7. Fejlfinding
Dette afsnit omhandler almindelige problemer, du kan støde på.
7.1. No Power / System Not Starting
- Tjek strømforbindelser: Ensure the PSU is properly connected to the wall outlet and the power switch on the PSU is in the 'ON' position. Verify all internal power cables (24-pin ATX, 8-pin CPU, PCIe, SATA) are securely connected.
- Frontpanelets overskrifter: Double-check that the power button header (PWR SW) is correctly connected to the motherboard.
- Motherboard/CPU: Sørg for, at CPU og RAM er korrekt isat.
7.2. Overdreven støj
- Ventilatorstøj: Check if any fan cables are obstructing fan blades. Ensure fans are securely mounted. Consider adjusting fan speeds in your motherboard's BIOS/UEFI or operating system.
- Vibration: Ensure all components (PSU, drives, GPU) are securely fastened to prevent rattling.
7.3. Overophedning
- Luftstrøm: Verify that fans are oriented correctly (intake/exhaust) and that there is adequate airflow.
- Støvfiltre: Clean dust filters regularly to prevent restricted airflow.
- Termisk pasta: Ensure CPU cooler has proper thermal paste application.
8. Specifikationer
| Feature | Specifikation |
|---|---|
| Modelnavn | Define 7 Nano |
| Modelnummer | FD-C-DEF7N-01 |
| Sagstype | Mini-tårn |
| Bundkort kompatibilitet | Mini ITX |
| Dimensioner (L x B x H) | Ca. 18.74 x 11.38 x 17.91 cm (pakke) |
| Vægt | Ca. 18.37 pund |
| Materiale | Aluminium |
| Farve | Sort Solid |
| Front I / O-porte | 5x USB 3.0, Audio In/Out, Power Button |
| Drive Bays | 2.5" SSD, 3.5" HDD (specific quantities vary by configuration) |
| Afkølingsmetode | Luft |
| Forudinstallerede ventilatorer | Dynamic X2 GP-12 (rear), Dynamic X2 GP-14 (front) |
9. Garanti og support
Fractal Design products are manufactured to the highest quality standards and come with a limited warranty. For detailed warranty information, please refer to the official Fractal Design webwebstedet eller garantikortet, der følger med dit produkt.
For technical support, troubleshooting assistance, or to inquire about replacement parts, please visit the official Fractal Design support page:
www.fractal-design.com/support/
Please have your product model number (FD-C-DEF7N-01) and proof of purchase ready when contacting support.