1. Introduktion
This manual provides detailed instructions for the ATOTO P807SD Portable Wireless Car Stereo. This device offers a seamless integration of smartphone features into your vehicle, enhancing your driving experience with navigation, communication, and entertainment functionalities. Please read this manual thoroughly before using the product to ensure proper operation and to maximize its features.
Video 1.1: Overview of the ATOTO P8 Portable Car Stereo. This video demonstrates the key features and benefits of the P8 unit, including Wireless CarPlay and Android Auto, and its ease of integration into a vehicle without replacing the OEM head unit.
2. Opsætning og installation
2.1 Pakkens indhold
Før installationen påbegyndes, skal du kontrollere, at alle komponenter er til stede i pakken:
- P8 On-Dash Navigator
- AC-44F6 Steering Remote Control
- Strømkabel
- Sticky Pad
- AUX kabel

Billede 2.1: The complete package contents of the ATOTO P807SD, showing the main unit, AC-44F6 remote control, power cable, sticky pad, and AUX cable.
2.2 Montering af enheden
The P807SD is designed for easy, non-permanent installation on your dashboard. The upgraded silicone pad provides enhanced stickiness for a secure hold.
- Clean the desired area on your dashboard to ensure it is free of dust and debris.
- Attach the sticky pad to the dashboard.
- Mount the P807SD unit onto the sticky pad using the provided holder.

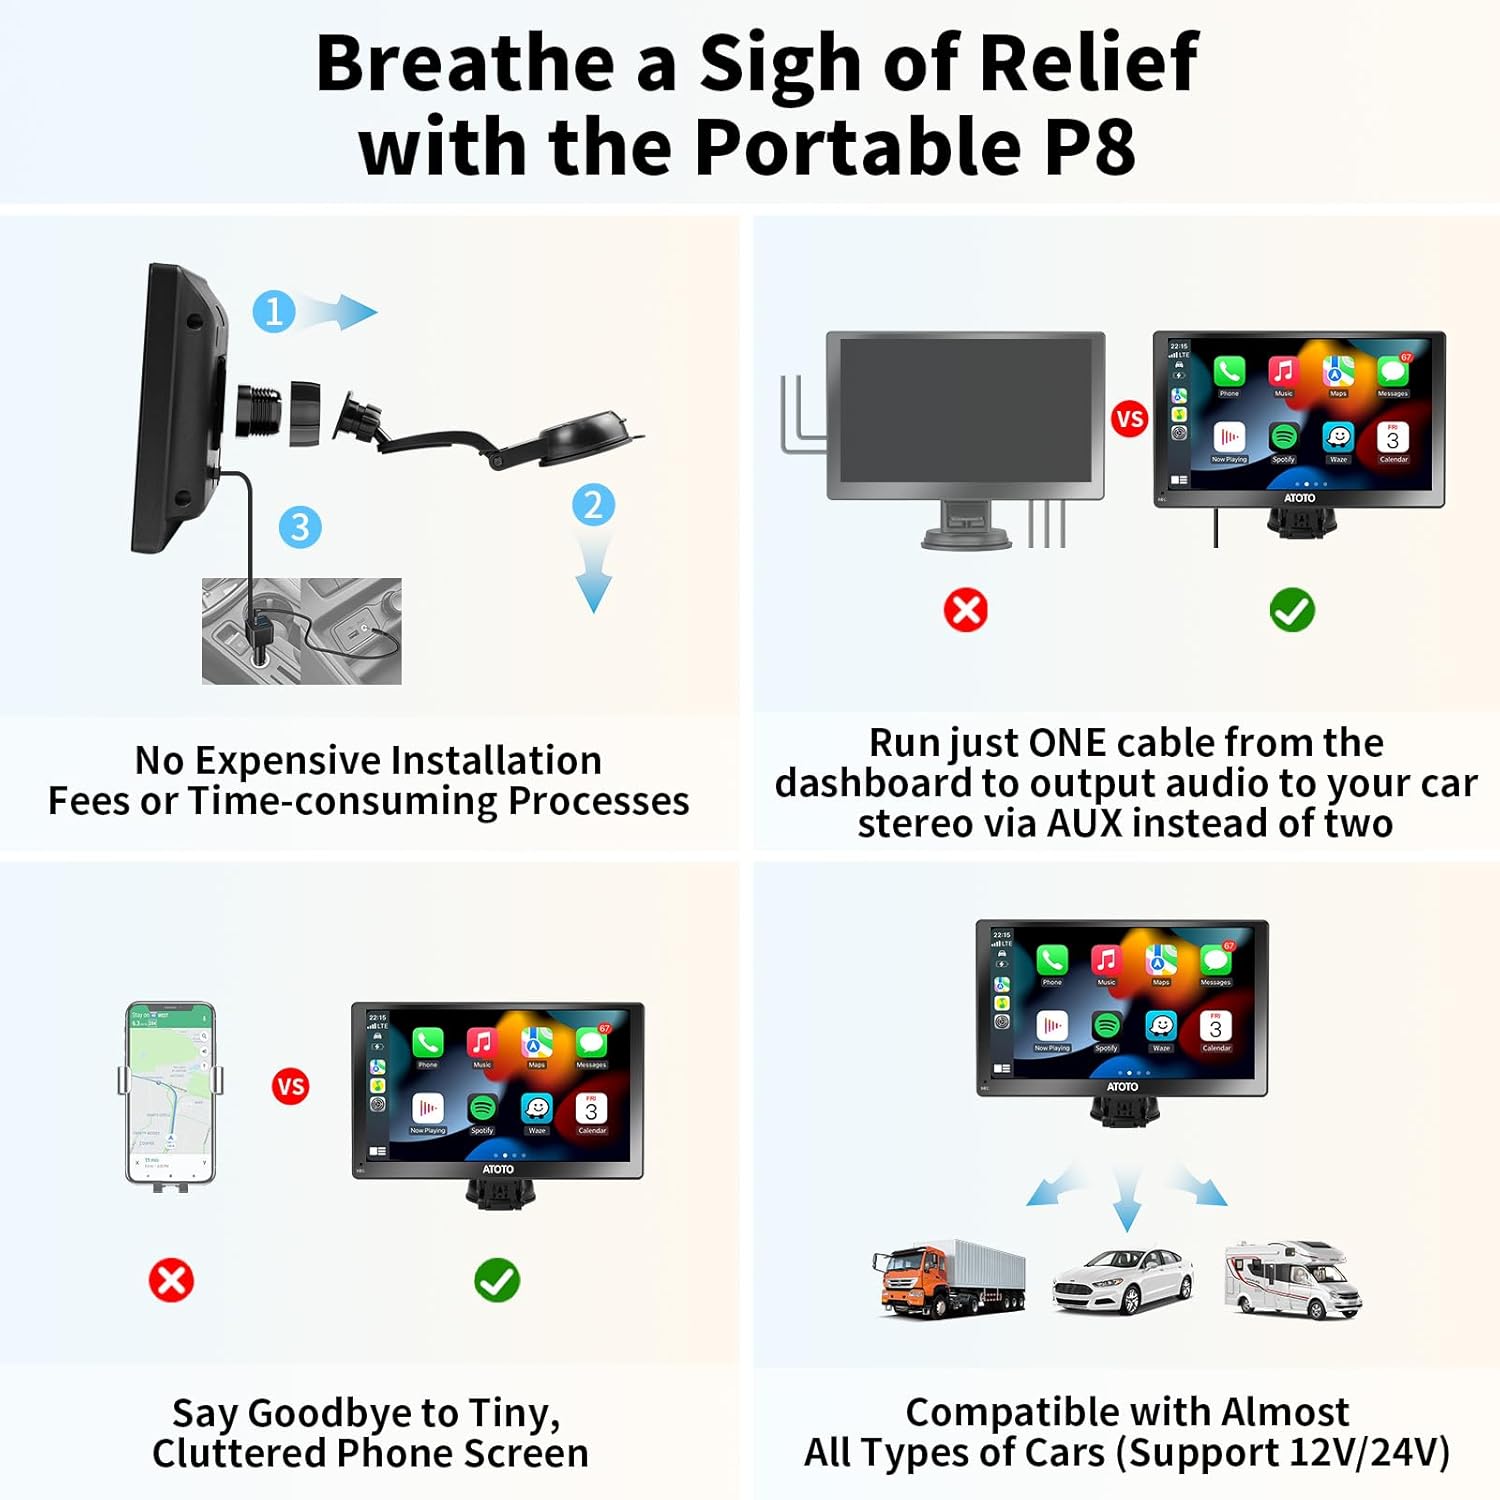
Billede 2.2: Visual comparison highlighting the simplicity of installing the ATOTO P8 compared to traditional in-dash car stereos.

Billede 2.3: Close-up of the enhanced adhesive and flexible silicone pad, demonstrating how it provides a secure hold for the P8 unit on various dashboard surfaces.
2.3 Strømtilslutning
Connect the power cable to the P807SD unit and plug the cigarette lighter adapter into your vehicle's 12V/24V power outlet. The innovative design requires only one cable for power and AUX function.

Billede 2.4: The all-in-one cigarette lighter adapter, which provides power, AUX output, and QC 3.0 quick charge ports, simplifying cable management on the dashboard.
2.4 Initial Connection for Wireless CarPlay/Android Auto
Follow these steps to connect your smartphone wirelessly:
- Ensure the P8 unit is mounted and powered on.
- Aktiver Bluetooth og Wi-Fi på din smartphone.
- On the P8, navigate to the CarPlay or Android Auto interface.
- Pair your phone with the P8 via Bluetooth. Once paired, the system will automatically establish a Wi-Fi connection for Wireless CarPlay or Android Auto.

Billede 2.5: A visual guide illustrating the four simple steps to connect your smartphone to the P8 for Wireless CarPlay or Android Auto functionality.
3. Betjening
3.1 Trådløs CarPlay og Android Auto
The P807SD provides full wireless integration with Apple CarPlay and Android Auto, allowing access to navigation, music, calls, and messages directly from the unit's display.
- Navigation: Use your preferred map applications with real-time traffic updates.
- Musik og medier: Stream audio from your phone's apps.
- Opkald og beskeder: Make and receive calls, and send messages using voice commands or the touchscreen.

Billede 3.1: Display of the ATOTO P8 screen showcasing the Wireless CarPlay and Android Auto interfaces, demonstrating access to phone, music, maps, and messages.
3.2 Lydudgangsmuligheder
The P807SD offers multiple ways to output audio to your car's sound system:
- Bluetooth: Connect to your car's original Bluetooth system for clear audio.
- FM Transmitter: Broadcast audio to your car's FM radio (stereo type).
- AUX udgang: Use the included AUX cable to connect to your car's AUX input (stereo type).
- Indbygget højttaler: For basic audio output directly from the P8 unit.

Billede 3.2: A visual representation of the four distinct audio output methods available on the ATOTO P8, allowing users to choose their preferred connection to the car's audio system.
3.3 Auto-Dimmer Function
The P807SD features an auto-dimmer with a built-in light sensor. This sensor automatically adjusts the screen brightness based on ambient light conditions, ensuring optimal visibility and reducing eye strain, especially when driving through tunnels or at night.

Billede 3.3: The ATOTO P8 display adapting its brightness automatically in response to varying ambient light, from bright daylight to low-light conditions, thanks to its auto-dimming feature.
3.4 AC-44F6 Wireless Steering Remote Control
The included AC-44F6 wireless remote control provides convenient access to key functions without needing to touch the screen, enhancing safety while driving. Functions include volume control, track skipping, call management, and voice assistant activation.

Billede 3.4: A driver using the AC-44F6 wireless steering remote control to manage the ATOTO P8, illustrating the convenience and safety of controlling functions without diverting attention from the road.
3.5 Camera Input (Optional)
The P807SD supports both front and rear camera inputs (cameras sold separately). This feature provides enhanced safety and convenience for parking and driving.
- Bagkamera: Viser automatisk bagsiden view with adjustable guidelines when the vehicle is in reverse.
- Forreste kamera: Supports automatic recording and saving of footage, useful for capturing unexpected incidents.
Billede 3.5: The ATOTO P807SD screen showing a clear rear camera feed with dynamic parking guidelines, assisting the driver in safe maneuvering.
3.6 Parking Monitor (Optional)
When connected to the ATOTO AC-P8ACL2 Fast Boot Connector (sold separately), the P807SD can activate a parking monitor function. This feature automatically starts recording in the event of severe vibrations while parked, capturing any unusual incidents to help preserve evidence.

Billede 3.6: The ATOTO P8 screen showing recorded footage from the parking monitor function, triggered by a detected vibration while the vehicle was parked.
4. Vedligeholdelse
4.1 OTA-opdateringer (Over-The-Air)
The ATOTO P807SD supports Over-The-Air (OTA) updates. This allows you to update the device's firmware directly via Wi-Fi, ensuring you always have the latest features and performance improvements without needing a computer or SD card.

Billede 4.1: The ATOTO P8 display showing the interface for Over-The-Air (OTA) updates, indicating the process of updating the device's software wirelessly.
5. Fejlfinding
If you encounter issues with your ATOTO P807SD, please refer to the following common troubleshooting steps:
- Ingen strøm: Ensure the cigarette lighter adapter is securely plugged in and the vehicle's power outlet is functional. Check the fuse in the adapter if available.
- Ingen lyd: Verify the selected audio output method (Bluetooth, FM, AUX) is correctly configured on both the P8 and your car stereo. Adjust volume levels on both devices.
- CarPlay/Android Auto opretter ikke forbindelse: Ensure Bluetooth and Wi-Fi are enabled on your phone. Try forgetting the device on both the P8 and your phone, then re-pairing.
- Skærmblænding: The QLED screen is designed to suppress glare. Ensure the auto-dimmer is enabled for optimal performance in varying light conditions.
- Fjernbetjeningen reagerer ikke: Check the battery in the remote control. Ensure there are no obstructions between the remote and the P8 unit.
For yderligere assistance, kontakt venligst ATOTOs kundesupport.
6. Specifikationer
| Feature | Detalje |
|---|---|
| Mærke | ATOTO |
| Modelnavn | P807SD-RM |
| Skærmstørrelse | 7 tommer |
| Display Type | QLED |
| Opløsning | 800 x 480 |
| Operativsystem | Linux |
| Forbindelsesteknologi | Bluetooth, USB, Wi-Fi |
| Særlige funktioner | Anti-Glare, Auto-Dimmer, Camera Input, Steering Remote Control, Wireless CarPlay and Android Auto |
| Lydudgangstilstand | Stereo (Bluetooth, FM Transmitter, AUX), Built-in Speaker |
| Monteringstype | Dashboard montering |
| Kompatibel køretøjstype | Bil (12V/24V) |
| Inkluderede komponenter | P8 On-Dash Navigator, AC-44F6 Steering Remote Control, Power Cable, Sticky Pad, AUX Cable |
7. Garanti og support
7.1 Produktgaranti
The ATOTO P807SD comes with a standard 12-month warranty. You can extend this to an 18-month product care period by registering your product with ATOTO. This extended care provides priority support and access to additional resources.

Billede 7.1: An illustration depicting the standard 12-month warranty (365 days) plus an additional 6 months (180 days) for extended product care, totaling 18 months of coverage.
7.2 Kundesupport
For technical assistance, troubleshooting, or warranty claims, please contact ATOTO customer support. You can find useful tools and resources, including detailed manuals and FAQs, by scanning the QR code below or visiting the official ATOTO support webwebsted.

Billede 7.2: A smartphone scanning a QR code from a manual, indicating access to useful tools and resources for the ATOTO P807SD.
You can also seek help from experts directly:
- E-mail: support@myatoto.com
- Online Support: Visit the ATOTO Store on Amazon for more information and support options.

Billede 7.3: An illustration representing expert customer support available for the ATOTO P807SD, emphasizing reliable assistance.