
OMOTON WK003
OMOTON 2.4GHz Wireless AZERTY Keyboard Instruction Manual
Model: WK003
Mærke: OMOTON
1. Introduktion
Thank you for choosing the OMOTON 2.4GHz Wireless AZERTY Keyboard. This ultra-slim, silent keyboard is designed for comfortable and efficient typing across various Windows operating systems. This manual provides detailed instructions for setting up, operating, maintaining, and troubleshooting your new keyboard to ensure optimal performance.
2. Pakkens indhold
Please check the package contents carefully. If any items are missing or damaged, please contact OMOTON customer support.
- 1 x OMOTON 2.4GHz Wireless AZERTY Keyboard
- 1 x USB-modtager
- 1 x brugermanual
3. Opsætningsvejledning
Follow these steps to set up your OMOTON wireless keyboard:
- Installer batterier: Open the battery compartment on the back of the keyboard. Insert two AAA batteries (not included), ensuring correct polarity. Close the compartment.
- Indsæt USB-modtager: Locate the USB receiver, which is magnetically stored in the battery compartment. Plug the USB receiver into an available USB port on your computer.

Image: Battery compartment with USB receiver and AAA batteries.
- Tænd: Slide the ON/OFF switch located on the top right side of the keyboard to the "ON" position.
- Forbinde: Your computer should automatically detect and install the necessary drivers for the keyboard. No additional software is required.

Image: Plug & Play setup with USB receiver.
Tastaturet er nu klar til brug.
4. Betjeningsvejledning
4.1 Grundlæggende skrivning
Simply begin typing. The keyboard features a standard AZERTY layout for familiar use.
4.2 Fn Lock Function
The keyboard includes a convenient Fn Lock function. By default, the F1-F12 keys perform their standard function. To access the multimedia shortcuts directly without pressing the Fn key, activate the Fn Lock.
- Activate/Deactivate Fn Lock: Trykke Fn + Échap simultaneously. When activated, the multimedia functions (e.g., volume control, home page) will be directly accessible by pressing F1-F12. When deactivated, F1-F12 will perform their standard functions, and multimedia actions will require pressing Fn + Fx.

Image: Fn Lock function and multimedia keys.
4.3 Multimediegenveje
The keyboard provides 12 multimedia shortcuts for quick access to common functions. These can be used directly when Fn Lock is active, or by pressing Fn in combination with the respective F-key when Fn Lock is inactive.
| Nøgle | Fungere |
|---|---|
| F1 | Stum |
| F2 | Lydstyrke ned |
| F3 | Lydstyrke op |
| F4 | Forrige spor |
| F5 | Afspil/pause |
| F6 | Næste spor |
| F7 | Brightness Down (System Dependent) |
| F8 | Brightness Up (System Dependent) |
| F9 | Søg |
| F10 | Hjemmeside |
| F11 | Kopi |
| F12 | Indsæt |
4.4 Kompatibilitet
This keyboard is compatible with Windows 11, 10, 8, 7, XP, and Vista, making it suitable for a wide range of desktop and laptop computers.
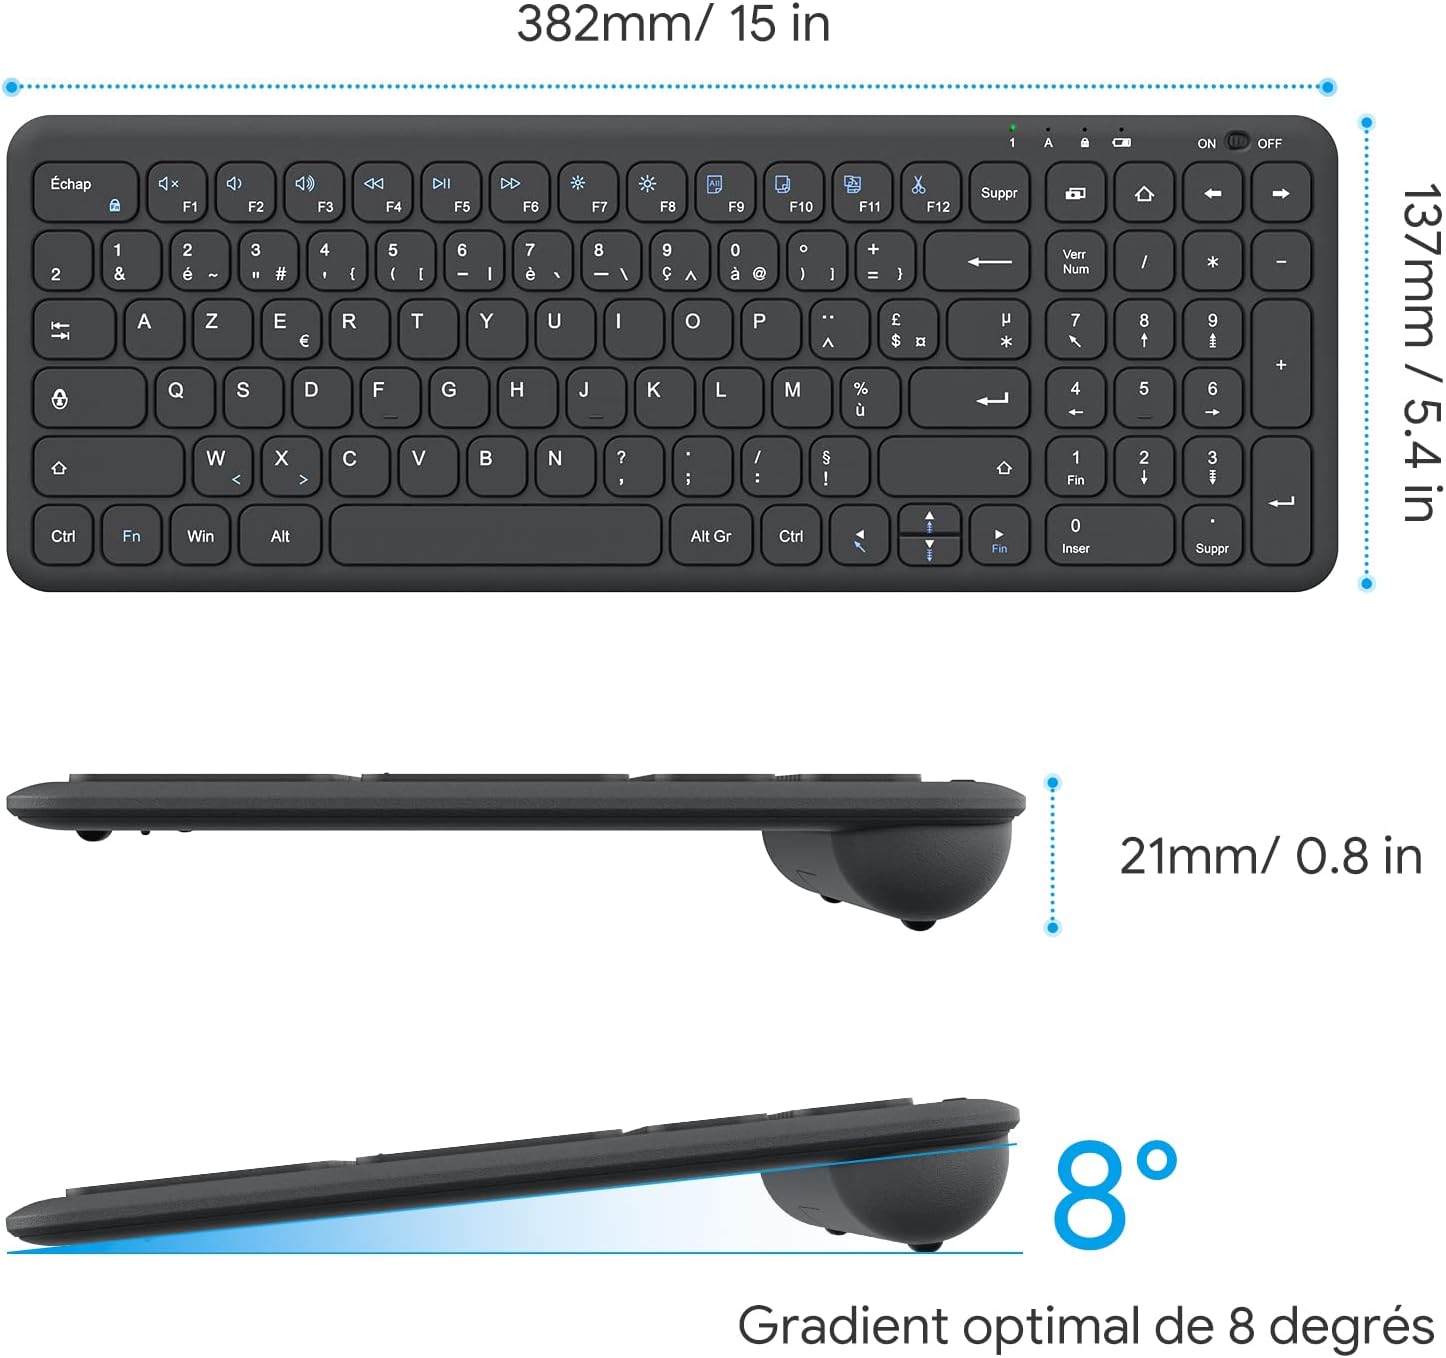
Image: Keyboard compatibility with Windows systems.
5. Vedligeholdelse
5.1 Udskiftning af batteri
When the keyboard's performance degrades or the indicator light flashes, it's time to replace the batteries. Open the battery compartment on the back and replace the two AAA batteries with new ones, observing polarity.
5.2 Rengøring
For at rengøre dit tastatur skal du forsigtigt tørre overfladen af med en blød kludamp cloth. Avoid using harsh chemicals or abrasive materials. Ensure the keyboard is turned off before cleaning.
5.3 USB Receiver Storage
For convenience and to prevent loss, the USB receiver can be magnetically stored inside the keyboard's battery compartment when not in use or during transport.
6. Fejlfinding
Hvis du støder på problemer med dit tastatur, kan du bruge følgende almindelige løsninger:
- Tastaturet reagerer ikke:
- Sørg for, at tastaturet er tændt.
- Kontroller, om batterierne er korrekt installeret og har tilstrækkelig opladning. Udskift om nødvendigt.
- Kontroller, at USB-modtageren er korrekt tilsluttet en fungerende USB-port på din computer. Prøv en anden USB-port.
- Genstart din computer.
- Lagging or intermittent input:
- Ensure the keyboard is within the effective operating range (up to 10 meters) of the USB receiver.
- Reduce potential interference by moving the keyboard closer to the receiver or away from other wireless devices (e.g., Wi-Fi routers, cordless phones).
- Check battery level. Low batteries can affect wireless performance.
- Specifikke taster virker ikke:
- Rengør forsigtigt området omkring den berørte tast for at fjerne eventuelt snavs.
- If the issue persists, contact OMOTON customer support for further assistance.
7. Specifikationer
Detailed technical specifications for the OMOTON Wireless AZERTY Keyboard:
| Feature | Detalje |
|---|---|
| Mærke | OMOTON |
| Model | WK003 |
| Forbindelsesteknologi | 2.4 GHz trådløs (USB-modtager) |
| Tastaturlayout | AZERTY |
| Kompatible enheder | PC, Desktop, Laptop |
| Kompatible operativsystemer | Windows 11/10/8/7/XP/Vista |
| Særlige funktioner | 12 Multimedia Shortcuts, Fn Lock, Silent Keys, Ultra-Slim Design, Magnetic USB Receiver Storage |
| Farve | Sort |
| Strømkilde | 2 x AAA batterier (medfølger ikke) |
| Dimensioner (L x B x H) | 38.1 x 13.7 x 2 cm (15 x 5.4 x 0.8 tommer) |
| Antal nøgler | 99 |
| Key Switch Type | Tactile (Scissor-mechanism) |
| Optimal Gradient | 8 grader |

Image: Keyboard dimensions and ergonomic design.

Image: Scissor-mechanism key design.
8. Garantioplysninger
OMOTON products typically come with a manufacturer's warranty. Please refer to the warranty card included with your product or visit the official OMOTON webwebstedet for detaljerede garantivilkår og -betingelser. Gem din købskvittering som købsbevis i tilfælde af garantikrav.
9. Kundesupport
If you have any questions, require technical assistance, or experience issues not covered in this manual, please do not hesitate to contact OMOTON customer support. You can usually find contact information on the OMOTON official webhjemmeside eller gennem den forhandler, hvor du købte produktet.
Ask a question about this manual
Ask about setup, troubleshooting, compatibility, parts, safety, or missing instructions. Manuals+ will review the question and use this page’s manual context to help answer it.