
uxcell M16 x 2 / a22032100ux0379
Instruktionsmanual
uxcell Tap and Die Set, M16 x 2 Metric Left Hand
Model: M16 x 2 / a22032100ux0379
1. Introduktion
This manual provides essential information for the safe and effective use of your uxcell M16 x 2 Metric Left Hand Tap and Die Set. This set is designed for creating or repairing male and female threads in various materials. Please read these instructions carefully before use to ensure proper operation and to prolong the life of your tools.
2. Produktet er slutview
The uxcell M16 x 2 Tap and Die Set includes a straight flute tap and a round threading die, both featuring a left-hand thread design. These tools are crafted for precision and durability in threading applications.

Figure 2.1: The uxcell M16 x 2 Left Hand Tap and Die Set, showing the straight flute tap and the round threading die.

Figure 2.2: Detailed dimensions of the M16 x 2 tap and die, including length, diameter, and thread size.
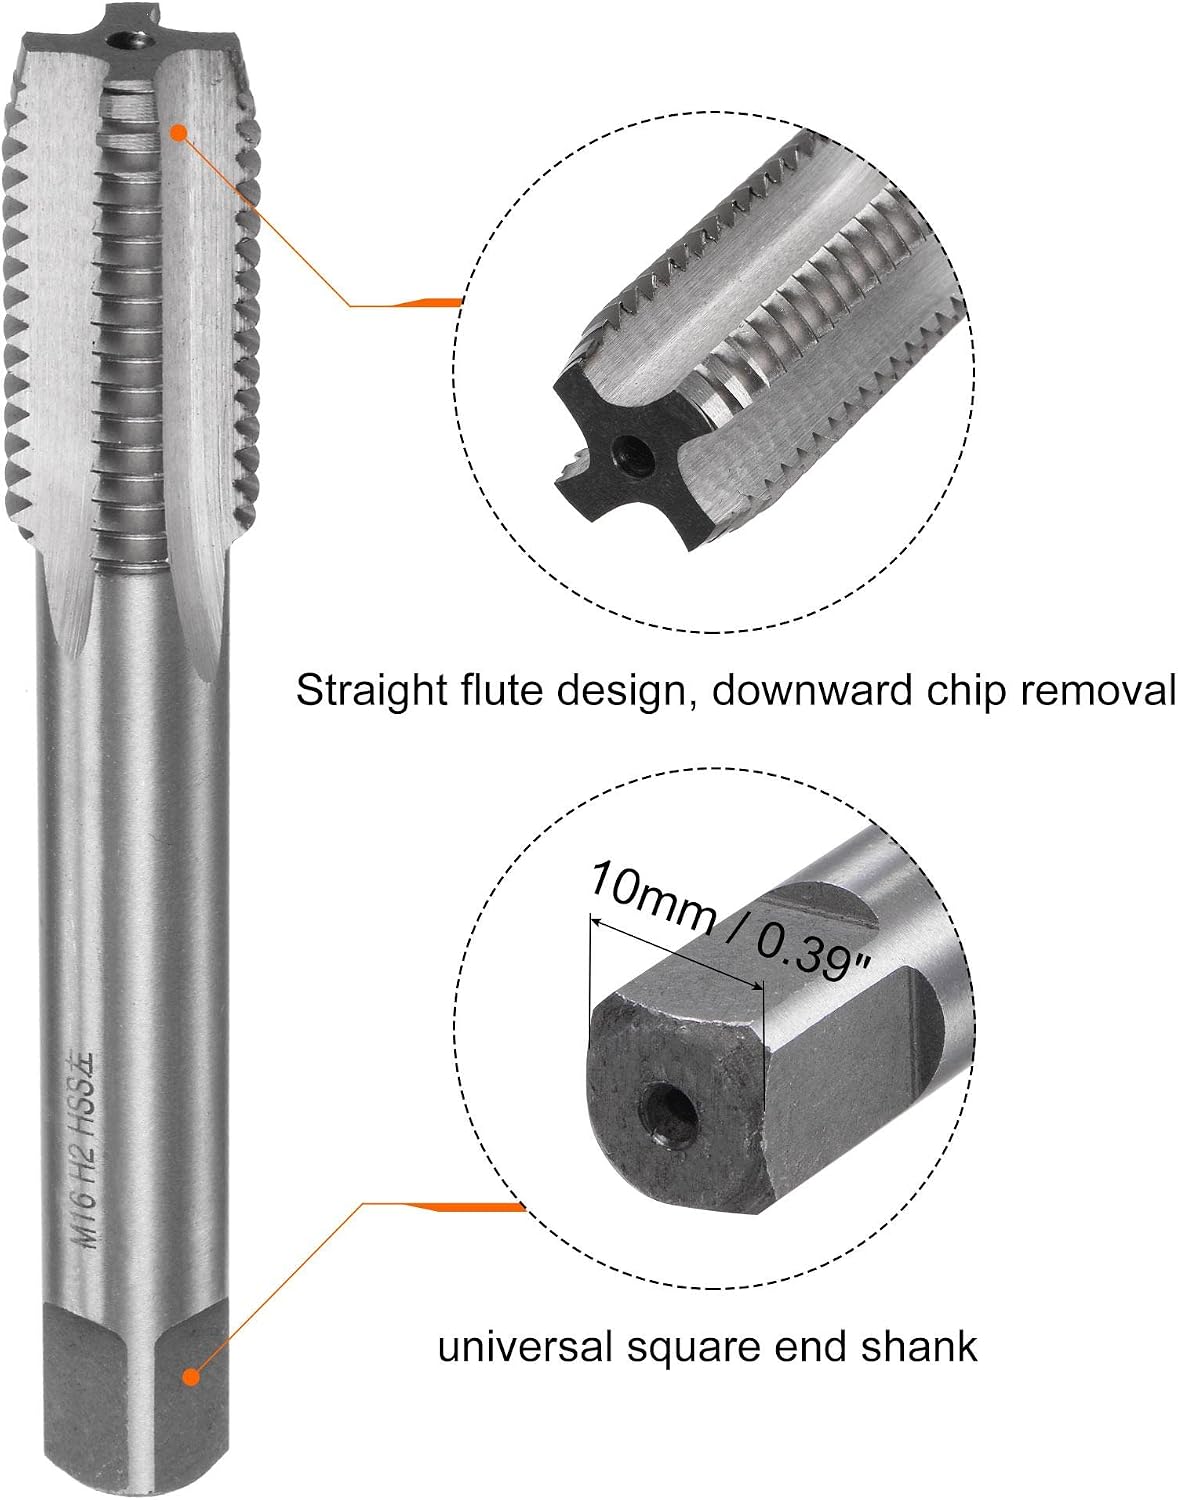
Figur 2.3: Nærbillede view highlighting the straight flute design for downward chip removal and the universal square end shank of the tap.

Figure 2.4: The round threading die, designed for left-hand thread cutting with clear threads, made from alloy tool steel.
Nøglefunktioner:
- Left Hand Thread: Both the tap and die are designed for left-hand threading applications.
- Materiale: The tap is made from High Speed Steel (HSS) for wear resistance and toughness. The die is made from Alloy Tool Steel, offering hardness, high torque, and good wear resistance.
- Straight Flute Tap: Provides efficient downward chip removal during tapping.
- Round Die: Features a conical locking hole for strong, secure fastening in a die wrench.
- Ansøgninger: Suitable for processing, correcting, or cleaning external threads (die) and internal threads (tap). Ideal for stainless steel, aluminum alloy, cast iron, copper, iron, aluminum, and plastic.
3. Specifikationer
| Attribut | Værdi |
|---|---|
| Fabrikant | uxcell |
| Varenummer | a22032100ux0379 |
| Varens vægt | 0.01 ounce |
| Pakkedimensioner | 5.31 x 3.7 x 0.55 tommer |
| Varemodelnummer | a22032100ux0379 |
| Størrelse | M16 x 2 |
| Stil | Straight Flute Tap, Round Die |
| Slutte | Ubelagt |
| Materiale | High Speed Steel (Tap), Alloy Tool Steel (Die) |
| Vare Pakke Antal | 1 |
| Antal stykker | 1 |
| Brug | Maskine |
4. Opsætning
Proper setup is crucial for effective and safe threading. Ensure you have the necessary accessories before beginning.
4.1 Required Tools (Not Included):
- Die Wrench (for round dies)
- Tap Wrench or Machine (for taps)
- Tapping Oil or Suitable Lubricant
- Drill (if creating new holes)
- Appropriate Drill Bits (refer to drilling table)
4.2 Preparing the Die:
Insert the round die into a compatible die wrench. Ensure the fastening screw in the middle of the wrench is securely inserted into the slot of the die and tightened. This prevents the die from rotating during use.

Figure 4.1: Close-up of the round die, showing the conical locking hole for secure fastening in a die wrench.
4.3 Preparing the Tap:
The tap can be used with a tap wrench for manual operation or mounted in drill presses, tapping machines, CNC machines, or milling machines for automated threading.

Figure 4.2: Illustration of a die stock wrench, tap wrench handle, thread tap, and round die, demonstrating how they are used together.
5. Betjeningsvejledning
Follow these steps for successful threading operations.
5.1 Tapping Internal Threads (Using the Tap):
- Vælg borehoved: If creating a new hole, refer to the "Drilling Hole Diameter Comparison Table When Tapping" (Figure 5.1) to select the correct drill bit size for the M16 x 2 thread. The drilled hole diameter should be approximately 90 degrees of vertical hardness.
- Bore hul: Drill the pilot hole with a twist drill to the specified diameter and depth. For through holes, ensure the tap can pass completely. For blind holes, ensure the tap depth is sufficient but does not exceed 1.5 times the diameter of the tap.
- Påfør smøremiddel: Apply suitable tapping oil or lubricant to the cutting edge of the tap and the hole. This reduces friction, improves thread quality, and extends tool life.
- Start Tapping: Insert the tap into the hole, ensuring it is perpendicular to the workpiece. Apply steady, even pressure and begin turning the tap clockwise (for right-hand threads) or counter-clockwise (for left-hand threads, as with this M16 x 2 set).
- Chip fjernelse: After every 1/4 to 1/2 turn, reverse the tap slightly (counter-clockwise for left-hand threads) to break and clear chips from the flutes. This prevents chip buildup and tap breakage.
- Complete Threading: Continue turning and reversing until the desired thread depth is achieved.

Figure 5.1: Drilling Hole Diameter Comparison Table for various thread sizes, providing recommended drill bit diameters for tapping.

Figur 5.2: Eksample of tapping internal threads in a metal workpiece using a machine.
5.2 Threading External Rods (Using the Die):
- Prepare Rod: Ensure the rod to be threaded is slightly smaller than the nominal thread diameter and has a chamfered end to facilitate starting the die.
- Sikkert arbejdsemne: Secure the rod firmly in a vise or clamp.
- Påfør smøremiddel: Apply suitable cutting oil to the rod and the die.
- Start Threading: Place the die (mounted in its wrench) squarely onto the end of the rod. Apply firm, even pressure and begin turning the die counter-clockwise (for left-hand threads).
- Chip fjernelse: Periodically reverse the die slightly to break and clear chips.
- Complete Threading: Continue turning until the desired thread length is achieved.

Figure 5.3: Visual representation of the tap being used to create internal threads and the die being used to create external threads on a bolt.
6. Vedligeholdelse
Proper maintenance ensures the longevity and performance of your tap and die set.
- Rensning: After each use, clean the tap and die thoroughly to remove all chips and debris. A brush and compressed air can be effective.
- Smøring: Apply a light coat of rust-preventative oil to the tools before storage, especially if they are uncoated.
- Opbevaring: Store the tap and die in a dry, clean environment, preferably in their original packaging or a dedicated tool case, to prevent damage and corrosion.
- Inspektion: Periodically inspect the cutting edges for wear or damage. Worn tools can produce poor quality threads and may break during use.

Figure 6.1: Demonstrating the application of tapping oil to the die during use, which is crucial for lubrication and chip removal.
6.1 Understanding Coatings:
While this specific set is uncoated, some threading tools feature coatings that enhance performance. The table below provides general information on common coatings and their benefits.

Figure 6.2: Table detailing various coatings for threading tools, their colors, effects (e.g., improved wear resistance), hardness, and suitable processing materials.
7. Fejlfinding
Below are common issues encountered during threading and their potential solutions.
- Poor Thread Quality / Rough Threads:
- Ensure adequate lubrication is used.
- Check if the tap/die is dull or worn; replace if necessary.
- Verify the correct pilot hole size for tapping or rod diameter for threading.
- Reduce cutting speed and apply consistent pressure.
- Ensure proper chip evacuation by reversing the tool frequently.
- Tap / Die Breakage:
- Excessive force or improper alignment. Ensure the tool is perpendicular to the workpiece.
- Utilstrækkelig smøring.
- Chip buildup in flutes. Reverse frequently to clear chips.
- Using the wrong tap/die for the material hardness.
- Hole too small (for tapping).
- Difficulty Starting Thread:
- Ensure the workpiece is properly chamfered (for external threads).
- Verify the tool is aligned correctly and perpendicular to the workpiece.
- Apply firm, even pressure to initiate the cut.
8. Garanti og support
Specific warranty information for this product is not provided in the available data. For any product-related inquiries, technical support, or warranty claims, please contact uxcell customer service directly through their official channels or the retailer from whom the product was purchased.
For more information about uxcell products, you may visit the uxcell-butik på Amazon.
Ask a question about this manual
Ask about setup, troubleshooting, compatibility, parts, safety, or missing instructions. Manuals+ will review the question and use this page’s manual context to help answer it.