1.Overview
The aurora Y2T Yale Rim Lock is a modern style front door night latch designed for enhanced security. This lock features a 5-pin cylinder, key operation from the outside, and a lever handle with a snib function for operation from the inside. Its antique brass finish provides a classic aesthetic suitable for various door types.
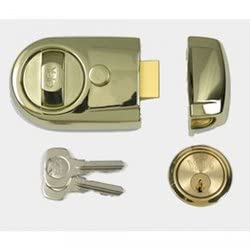
Figure 1: Main unit of the aurora Y2T Yale Rim Lock.
2. Pakkens indhold
Kontroller, at alle komponenter er til stede i pakken, før installationen påbegyndes:
- 1 x Y2T Yale Rim Lock Body
- 1 x 5-Pin Rim Cylinder
- 3 x nøgler
- Mounting Hardware (screws, escutcheon, etc.)
3. Specifikationer
| Mærke | nordlys |
| Modelnummer | Y2T |
| Materiale | Messing |
| Låsetype | Key Lock (Rim Lock) |
| Speciel funktion | Key Unlock, Thumb Turn |
| Varedimensioner (L x B x H) | 10.2 x 10.2 x 7.6 centimeter |
| Varens vægt | 454 g |
| Maks. dørtykkelse | 30-60 mm |
| backset | 60 mm (changeable to 50mm) |
| Sagens bredde | 93 mm |
| Case Højde | 66 mm |
| Boltlængde | 13 mm |
| Slutte | Antique Plated (Antique Brass) |

Figure 2: Detailed dimensions and components of the Y2T Rim Lock.

Figure 3: Door thickness compatibility for the Y2T Rim Lock, ranging from 30mm to 60mm.
4. Opsætning og installation
This section provides general guidelines for installing the aurora Y2T Yale Rim Lock. Professional installation is recommended for optimal security and functionality. Ensure you have the necessary tools, including a drill, measuring tape, pencil, and screwdriver.
4.1. Forbered døren
- Determine the desired position for the lock body on the inside of the door and the rim cylinder on the outside.
- Mark the center point for the cylinder hole on the door face. Ensure it aligns with the lock body's mechanism.
- Drill a pilot hole, then use an appropriate hole saw to create the main hole for the rim cylinder through the door.
- Mark and drill holes for the cylinder mounting screws.
4.2. Install the Rim Cylinder
- Insert the rim cylinder through the drilled hole from the outside of the door.
- Secure the cylinder using the provided mounting screws and escutcheon plate on the outside.
- Ensure the cylinder tailpiece extends sufficiently into the door's interior to engage with the lock body.
4.3. Mount the Lock Body
- Position the lock body on the inside of the door, aligning it with the rim cylinder's tailpiece.
- Mark the screw holes for the lock body.
- Drill pilot holes for the lock body screws.
- Secure the lock body to the door using the provided screws. Ensure the tailpiece correctly engages with the lock mechanism.
4.4. Installer låsepladen
- Close the door and mark the position where the lock bolt meets the door frame.
- Chisel out a recess in the door frame to accommodate the strike plate and the bolt.
- Secure the strike plate to the door frame with screws.
4.5. Testdrift
- With the door open, test the lock's operation using the key from the outside and the lever handle/thumb turn from the inside.
- Close the door and test the lock again to ensure smooth engagement with the strike plate.
5. Betjeningsvejledning
5.1. Locking from the Outside
Insert the key into the rim cylinder on the exterior side of the door. Turn the key to extend the bolt and secure the lock. Remove the key.
5.2. Oplåsning udefra
Insert the key into the rim cylinder on the exterior side of the door. Turn the key to retract the bolt and unlock the door. Remove the key.
5.3. Locking from the Inside
Turn the thumb turn or lever handle on the interior side of the lock body to extend the bolt and secure the door.
5.4. Oplåsning indefra
Turn the thumb turn or lever handle on the interior side of the lock body to retract the bolt and unlock the door.
5.5. Snib Function (Hold Back Latch)
The snib function allows the latch to be held in the retracted (open) position. To engage, retract the latch using the lever handle and then activate the snib mechanism (usually a small switch or button on the lock body) to hold it back. This prevents the door from latching automatically when closed. To disengage, simply operate the lever handle again or deactivate the snib mechanism.
6. Vedligeholdelse
Regular maintenance ensures the longevity and smooth operation of your aurora Y2T Yale Rim Lock.
- Rensning: Wipe the exterior surfaces of the lock body and cylinder with a soft, damp cloth. Avoid abrasive cleaners or solvents that could damage the antique brass finish.
- Smøring: Periodically apply a small amount of graphite-based lubricant or a specialized lock lubricant into the keyway of the cylinder. Do not use oil-based lubricants as they can attract dust and grime.
- Inspektion: Regularly check all screws for tightness. Ensure the lock bolt moves freely and engages properly with the strike plate.
- Nøglepleje: Undgå at bruge bøjede eller beskadigede nøgler, da dette kan beskadige cylindermekanismen.
7. Fejlfinding
| Problem | Mulig årsag | Løsning |
|---|---|---|
| Nøglen drejer ikke jævnt eller sidder fast. | Dirt in keyway, worn key, misaligned cylinder. | Apply lock lubricant to keyway. Try a different key. Check cylinder alignment. |
| Bolt does not extend or retract fully. | Misalignment with strike plate, internal mechanism issue, loose screws. | Check strike plate alignment and adjust if necessary. Tighten mounting screws. Lubricate internal mechanism if accessible. |
| Døren låser ikke ordentligt. | Strike plate misalignment, snib function engaged. | Adjust strike plate. Ensure snib function is disengaged. |
| Lever handle/thumb turn is stiff. | Lack of lubrication, internal friction. | Apply lock lubricant to moving parts. |
Hvis du støder på problemer, der ikke er nævnt her, eller hvis løsningerne ikke løser problemet, bedes du kontakte kundesupport.
8. Garanti og support
Specific warranty details for the aurora Y2T Yale Rim Lock may vary by region and retailer. Please refer to your purchase documentation or contact the seller/manufacturer directly for information regarding warranty coverage and claims.
For technical support or assistance with installation and operation, please reach out to aurora customer service through the contact information provided at the point of purchase or on the official aurora webwebsted.