1. Introduktion
Thank you for choosing the Xigmatek Lux M Micro-ATX Mini Tower PC Case. This manual provides detailed instructions for the installation, operation, and maintenance of your new PC chassis. Please read this manual carefully before beginning the assembly process to ensure proper installation and to maximize the performance and longevity of your system.
The Lux M case is designed to offer a robust and aesthetically pleasing housing for your computer components, featuring a tempered glass side panel, a metallic front panel with a unique cut-out pattern, and pre-installed fixed RGB fans for optimal cooling and visual appeal. It supports Micro-ATX and Mini-ITX motherboards and is compatible with various cooling solutions, including water cooling.
2. Sikkerhedsoplysninger
Overhold venligst følgende sikkerhedsforanstaltninger under installation og drift:
- Afbryd altid strømforsyningen fra stikkontakten, før du installerer eller fjerner komponenter, for at forhindre elektrisk stød.
- Handle all components with care. Avoid touching circuit boards directly; hold them by their edges.
- Wear an anti-static wrist strap when handling sensitive electronic components to prevent electrostatic discharge (ESD) damage.
- Keep the case and components away from liquids, excessive heat, and direct sunlight.
- Sørg for tilstrækkelig ventilation omkring pc-kabinettet for at forhindre overophedning.
- Hold små dele og skruer utilgængeligt for børn.
3. Pakkens indhold
Bekræft, at alle varer er til stede i din pakke. Hvis der mangler eller er beskadigede varer, bedes du kontakte din forhandler.
- Xigmatek Lux M Micro-ATX Mini Tower PC Case
- Tilbehørsæske (indeholder skruer, afstandsstykker, kabelbindere osv.)
- Brugervejledning (dette dokument)
4. Produktet er slutview
Familiarize yourself with the various parts of your Xigmatek Lux M PC case.
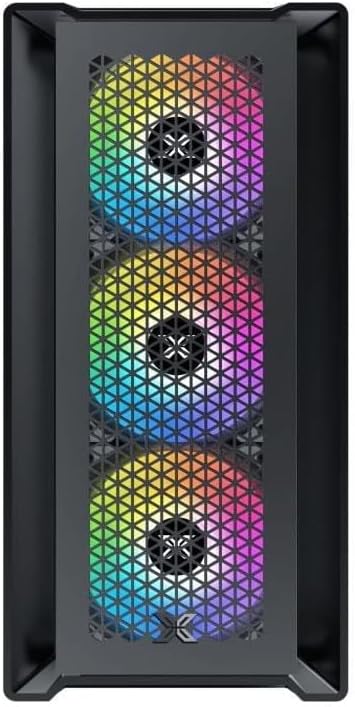
Figur 4.1: Forside View. This image displays the front of the Xigmatek Lux M case, highlighting the metallic mesh panel with a triangular design and the three pre-installed 120mm fixed RGB fans.

Figure 4.2: Angled Top-Front View. This perspective shows the tempered glass side panel, offering a clear view of the interior, and the top panel with its I/O ports (USB, audio) and power button.
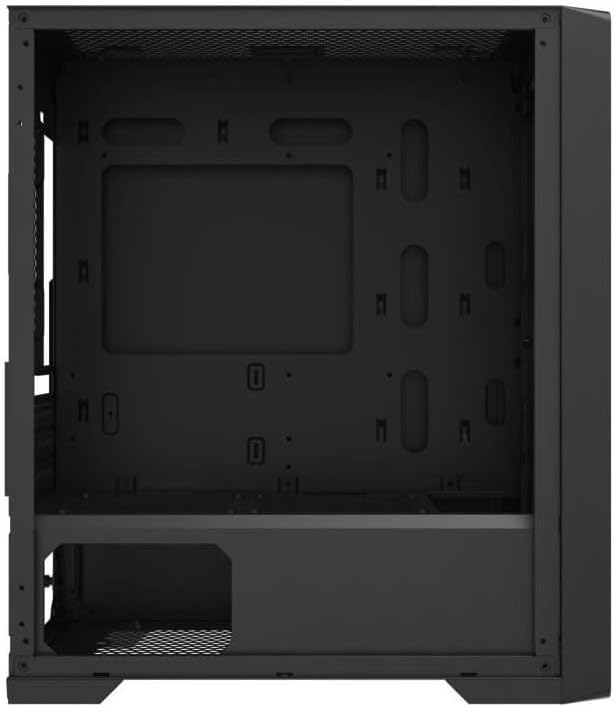
Figur 4.3: Indvendig layout. The internal structure of the case, featuring the motherboard mounting tray, cutouts for cable management, and the power supply shroud at the bottom.
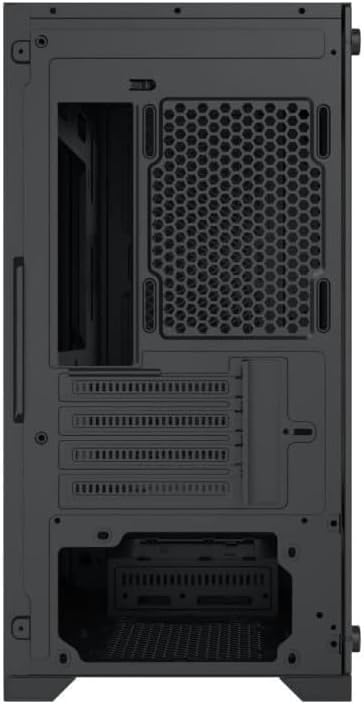
Figur 4.4: Bagside View. This image illustrates the rear of the case, including the expansion slots for graphics cards and other add-in cards, the rear fan mounting area, and the power supply mounting bracket.
5. Opsætning og installation
Follow these steps to install your computer components into the Xigmatek Lux M case.
5.1. Forberedelse af sagen
- Placer etuiet på en flad, stabil overflade.
- Remove the tempered glass side panel by unscrewing the thumb screws and carefully lifting it off. Set it aside on a soft, non-abrasive surface.
- Remove the opposite steel side panel by unscrewing the thumb screws and sliding it backward.
5.2. Installation af bundkort
The Lux M supports Micro-ATX and Mini-ITX motherboards.
- Installer I/O-skjoldet (hvis det ikke er forudinstalleret på dit bundkort) i den bageste åbning af kabinettet.
- Align the motherboard with the pre-installed standoffs. Ensure all screw holes on the motherboard match the standoffs.
- Fastgør bundkortet med de medfølgende skruer. Spænd ikke for hårdt.
5.3. Installation af strømforsyningsenhed (PSU)
The PSU mounts at the rear bottom of the case.
- Skub strømforsyningen ind i det dertil indrettede rum fra bagsiden af kabinettet.
- Align the PSU's screw holes with the holes on the case's rear panel.
- Fastgør strømforsyningen med de medfølgende skruer.
5.4. Storage Drive Installation (2.5"/3.5" Drives)
The case supports 2x 2.5"/3.5" storage drives.
- Locate the drive cage beneath the PSU shroud or dedicated 2.5" mounting points behind the motherboard tray.
- For 3.5" HDDs, slide the drive into a drive tray (if applicable) and secure it with screws.
- For 2.5" SSDs, secure them directly to the mounting points using the provided screws.
5.5. Installation af grafikkort (VGA) og udvidelseskort
Kabinettet understøtter grafikkort op til 320 mm i længden.
- Fjern de nødvendige dæksler til udvidelsespladserne fra bagsiden af kabinettet.
- Insert your graphics card or other expansion card into the appropriate PCIe slot on your motherboard.
- Secure the card to the case using the expansion slot screws.
5.6. Installation af kølesystem (valgfrit)
The Lux M comes with 4x 120mm X24F fixed RGB fans. It supports additional cooling options.
- CPU køler: Max height of 160mm. Install your CPU cooler according to its manufacturer's instructions.
- Radiatorstøtte: The case supports radiators of 360mm, 240mm, or 120mm. Refer to your radiator's manual for installation. Common mounting locations include the front and top panels.
5.7. Kabelforvaltning
Brug kabelføringsudskæringerne og fastgørelsespunkterne bag bundkortbakken til at organisere kablerne. Dette forbedrer luftgennemstrømningen og æstetikken.
5.8. Slutsamling
- Once all components are installed and cables are managed, reattach the steel side panel and secure it with thumb screws.
- Carefully reattach the tempered glass side panel and secure it with thumb screws.
6. Betjeningsvejledning
After completing the installation, connect your peripherals (monitor, keyboard, mouse) and power cable to the PC. Press the power button located on the top panel of the case to start your system.
The pre-installed X24F RGB fans feature fixed RGB lighting, which will illuminate automatically upon system power-on. No additional software or controller is required for their basic operation.
Ensure that the case's ventilation is not obstructed to maintain optimal airflow and cooling performance.
7. Vedligeholdelse
Regelmæssig vedligeholdelse er med til at sikre dine pc-komponenters levetid og optimale ydeevne.
- Støvrensning: Periodically clean dust filters (if present) and the interior of the case using compressed air or a soft brush. Dust accumulation can hinder airflow and lead to overheating.
- Udvendig rengøring: Tør de udvendige overflader af med en blød, damp cloth. Avoid harsh chemicals that may damage the finish or tempered glass.
- Hærdet glas: Clean the tempered glass panel with a glass cleaner and a microfiber cloth to avoid scratches and streaks.
8. Fejlfinding
Hvis du støder på problemer under eller efter installationen, kan du overveje følgende almindelige fejlfindingstrin:
- Ingen strøm:
- Sørg for, at strømkablet er korrekt tilsluttet til både strømforsyningen og stikkontakten.
- Check that the PSU switch is in the 'ON' position.
- Kontroller, at kablet til strømafbryderen på frontpanelet er korrekt tilsluttet til bundkortets frontpanelheader.
- Fans Not Spinning / RGB Not Lighting:
- Ensure all fan power cables are securely connected to the motherboard or a fan controller.
- For RGB, confirm that any necessary RGB headers are connected to the motherboard (though the included fans are fixed RGB and should light up with power).
- Ingen skærmoutput:
- Verify that your monitor cable is connected to the graphics card (if installed) and not the motherboard's integrated graphics port.
- Sæt grafikkortet tilbage i dets PCIe-slot.
- Overophedning:
- Sørg for, at alle kabinetblæsere drejer og er orienteret korrekt for optimal luftstrøm (indsugning/udsugning).
- Rengør eventuelle støvfiltre og interne komponenter.
- Verify that the CPU cooler is properly seated and making good contact with the CPU.
For more complex issues, consult your component manuals or seek assistance from Xigmatek support or a qualified technician.
9. Specifikationer
| Feature | Specifikation |
|---|---|
| Mærke | Xigmatek |
| Modelnavn | Lux M |
| Modelnummer | EN48540 |
| Sagstype | Mini Tower |
| Bundkort kompatibilitet | Micro-ATX, Mini-ITX |
| Materiale | Tempered Glass (side panel), Metal (front panel) |
| Farve | Sort |
| Forudinstallerede ventilatorer | 4 x 120mm X24F Fixed RGB Fans |
| Radiatorstøtte | 360 mm, 240 mm, 120 mm |
| Max CPU kølerhøjde | 160 mm |
| Maksimal VGA-længde | 320 mm |
| Max PSU-længde | 165 mm |
| Opbevaringsbåse | 2x 2.5"/3.5" |
| Særlige funktioner | RGB Lighting, Triangular Mesh Front Design |
10. Garanti og support
Xigmatek products are manufactured to the highest quality standards. For warranty information and technical support, please refer to the warranty card included with your product or visit the official Xigmatek webwebsted. Gem venligst din købsbevis til garantikrav.
For further assistance, you may contact Xigmatek customer support through their official channels.


