
Sonew Sonew3wabr985xe448
Sonew Intelligent Door Lock Cylinder User Manual
Model: Sonew3wabr985xe448
1. Introduktion
Thank you for choosing the Sonew Intelligent Door Lock Cylinder. This smart lock offers advanced security features and multiple convenient unlocking methods, including fingerprint, password, and traditional key. This manual provides detailed instructions for installation, setup, operation, and maintenance to ensure optimal performance and security.
Pakkens indhold
Kontroller venligst, at alle nedenstående varer er inkluderet i din pakke:
- 1 x Smart Lock Cylinder
- 2 x nøgler
- 1 x skruetrækker
- 1 x Silicone Suction Cup
- 1 x Brugermanual (dette dokument)

Figure 1.1: Sonew Smart Lock Cylinder and its accessories.
2. Specifikationer
The following table outlines the technical specifications of the Sonew Intelligent Door Lock Cylinder:
| Feature | Specifikation |
|---|---|
| Varetype | Smart låsecylinder |
| Materiale | Zinklegering |
| Sikkerhedsniveau | Top |
| Adaptable Door Types | Security Doors, Doors, Wooden Doors, Glass Doors |
| Adaptable Door Thickness | Approx. 40mm-100mm (1.57-3.94in) |
| Lock Cylinder Size | 70mm (2.76in), with hole in middle (35mm/1.38in, 35mm) |
| Adgangskodekapacitet | 30 Groups (First group is management password) |
| Password Længde | 6-12 cifre |
| Oprindelig adgangskode | 123456 |
| Fingeraftrykskapacitet | 100 stk |
| Elektrostatisk afladning (ESD) | 15 KV |
| Strømindgang | 3.6-5V |
| Nuværende (fungerer) | <135mA |
| Aktuel (standby) | <10uA |
| Arbejdstemperatur | -20℃ til 70℃ (-4°F til 158°F) |
| Compression Cycles | 100,000 gange |
| Batteritype | 3 x AAA batterier (medfølger ikke) |
| Oplåsningsmetoder | Fingerprint, Password, Key |

Figure 2.1: Door thickness and lock cylinder size compatibility.
3. Installation
Follow these steps to install your Sonew Intelligent Door Lock Cylinder. Ensure your door thickness is between 40mm and 100mm.
- Forbered døren: Ensure your door has a standard lock cylinder hole. If replacing an existing lock, remove the old cylinder.
- Insert the Lock Cylinder: Insert the main lock cylinder body into the door's lock hole. Ensure the central part aligns correctly.
- Fastgør cylinderen: Use the provided screwdriver to tighten the fixed core screw, securing the cylinder in place.
- Fastgør håndtag: Connect the front handle (with keypad) and the rear handle to the lock cylinder. Ensure they are oriented correctly for inside and outside.
- Endelig stramning: Secure the handles with the fixed screw bolts.

Figure 3.1: Installation diagram of the smart lock cylinder.
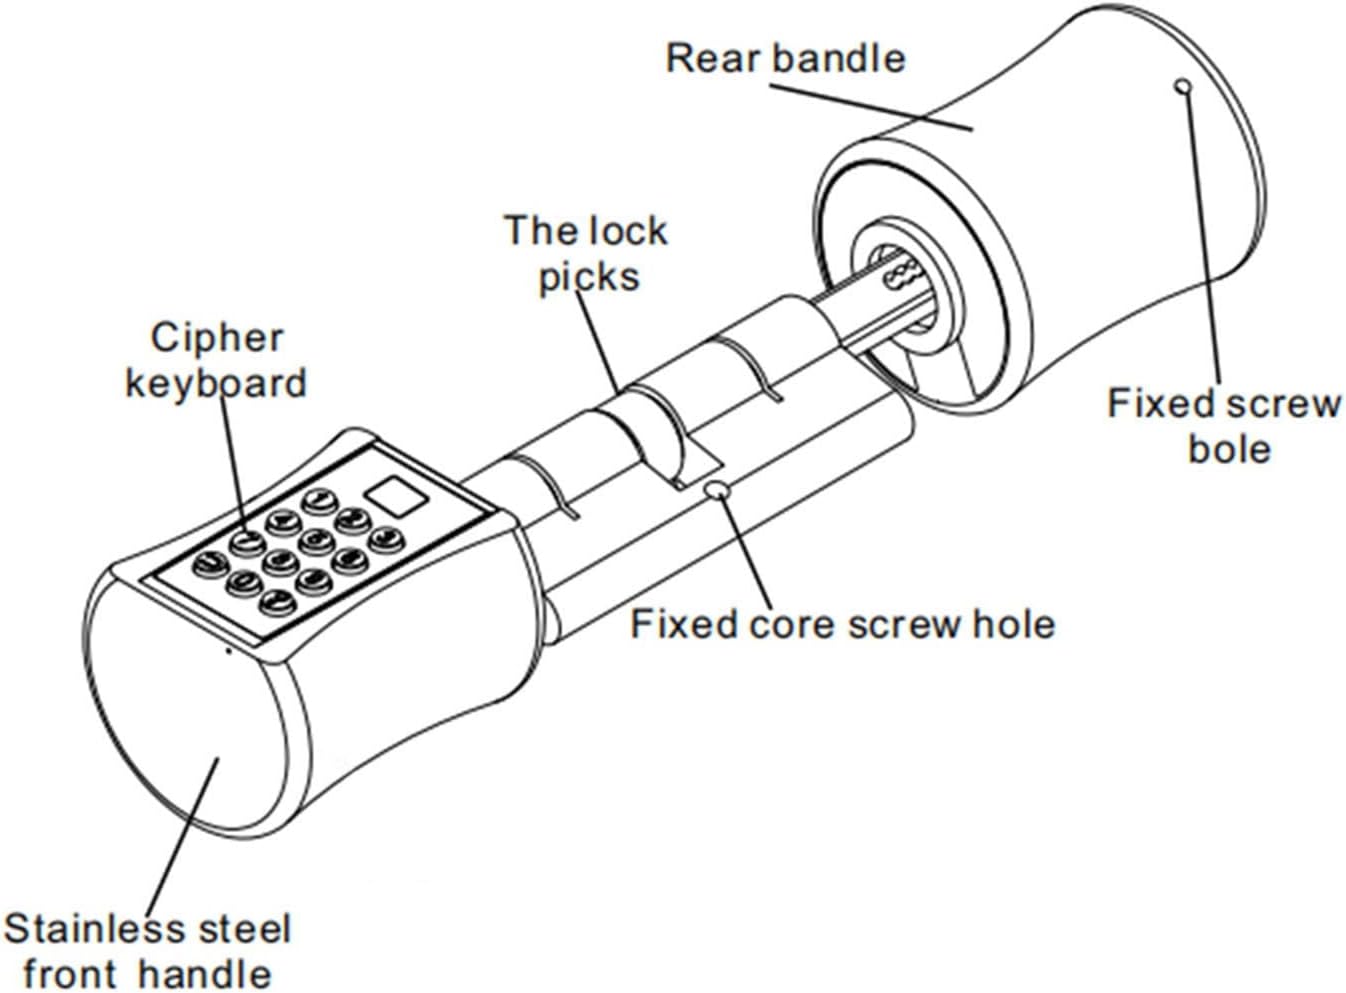
Figur 3.2: Eksploderet view of lock components.
4. Indledende opsætning og programmering
Before first use, you need to install batteries and set up the management password and user fingerprints.
4.1 Batteriinstallation
The lock requires 3 AAA batteries (not included). Locate the battery compartment, typically on the inside handle, and insert the batteries according to the polarity indicators.
4.2 Setting the Management Password
The initial password is 123456. It is highly recommended to change this immediately.
- Tryk på * nøgle.
- Enter the current management password (default: 123456) followed by #.
- Trykke 1 to enter password management mode.
- Trykke 1 again to add a new management password.
- Enter your new 6-12 digit management password followed by #.
- Re-enter the new management password followed by # for at bekræfte.
- A confirmation tone indicates success.
4.3 Registrering af fingeraftryk
The lock can store up to 100 fingerprints. For optimal recognition, ensure your finger is clean and dry.
- Tryk på * nøgle.
- Enter the management password followed by #.
- Trykke 2 to enter fingerprint management mode.
- Trykke 1 to add a new fingerprint.
- Place your finger on the fingerprint sensor. Lift and place it again several times (typically 4-5 times) from different angles until the lock confirms successful registration.
- A confirmation tone indicates success. Repeat for additional fingerprints.

Figure 4.1: Using the fingerprint sensor for registration and unlocking.
5. Betjening
The Sonew Smart Lock offers multiple ways to unlock your door.
5.1 Oplåsning med fingeraftryk
Placer din registrerede finger på fingeraftrykssensoren. Låsen låses op på cirka 0.02 sekunder, hvis fingeraftrykket genkendes.
5.2 Oplåsning med adgangskode
Enter your registered password on the keypad followed by the # key. The lock will unlock.
5.3 Virtual Password Function (Enhanced Security)
To prevent others from peeking at your password, you can enter random digits before and after your actual password. Only the correct sequence of your password needs to be present within the entered digits.
Exampdet: If your password is 123456, kan du indtaste 987123456012 and the lock will still open.
5.4 Unlocking with Key
In case of battery depletion or electronic malfunction, you can always use the provided physical keys to unlock the door manually.

Figure 5.1: Keypad and fingerprint sensor for unlocking.

Figure 5.2: Physical keys for manual unlocking.
6. Vedligeholdelse
6.1 Battery Replacement and Emergency Power
The lock will issue a low battery alarm when the voltage is too low. Replace the 3 AAA batteries promptly to ensure continuous operation.
In an emergency, if the batteries are completely depleted, there is a power interface near the keyhole. You can connect a 5V power source (e.g., a power bank) to temporarily power the lock and unlock it.
6.2 Rengøring
Wipe the lock surface with a soft, dry cloth. Do not use abrasive cleaners or solvents, as they may damage the finish or electronic components. Keep the fingerprint sensor clean for optimal performance.
6.3 Generel pleje
Avoid exposing the lock to extreme temperatures or direct water spray. The lock is designed for indoor use or protected outdoor environments.
7. Fejlfinding
If you encounter issues with your Sonew Smart Lock, refer to the following common problems and solutions:
| Problem | Mulig årsag/løsning |
|---|---|
| Lås reagerer ikke. |
|
| Fingeraftryk ikke genkendt. |
|
| Adgangskoden virker ikke. |
|
| Lock cylinder feels loose after installation. |
|
8. Garanti og support
For any product inquiries, technical support, or warranty claims, please contact Sonew customer service through the retailer where you purchased the product or visit the official Sonew brand store on Amazon.
Sonew Brand Store: https://www.amazon.com/stores/Sonew/page/331933A2-EC71-47F9-8BF4-25DD5775CEBD
Gem venligst din købsbevis af garantihensyn.
Ask a question about this manual
Ask about setup, troubleshooting, compatibility, parts, safety, or missing instructions. Manuals+ will review the question and use this page’s manual context to help answer it.