1. Introduktion
Thank you for choosing the CREWORKS 8-in-1 Heat Press. This versatile machine is designed for transferring designs onto various items such as T-shirts, bags, hats, mugs, and plates using heat transfer or sublimation paper and vinyl. Its 30x38cm heating platen provides ample space for creative projects, offering professional results for both personal and commercial use.
Key features of your heat press include:
- Kraftfuld funktionalitet: Equipped with a 30x38cm Teflon-coated heating panel for efficient and safe operation.
- Dobbelt digitalt display: Features a digital timer and dual temperature control display for precise and intuitive operation.
- Praktisk design: Rack-type control box for easy connection and immediate use.
- Nem betjening: Drawer-type work platform allows for simple replacement of accessories. Aluminum grill lid base and baking sheets ensure mechanical strength and reduced weight.
- Alsidighed: The 8-in-1 design accommodates a wide range of items including T-shirts, mouse pads, backpacks, pillowcases, mugs, and hats.
2. Sikkerhedsinstruktioner
Please read all safety instructions carefully before operating the heat press to prevent injury or damage to the machine. Keep this manual for future reference.
- Tilslut altid maskinen til en jordet stikkontakt med den korrekte lydstyrke.tage (220V / 50Hz).
- Do not touch the heating platen or other hot surfaces during operation or immediately after use. Use heat-resistant gloves if necessary.
- Hold børn og kæledyr væk fra maskinen under drift.
- Ensure adequate ventilation in the work area to dissipate heat and fumes from transfer materials.
- Never leave the machine unattended while it is powered on or operating.
- Betjen ikke maskinen med våde hænder eller i damp forhold.
- Tag stikket ud af stikkontakten, når maskinen ikke er i brug, eller før rengøring og vedligeholdelse.
- Hvis netledningen er beskadiget, skal den udskiftes af producenten, dennes serviceagent eller lignende kvalificerede personer for at undgå en fare.
- The machine is designed with a heat-resistant casing, capable of withstanding temperatures up to 250°C (480°F). However, direct contact with hot surfaces should still be avoided.

Figure 2.1: The heat press features a heat-resistant casing and insulation layers, designed to protect users from direct heat and capable of withstanding temperatures up to 250°C (480°F).
3. Produktkomponenter
Familiarize yourself with the main parts of your CREWORKS 8-in-1 Heat Press:
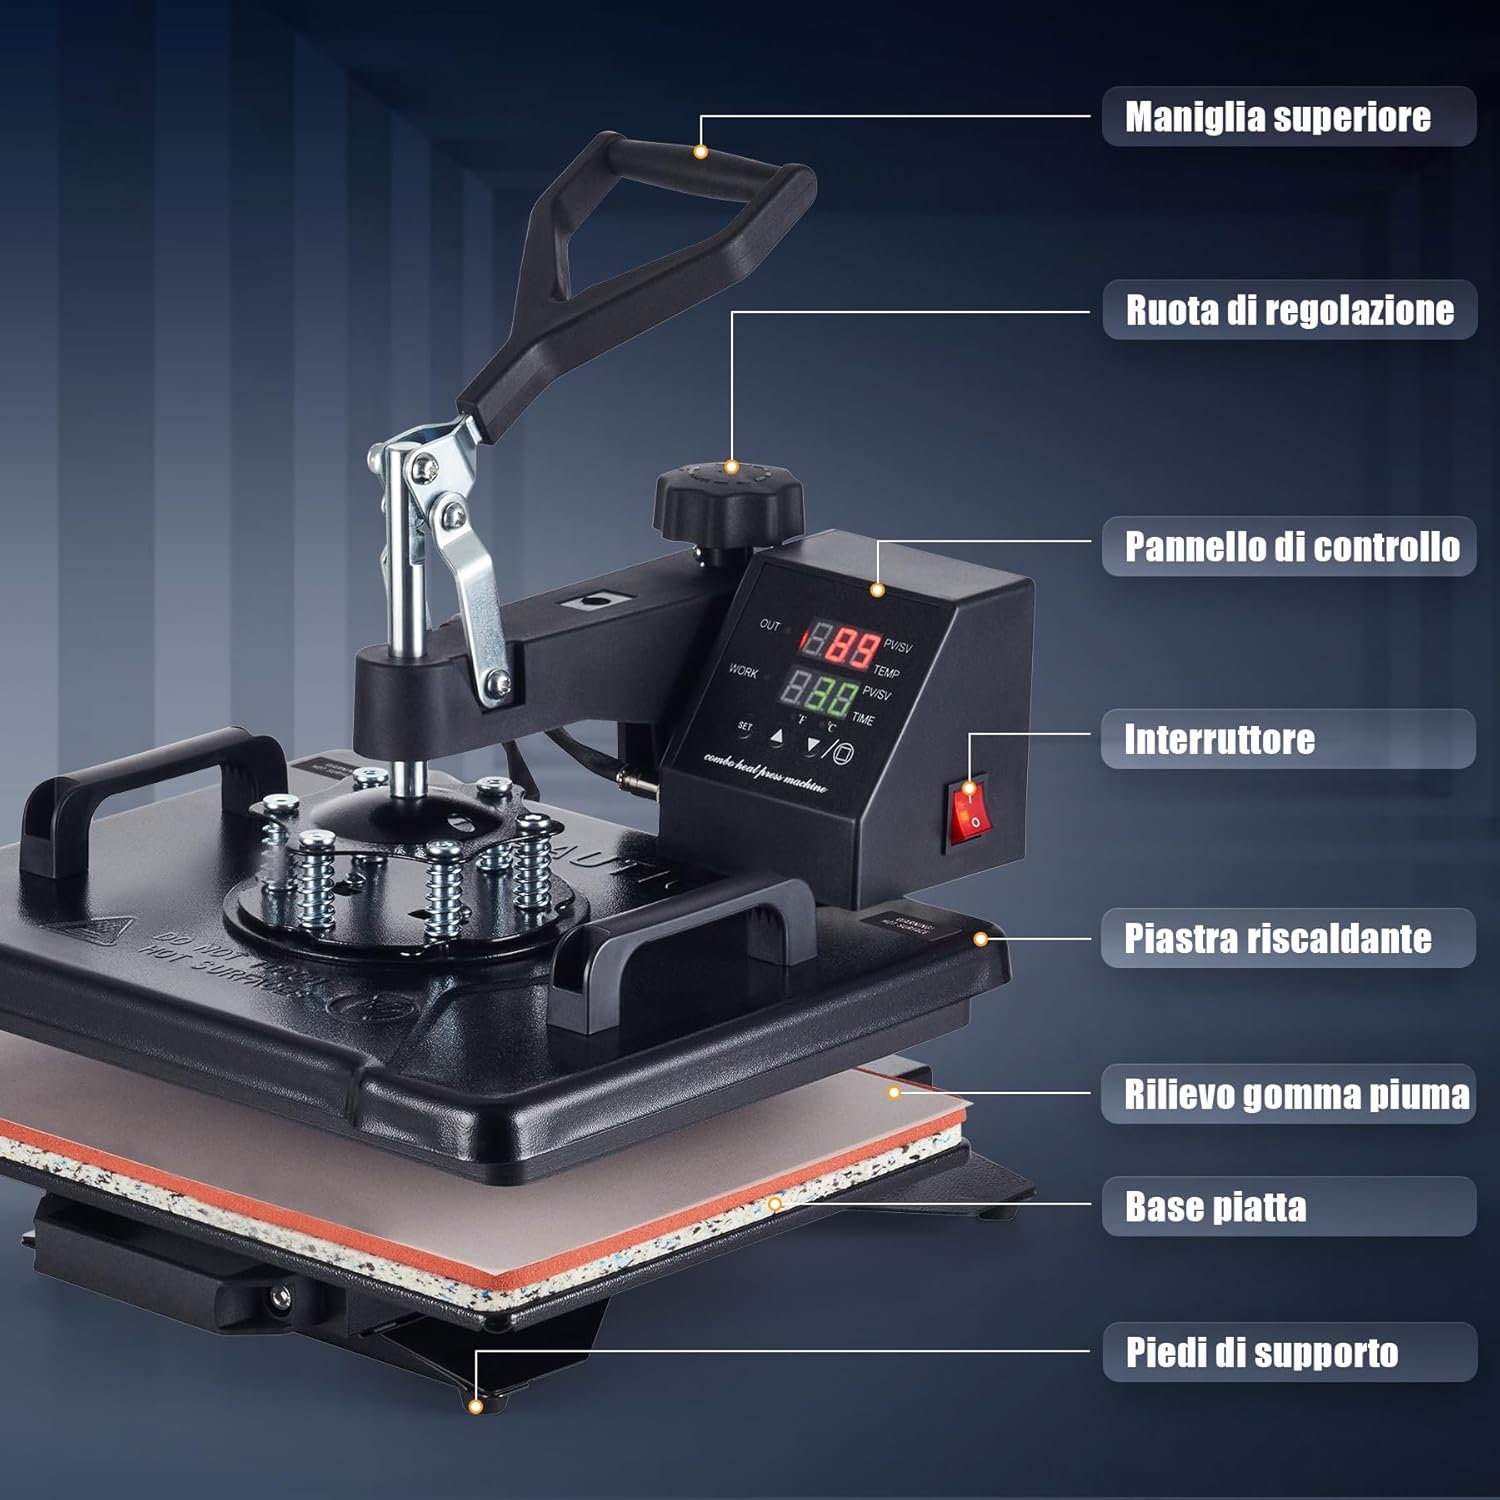
Figure 3.1: This diagram identifies the key parts of your heat press machine, including the top handle, adjustment wheel, control panel, power switch, heating platen, foam rubber pad, flat base, and support feet.
- Øverste håndtag: Used to lift and lower the heating platen.
- Justeringshjul: Controls the pressure applied by the heating platen.
- Kontrolpanel: Digital display for setting temperature and time.
- Afbryderen: Tænder/slukker maskinen.
- Varmeplade: The upper heated surface that applies heat and pressure.
- Foam Rubber Pad: Provides a soft, heat-resistant surface for items.
- Flad base: The lower platform where items are placed.
- Støttefødder: Stabilize the machine during operation.
4. Pakkens indhold
Ved udpakning skal du kontrollere, at alle følgende varer er inkluderet:
- 1 x Heat Press Main Unit
- 1 x 9 oz Cup Press Attachment
- 1 x 11 oz Cup Press Attachment
- 1 x 12 oz Cup Press Attachment
- 1 x 17 oz Cup Press Attachment
- 1 x 5" Plate Press Attachment
- 1 x 6" Plate Press Attachment
- 1 x Cap Press Attachment
- 1 x Instruction Manual (English or German)
5. Specifikationer
| Feature | Specifikation |
|---|---|
| Mærke | BEMANNINGER |
| Model | 30x38cm 8 in 1 |
| Magt | 1150W |
| Voltage | 220V / 50Hz |
| Maks. Temperatur | 250°C (480°F) |
| Timer kontrol | 0-999 sekunder |
| Overordnede dimensioner | 30 x 38 x 49.5 cm (12 x 15 x 19.5 '') |
| Højdeområde | 34-43 cm (13.25-17 tommer) |
| Pladeområde | 30 x 38 cm (12 x 15 tommer) |
| Kabellængde | 137 cm (4.5 fod) |
| Varens vægt | 11.5 kilo |
| Materiale | Ceramic, Silicone, Vinyl (for accessories) |
| Anbefalede anvendelser | Bag, Bottle, Cap, Handbag, Hat, Mouse Pad, Mug, Pillow, Plate, Socks, T-Shirt |
6. Opsætning
Follow these steps for initial setup of your heat press:
- Pakker ud: Fjern forsigtigt alle komponenter fra emballagen. Gem emballagen til senere opbevaring eller transport.
- Placering: Place the main heat press unit on a stable, heat-resistant surface in a well-ventilated area. Ensure there is enough space around the machine for safe operation and rotation.
- Control Box Connection: The control box is designed for rack-type installation. Simply connect the control box to the main unit. Ensure all connections are secure.
- Strømtilslutning: Plug the power cord into a grounded 220V / 50Hz electrical outlet.
- Indledende kontrol: Before first use, turn on the power switch and allow the machine to heat up to a low temperature (e.g., 100°C) to ensure all functions are working correctly. Observe for any unusual smells or sounds.
7. Betjeningsvejledning
This section outlines the general operation of your heat press. Specific settings (temperature, time, pressure) will vary depending on the material and transfer type.

Figure 7.1: Operating the heat press is simplified into three main steps: 1. Lift and rotate the heating platen away from the base. 2. Position your item and design on the silicone pad. 3. Lower the heating platen and apply pressure to begin the transfer.
7.1. Grundlæggende betjeningstrin
- Tænd: Turn on the main power switch located on the control panel.
- Indstil temperatur og tid: Use the digital control panel to set the desired temperature and time according to your transfer material's specifications. Refer to Section 7.2 for details.
- Forvarm: Allow the machine to reach the set temperature. The display will indicate when the target temperature is achieved.
- Forbered vare: Lift the top handle and rotate the heating platen 360 degrees to the side, away from the base. This provides a clear workspace.
- Position Element: Place your item (e.g., T-shirt, mug) onto the appropriate pad or attachment. Lay your transfer design onto the item.
- Påfør tryk: Rotate the heating platen back over the item. Lower the top handle firmly to engage the heating platen with the item. The timer will start automatically.
- Fuld overførsel: Once the timer alarms, lift the top handle and rotate the heating platen away from the item. Carefully remove the transferred item.
- Sluk: When finished, turn off the power switch and unplug the machine.
7.2. Control Panel Settings
The intuitive LED control panel allows precise adjustment of temperature and time.

Figure 7.2: The intuitive LED control panel displays the maximum temperature (250°C / 480°F) and timer interval (0-999 seconds). It also provides recommended temperature settings for common materials like chemical fibers (160°C), cotton apparel (170°C), and ceramic mugs (200°C).
- Temperaturindstilling: Press the 'SET' button, then use the up/down arrows to adjust the target temperature. Press 'SET' again to confirm. The maximum temperature is 250°C (480°F).
- Tidsindstilling: Press the 'SET' button twice, then use the up/down arrows to adjust the transfer time in seconds. Press 'SET' again to confirm. The timer range is 0-999 seconds.
- Temperaturenhed: The display can switch between Celsius and Fahrenheit. Consult the manual for specific instructions on changing units if needed.
Anbefalede temperaturretningslinjer:
- Chemical Fibers: Approximately 160°C
- Cotton Apparel: Approximately 170°C
- Ceramic Mugs: Approximately 200°C
Note: These are general guidelines. Always refer to the specific instructions provided with your transfer material and item.
7.3. Trykjustering
The pressure adjustment wheel allows you to fine-tune the downward force of the heating platen. Proper pressure is crucial for a successful transfer.

Figure 7.3: The machine features a 360-degree swivel design for safe and easy placement of items, along with a pressure adjustment knob to apply the correct force for various materials.
- To Increase Pressure: Turn the adjustment wheel clockwise.
- To Decrease Pressure: Turn the adjustment wheel counter-clockwise.
- Testing Pressure: Before heating, close the platen onto your item. You should feel a firm resistance when closing the handle. Adjust until the desired pressure is achieved.
7.4. Brug af forskellige tilbehør
The 8-in-1 heat press includes various attachments for different items. The drawer-type work platform makes changing accessories straightforward.
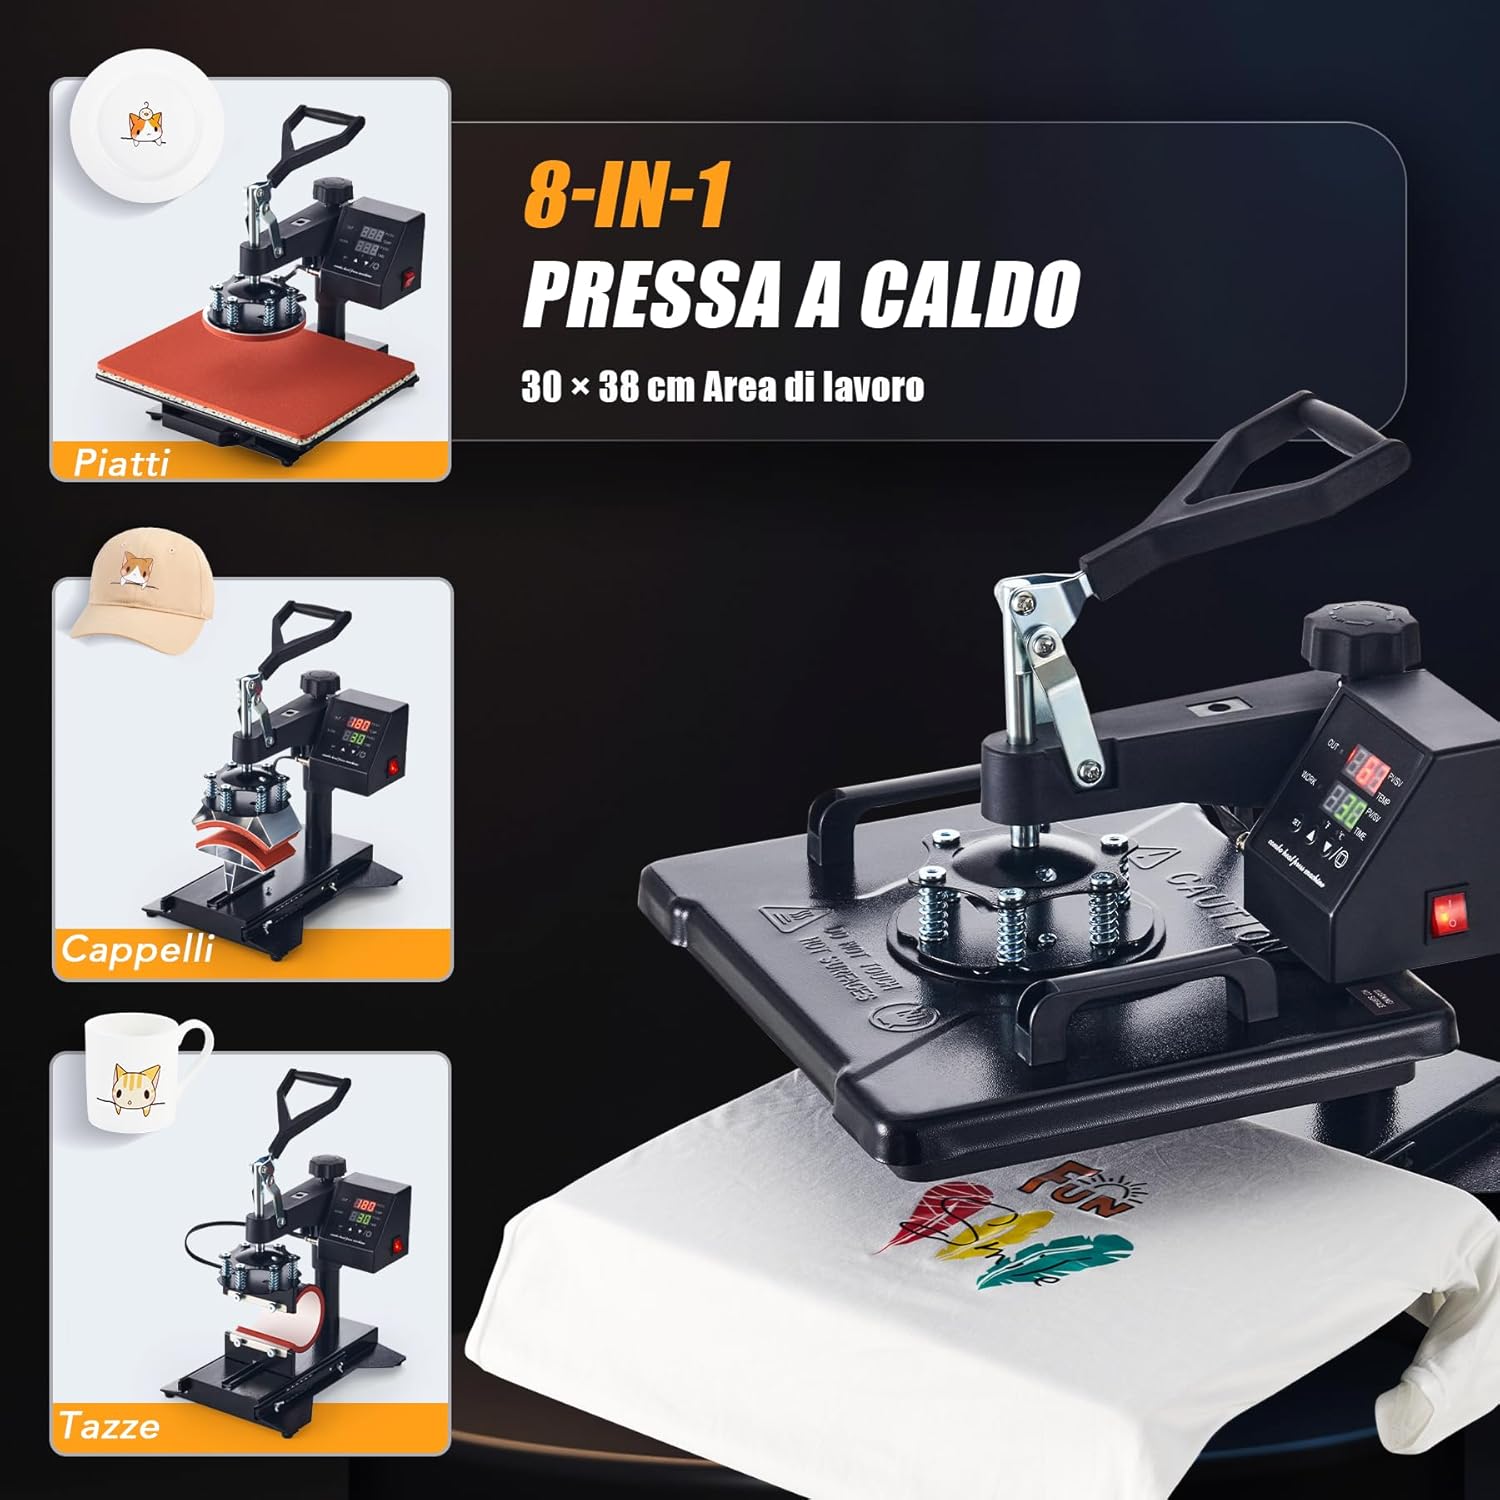
Figure 7.4: The CREWORKS 8-in-1 Heat Press comes with various attachments, allowing you to transfer designs onto different items such as plates, caps, and mugs, in addition to flat items like T-shirts.
- Ændring af vedhæftede filer: Ensure the machine is unplugged and cool. Loosen any securing screws or clips holding the current attachment. Carefully remove it and install the desired attachment (e.g., mug press, plate press, cap press). Secure it firmly.
- Kruspresse: Use the appropriate mug attachment for your mug size (9oz, 11oz, 12oz, 17oz). Adjust the pressure knob on the mug attachment to ensure a snug fit around the mug.
- Pladepresse: Use the 5" or 6" plate attachment. Ensure the plate is centered and stable.
- Cap Press: Use the cap attachment. Position the cap securely on the curved surface.
7.5. Uniform Heat Transfer
The CREWORKS heat press is designed with a dual-tube heating element to ensure consistent results.
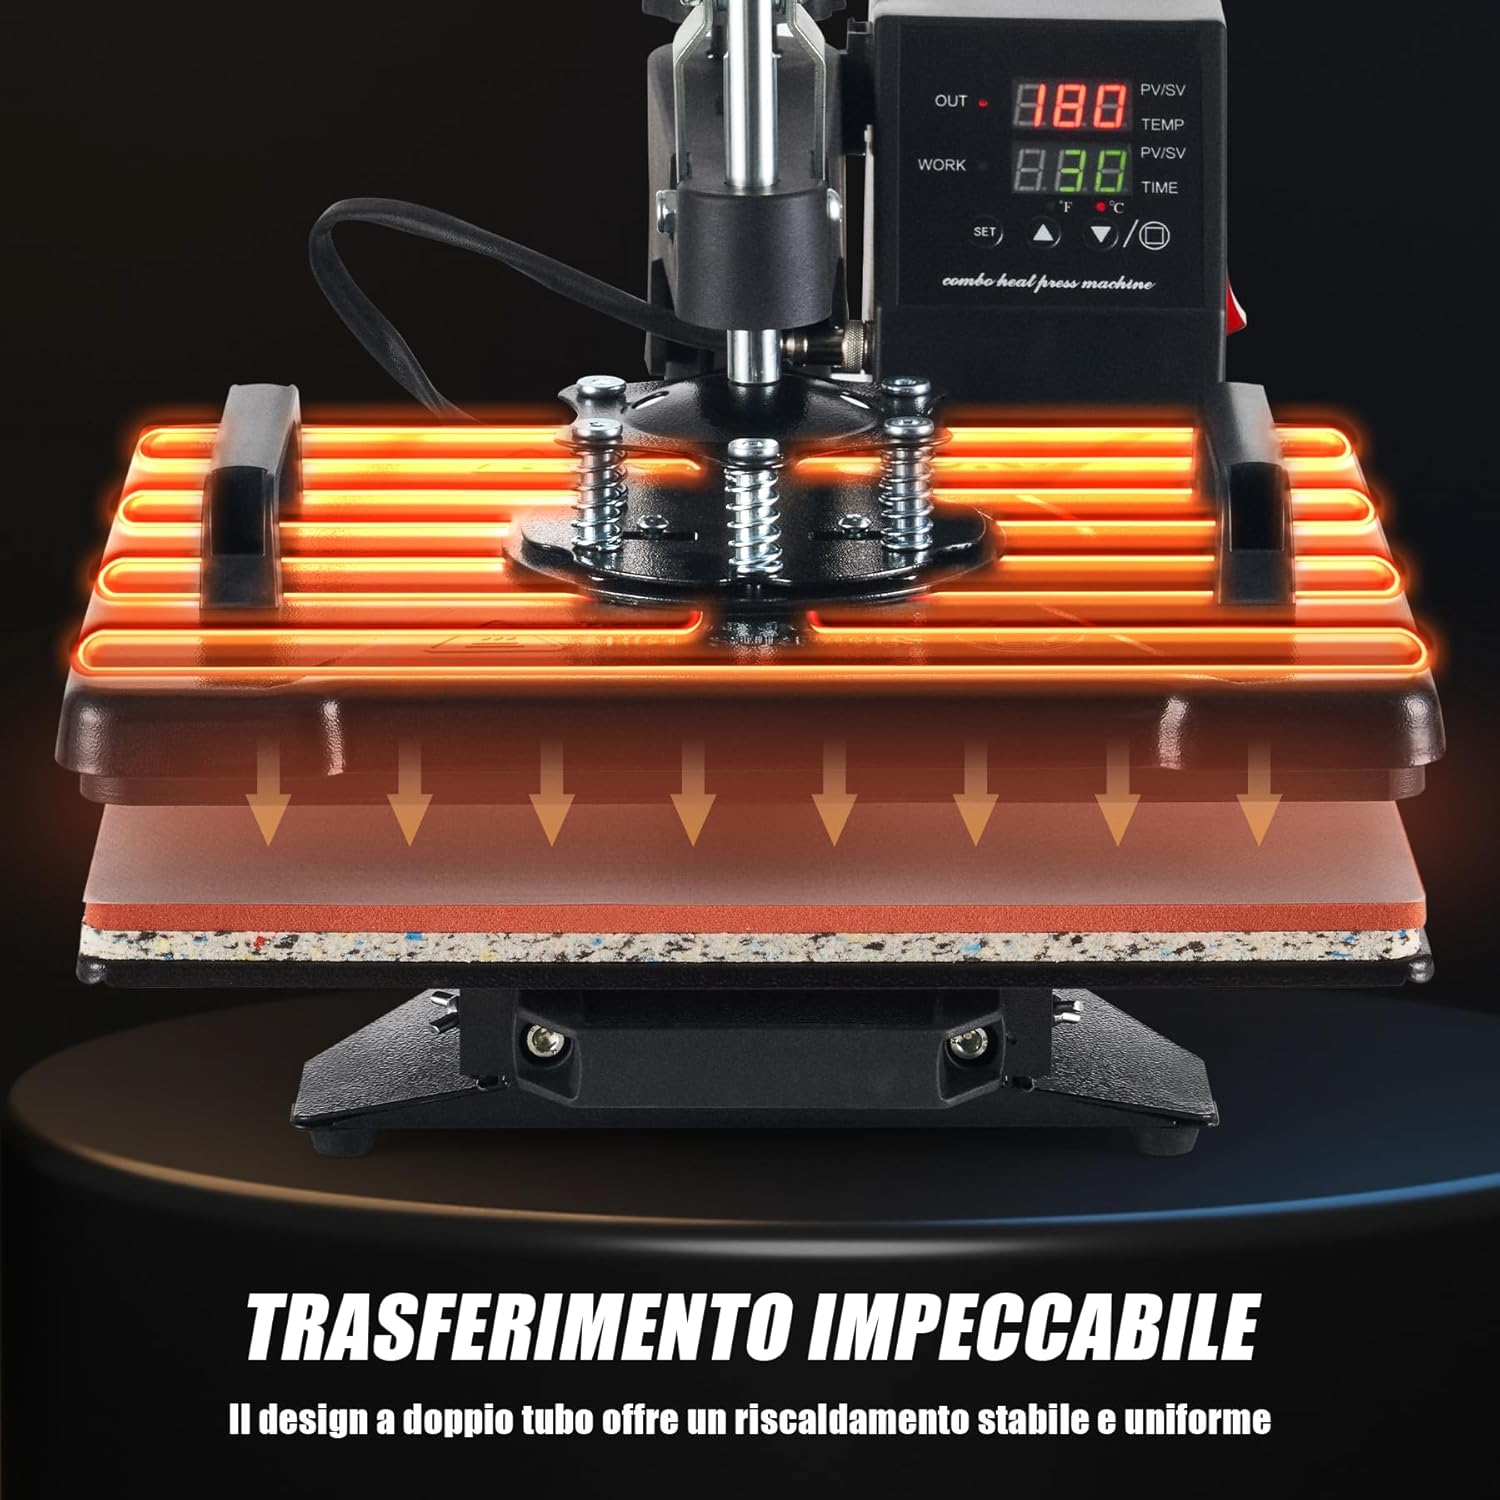
Figure 7.5: The dual-tube heating design ensures stable and uniform heat distribution across the entire platen, guaranteeing consistent and high-quality transfers.
The dual-tube heating design provides stable and uniform heat distribution across the entire platen surface. This minimizes cold spots and ensures that your designs are transferred evenly and consistently, resulting in professional-quality finished products.
8. Vedligeholdelse
Regelmæssig vedligeholdelse sikrer din varmepresses levetid og optimale ydeevne.
- Rengøring af pladen: Ensure the machine is cool and unplugged. Use a soft, damp cloth to wipe down the Teflon-coated heating platen. For stubborn residue, use a specialized platen cleaner. Avoid abrasive cleaners or tools that could scratch the surface.
- Rengøring af silikonepuden: The silicone pad can be wiped with a damp cloth. If it becomes heavily soiled or damaged, it may need replacement to ensure even pressure.
- Generel rengøring: Tør maskinens yderside af med en tør eller let fugtig klud.amp klud til at fjerne støv og snavs.
- Opbevaring: Store the heat press in a clean, dry environment when not in use.
- Inspektion: Periodically check all cables and connections for signs of wear or damage. Do not operate the machine if any part is damaged.
9. Fejlfinding
If you encounter issues with your heat press, refer to the table below for common problems and solutions.
| Problem | Mulig årsag | Løsning |
|---|---|---|
| Maskinen tænder ikke | Power cord not plugged in; Power outlet fault; Main switch off | Check power cord connection; Test outlet with another device; Ensure main switch is ON. |
| Heating platen not heating up | Temperature not set; Heating element fault | Verify temperature setting on control panel; Contact customer support if issue persists. |
| Uneven transfer results | Uneven pressure; Incorrect temperature/time; Damaged silicone pad | Adjust pressure knob; Verify temperature and time settings; Inspect and replace silicone pad if damaged. |
| Overførslen klæber ikke | Insufficient temperature; Insufficient time; Insufficient pressure; Incorrect transfer material | Increase temperature or time; Increase pressure; Ensure correct transfer material for item; Consult transfer material instructions. |
| Design peeling or cracking | Over-pressing; Too high temperature; Incorrect peeling method (hot/cold peel) | Reduce pressure or time; Lower temperature; Follow transfer material's specific peeling instructions. |
If you encounter a problem not listed here or if the suggested solutions do not resolve the issue, please contact CREWORKS customer support.
10. Garanti og support
CREWORKS products are manufactured to high-quality standards. For information regarding warranty coverage, please refer to the warranty card included with your product or visit the official CREWORKS webwebsted.
For technical assistance, troubleshooting, or spare parts, please contact CREWORKS customer support through the retailer where you purchased the product or via the contact information provided on the official CREWORKS webwebsted.