1. Introduktion
Thank you for choosing the NinjaABXY Wireless Presenter Remote. This device is designed to enhance your presentations by providing seamless control over your slides and a bright red laser pointer for highlighting key information. With its plug-and-play functionality and ergonomic design, it offers a professional and convenient experience for speeches, meetings, and classroom environments.
2. Produktet er slutview og funktioner
The NinjaABXY Wireless Presenter Remote combines essential features for effective presentations:
- Trådløs kontrolrækkevidde: Up to 50 feet, allowing freedom of movement.
- Rød lasermarkør: A bright red laser with a range of up to 300 feet for clear highlighting.
- Intuitive knapper: Dedicated buttons for page up/down, full screen/black screen, and laser activation.
- Plug and Play: No software installation required for most operating systems.
- Built-in USB Receiver: Conveniently stored inside the presenter to prevent loss.
- Ergonomisk design: Comfortable to hold and easy to carry.

Figure 1: Key features of the Wireless Presenter Remote.

Figur 2: Detaljeret view of the presenter's buttons and internal components.
3. Opsætning
3.1 Battery Installation and USB Receiver Access
The presenter requires one AAA battery (not included). The USB receiver is conveniently stored inside the presenter's battery compartment.
- Gently slide open the back cover of the presenter.
- Remove the USB receiver from its slot.
- Insert one AAA battery into the battery slot, ensuring correct polarity.
- Sæt bagdækslet på igen.
- Locate the ON/OFF switch on the side of the presenter and slide it to the "ON" position.

Figur 3: Batteriinstallation og placering af USB-modtager.
3.2 Connecting the USB Receiver (Plug and Play)
The presenter is designed for plug-and-play operation with most systems.
- Sæt USB-modtageren i en ledig USB-port på din computer.
- The computer should automatically detect and install the necessary drivers. The USB receiver's flash light indicates a successful connection.
- Once connected, the presenter is ready for use.

Figure 4: Plug and Play setup with the USB receiver.
3.3 Mac OS Specific Setup
For Mac OS users, a simple one-time setup may be required to ensure full functionality:
- Plug the USB receiver into your Mac.
- Open "System Preferences" and select "Keyboard".
- Click "Change Keyboard Type".
- When prompted, triple-press either the next page or previous page button on the presenter.
- A window will appear after a few seconds. Click "OK".
- Select the "ANSI" option and click "Done".
Video 1: Demonstrating the setup process for Mac OS. This video shows how to install the battery, connect the USB receiver, and perform the specific keyboard setup steps for Mac computers.
4. Betjeningsvejledning
4.1 Button Functions and Slide Navigation
The presenter remote features intuitive buttons for easy control during your presentation:
- Side op/ned-knapper: Use the arrow buttons to navigate forward or backward through your presentation slides.
- Fuld skærm knap: Press the button with the full screen icon to enter or exit full screen mode in your presentation software.
- Sort skærm knap: Press the button with the black screen icon to temporarily black out the screen, drawing audience attention back to you. Press again to resume the presentation.
- Laserpointer-knap: Press and hold the central button with the triangle icon to activate the red laser pointer. Release to turn off.

Figure 5: Wireless and laser range for effective interaction.

Figure 6: The Wireless Presenter is a valuable tool for various presentation settings.
Video 2: Demonstration of basic slide navigation and screen blanking functions.
Video 3: A short demonstration of the presenter's basic functions.
4.2 Bred kompatibilitet
The presenter is compatible with a wide range of software and operating systems, making it a versatile tool for various users:
- Understøttet software: MS Word, Excel, PowerPoint, ACD See, websites, iWork (Keynote, Numbers, Pages), Google Slides, Prezi, etc.
- Understøttede operativsystemer: Windows, Mac OS, Linux, Android, Chromebook.
- Kompatible enheder: PC, Desktop, Computer, Laptop, Projector Screen.

Figure 7: Compatibility with popular software and operating systems.
5. Vedligeholdelse
- Udskiftning af batteri: Replace the AAA battery when the laser pointer or remote functions become weak or unresponsive.
- Rensning: Brug en blød, tør klud til at rengøre overfladen på præsentatoren. Undgå at bruge skrappe kemikalier eller slibende materialer.
- Opbevaring: When not in use, store the USB receiver securely in its designated slot within the presenter's battery compartment to prevent loss. Store the presenter in a cool, dry place away from direct sunlight and extreme temperatures.
6. Fejlfinding
- Presenter not responding:
- Ensure the ON/OFF switch on the side of the presenter is in the "ON" position.
- Kontroller, om AAA-batteriet er isat korrekt og har tilstrækkelig opladning. Udskift det om nødvendigt.
- Kontroller, at USB-modtageren er korrekt tilsluttet en fungerende USB-port på din computer.
- For Mac OS, ensure the specific setup steps (Section 3.3) have been completed.
- Laser pointer not working:
- Ensure the presenter is turned on and the battery has power.
- Press and hold the central laser button firmly.
- Note: The red laser is not recommended for TV/LED/LCD screens as it may not be clearly visible.
- Intermitterende forbindelse:
- Prøv at tilslutte USB-modtageren til en anden USB-port på din computer.
- Ensure there are no major obstructions or strong wireless interference between the presenter and the USB receiver.
7. Specifikationer
| Modelnummer | RLP303 |
| Trådløs teknologi | 2.4 GHz RF |
| Trådløs kontrolafstand | Op til 50 fod (15 meter) |
| Laser Display Range | Op til 300 fod (91 meter) |
| Laser farve | Rødt Lys |
| Batteritype | 1 x AAA-batteri (medfølger ikke) |
| Produktdimensioner | 5.1 x 3.5 x 1.6 tommer (12.95 x 8.89 x 4.06 cm) |
| Varens vægt | 0.9 ounce (25.5 gram) |
| Materiale | ABS plast |
8. Garanti og support
All NinjaABXY products come with a 30 dages gratis erstatningsservice og en 90 dages garanti, ensuring a hassle-free purchase experience. We are committed to customer satisfaction and product quality.
If you have any questions about your Wireless Presenter Remote, require technical assistance, or need to claim your warranty, please do not hesitate to contact us. Our dedicated support team is ready to assist you.
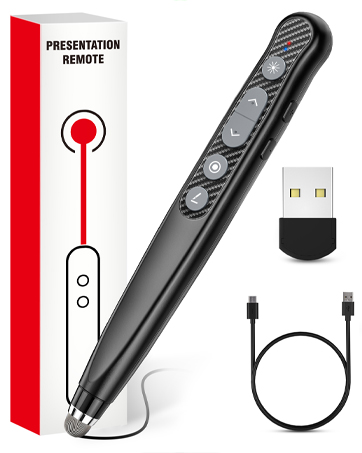
Figure 8: Contact us for support.