Agrieyes AG-W02F
Agrieyes Blue Rechargeable Flashing Lights Instruction Manual
Model: AG-W02F | Brand: Agrieyes
1. Produktet er slutview
The Agrieyes Blue Rechargeable Flashing Lights are designed as wireless warning hazard beacon lights for various vehicles, including trucks, engineering vehicles, and agricultural machinery. These lights feature a strong magnetic base for easy installation and are built with durability and high visibility in mind, ensuring enhanced safety in diverse conditions.

Image 1.1: Agrieyes Blue Rechargeable Flashing Lights, showing the two lights and their carrying case.
2. Produktfunktioner
- Excellent Waterproof Rating: Manufactured with a glue-filling process to protect the PCB board and LEDs, coupled with advanced ultrasonic fusion technology for thorough sealing and superior waterproof effect.
- Høj kvalitetskonstruktion: Features high brightness output with excellent housing for better heat dissipation, extending the life of the lights to more than 50,000 hours.
- Low Power, Super Brightness: Professional wiring design with efficient photoelectric energy conversion, reducing power consumption by 15% while increasing brightness by 30%.
- Longer-Lasting Power: Once fully charged for 8 hours, the lights provide extended use, suitable for prolonged operation.
- Nem at installere: Equipped with 5 strong magnets, these wireless strobe lights can be installed anywhere on a vehicle, such as on the roof, body, or tail, and are designed to remain secure at speeds up to 60 mph.
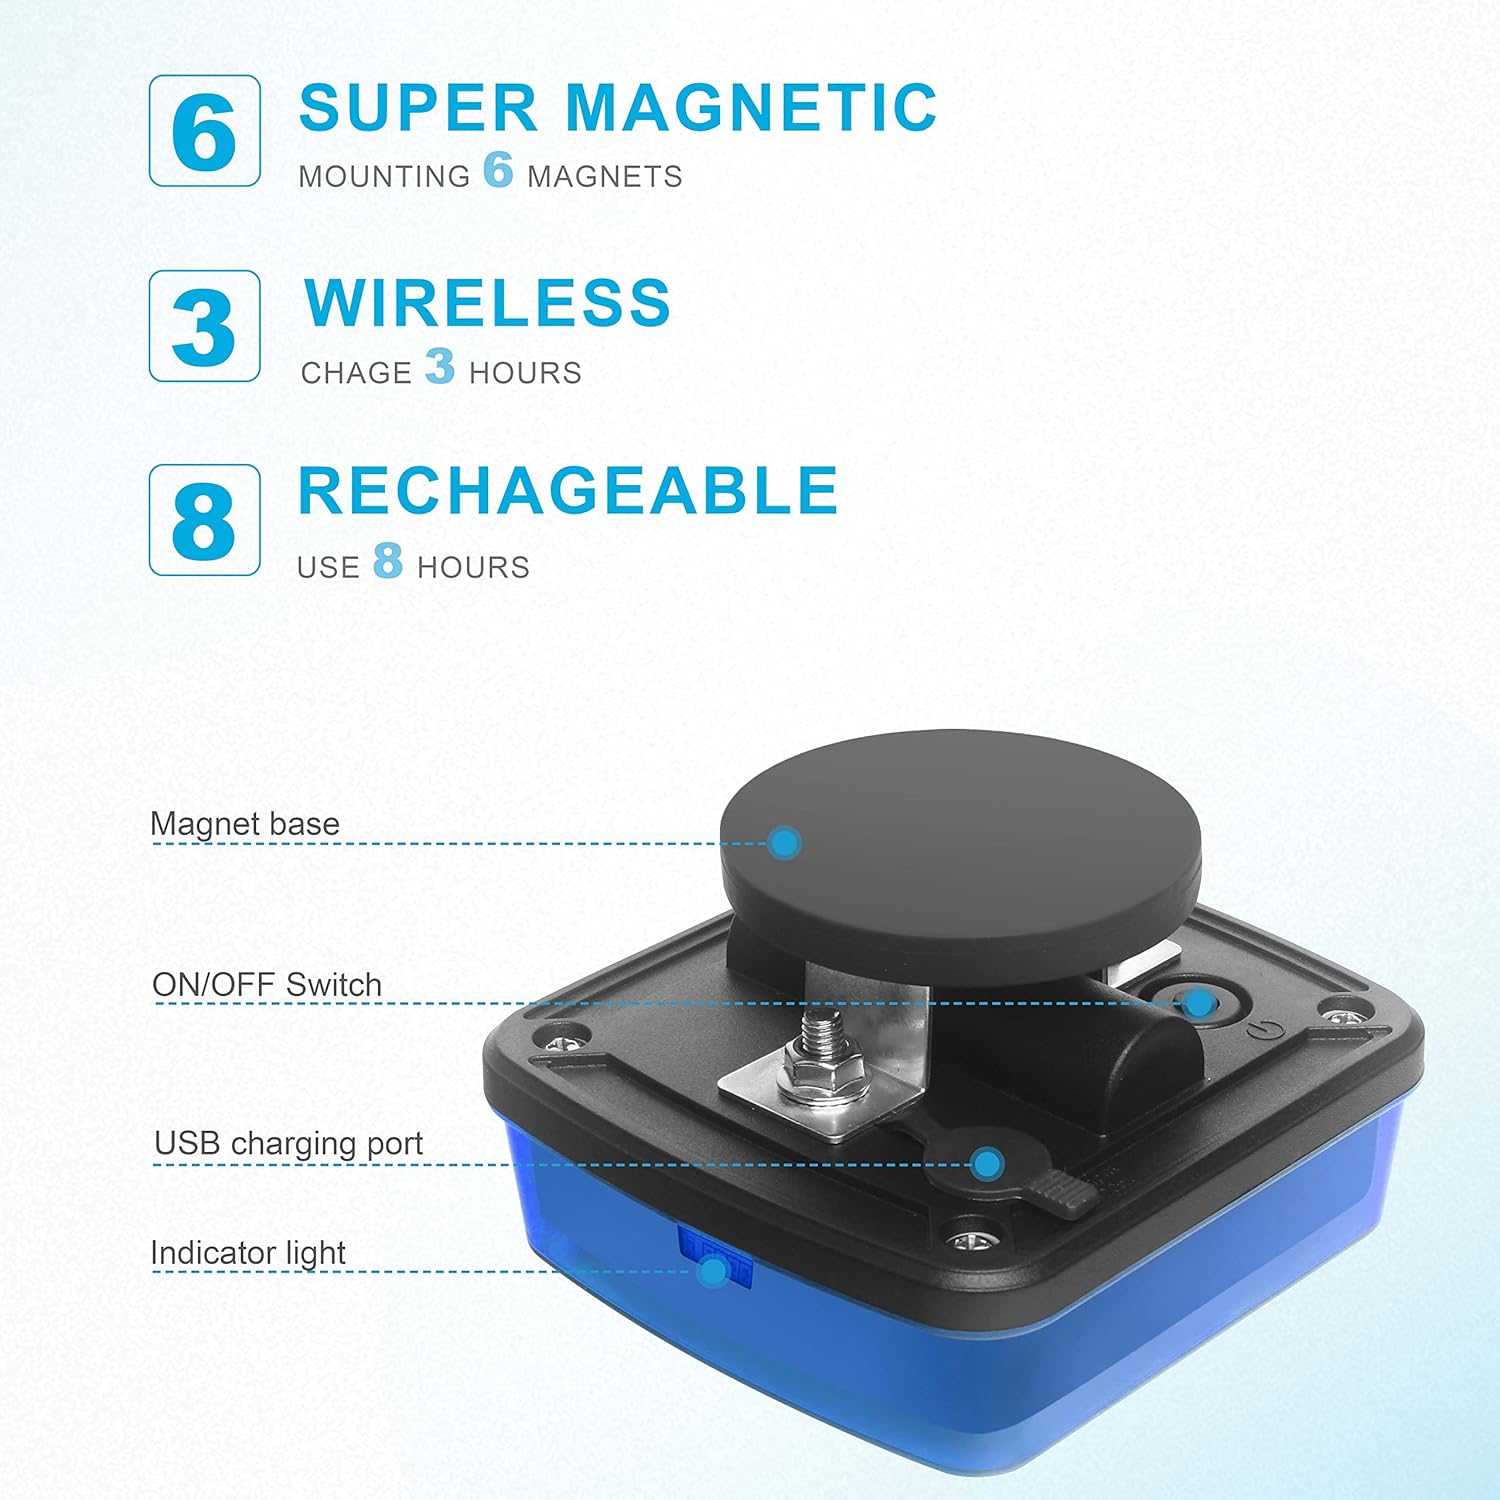
Image 2.1: Key features highlighted, including super magnetic mounting, wireless operation, and rechargeable battery.
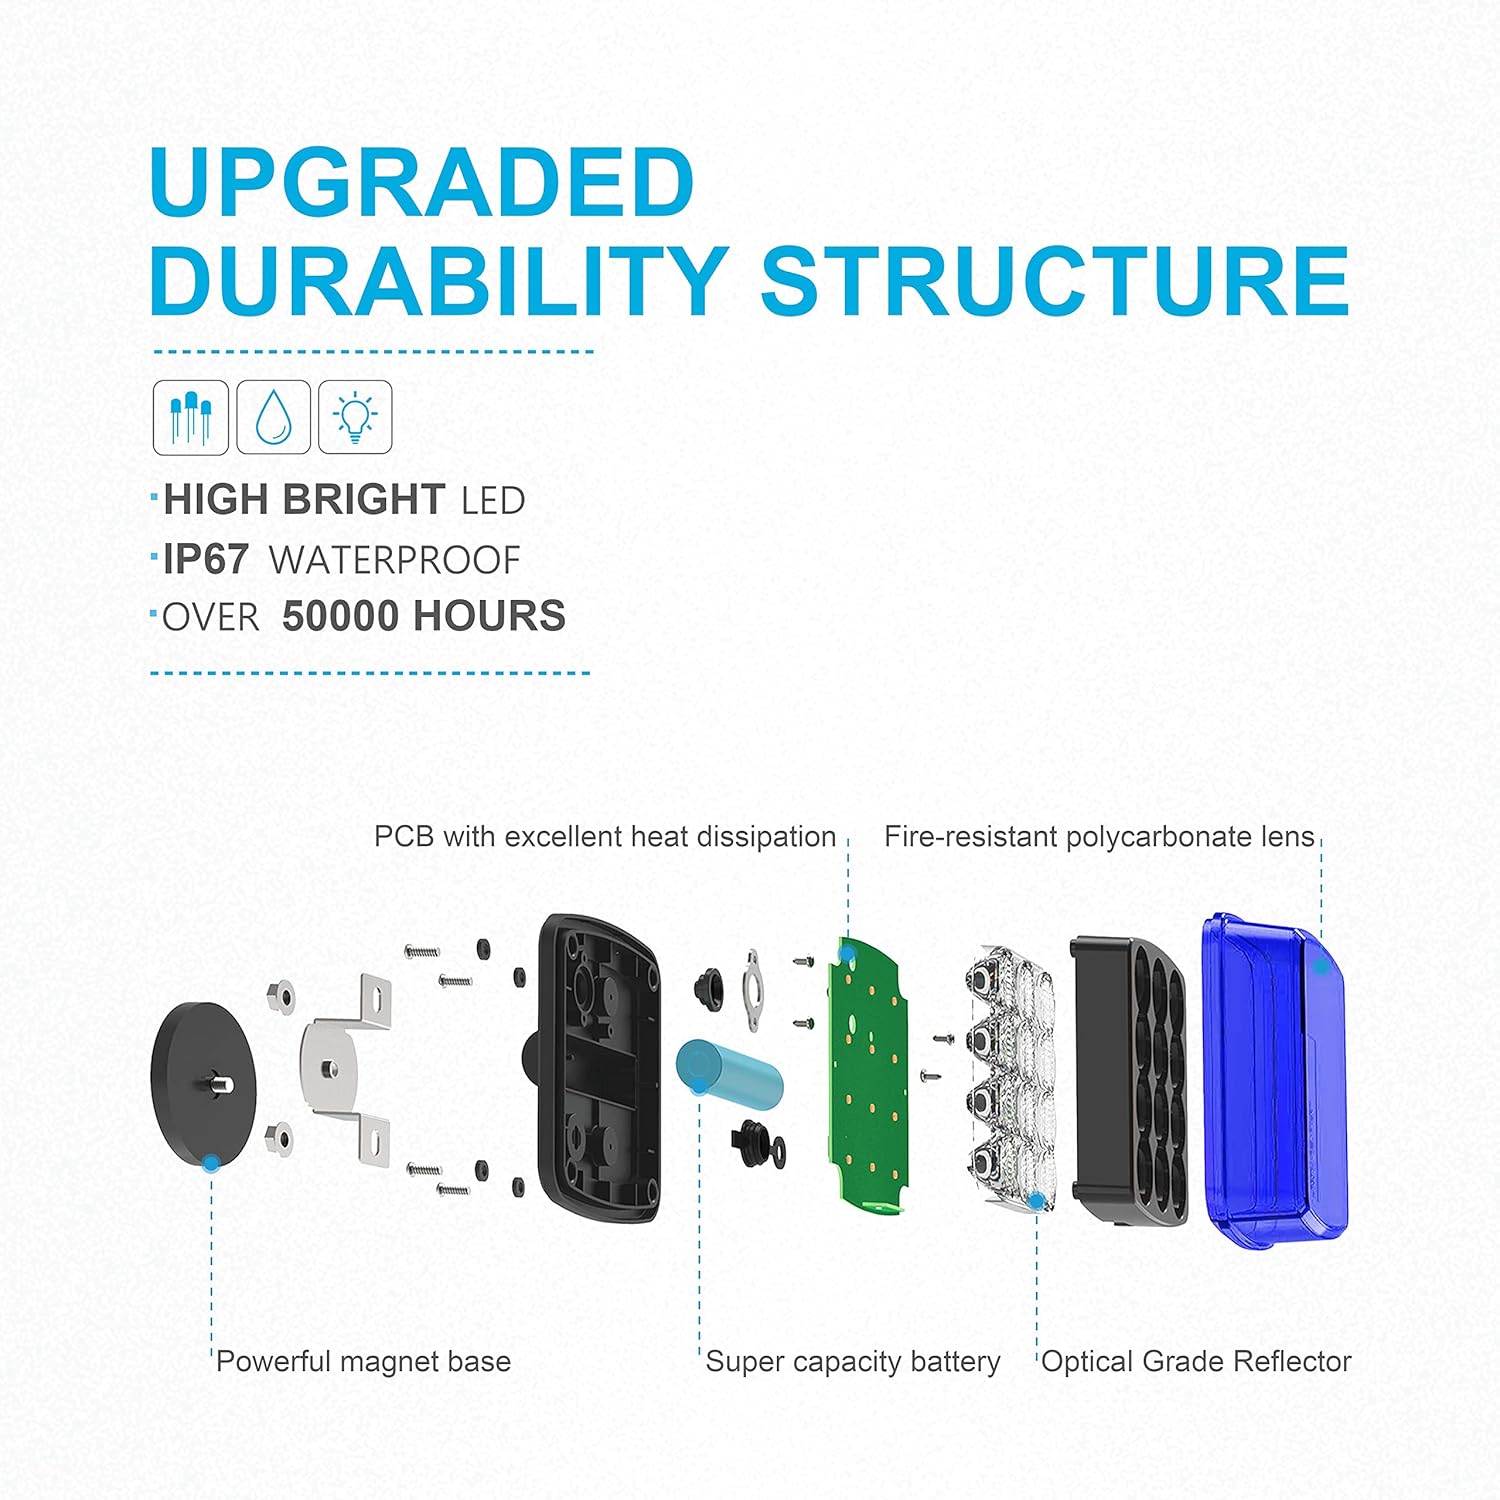
Billede 2.2: Eksploderet view illustrating the upgraded durability structure, including the powerful magnet base, super capacity battery, and optical grade reflector.
3. Hvad er der i æsken
The product package for the Agrieyes Blue Rechargeable Flashing Lights typically includes the following items:
- Blue Magnetic Strobe Lights (2 units)
- USB adaptor (1 unit)
- Charging cord (1 unit)

Image 3.1: Contents of the portable packing, showing two lights, a USB adapter, and a charging cord.
4. Specifikationer
| Specifikation | Detalje |
|---|---|
| Farve | Blå |
| Form | Lineær |
| Materiale | Acrylonitril Butadien Styren (ABS) |
| Finish Type | Magnetisk |
| Lyskildetype | LED |
| Strømkilde | Batteridrevet |
| Mærke | Agrieyes |
| Antal batterier | 1 Lithium Ion batterier påkrævet (medfølger) |
| Voltage | 5 volt |
| Maksimal kompatibel lyskilde Wattage | 15 watt |
| Monteringstype | Magnetisk montering |
| Pærefunktioner | Blinker |
| Specifikation Met | ECE R10, CE, RoHS |
| Antal lyskilder | 2 |
| Ampslette | 1.35 Amps |
| Produktdimensioner | 4.3 cm L x 1.4 cm B x 4 cm H |
| Varens vægt | 2.68 pund |
| Oprindelsesland | Kina |
| Modelnummer | AG-W02F |
5. Opsætning og installation
The Agrieyes Magnetic Strobe Lights are designed for quick and easy installation due to their strong magnetic base.
5.1 Montering af lysene
- Identify a clean, flat metallic surface on your vehicle where the light needs to be placed. Ensure the surface is free of dirt, debris, or rust to maximize magnetic adhesion.
- Place the light firmly onto the chosen metallic surface. The 5 strong magnets will secure the light in position.
- Verify that the light is securely attached and does not wobble. While designed to withstand speeds up to 60 mph, it is recommended to periodically check the adhesion, especially after prolonged use or rough terrain.
These lights are suitable for various applications, including emergency vehicles, agricultural machinery, and trucks, as shown in the image below.

Billede 5.1: Eks.amples of wider applications for the Agrieyes lights on different types of vehicles.
6. Betjeningsvejledning
The Agrieyes Magnetic Strobe Lights are simple to operate with a single button control.
6.1 Tænd/sluk
- At tænde lysene ON: Press the power button briefly for approximately 1 second. The electricity indicator light will illuminate, and the lamp will double flash, indicating it is turned on and functioning normally. The working indicator light will also light up simultaneously.
- At tænde lysene SLUKKET: Press the power button briefly for approximately 1 second. The electricity indicator light will turn off, and the working indicator light will remain on briefly before turning off, indicating the unit is powered down.
6.2 Changing Flash Modes
The lights feature multiple flashing options to suit various warning needs. To cycle through the different flash modes, press the power button repeatedly after the light is turned on. Each press will switch to the next available mode.
Watch the video below for a demonstration of the operation and charging process:
Video 6.1: Official Agrieyes video demonstrating the operation, power on/off, and charging of the magnetic strobe lights.
7. Opladningsinstruktioner
To ensure optimal performance and longevity of your Agrieyes Flashing Lights, follow these charging guidelines:
- Locate the micro USB charging port on each light.
- Connect one end of the provided charging cord (micro USB) to the charging port on each lamp.
- Connect the other end of the charging cord (standard USB) to a compatible USB power source (e.g., USB wall adapter, vehicle USB port, computer USB port).
- Allow the lights to charge fully. A full charge typically takes approximately 8 hours and provides extended operational use.
- The indicator light on the unit will provide feedback on the charging status. Refer to the operating instructions section for details on indicator light behavior during charging.
It is recommended to fully charge the lights before first use to ensure maximum battery life.
8. Vedligeholdelse
Proper maintenance will help extend the lifespan and ensure the continued performance of your Agrieyes Flashing Lights.
8.1 Rengøring
- Regularly clean the exterior of the lights with a soft, damp klæde.
- Avoid using abrasive cleaners, solvents, or harsh chemicals, as these can damage the housing or lens.
- Ensure the magnetic base is clean and free of metallic debris to maintain strong adhesion.
8.2 Opbevaring
- When not in use for extended periods, store the lights in a cool, dry place, away from direct sunlight and extreme temperatures.
- It is advisable to charge the lights periodically (e.g., every 3-6 months) even when stored, to maintain battery health.
8.3 Pleje af batterier
- Undgå at aflade batteriet helt før genopladning.
- Overoplade ikke batteriet; frakobl det, når det er fuldt opladet.
9. Fejlfinding
If you encounter issues with your Agrieyes Flashing Lights, refer to the following common troubleshooting steps:
| Problem | Mulig årsag | Løsning |
|---|---|---|
| Lyset tændes ikke. | Batteriet er afladet. | Charge the light fully using the provided charging cable. |
| Lyset tændes ikke. | Tænd/sluk-knappen er ikke trykket korrekt ind. | Ensure a brief, firm press (approx. 1 second) on the power button. |
| Lyset er svagt eller ujævnt. | Lav batteriopladning. | Genoplad lyset. |
| Lyset er svagt eller ujævnt. | Linsen er beskidt. | Rengør linsen med en blød, damp klæde. |
| Magnetic adhesion is weak. | Mounting surface is dirty or non-metallic. | Clean the mounting surface thoroughly. Ensure the surface is metallic and flat. |
| Ladeindikatoren virker ikke. | Defekt ladekabel eller strømkilde. | Prøv et andet USB-kabel eller en anden strømadapter. Sørg for, at forbindelserne er sikre. |
If the problem persists after attempting these solutions, please contact Agrieyes customer support for further assistance.
10. Sikkerhedsoplysninger
Please read and adhere to the following safety guidelines to prevent injury or damage to the product:
- Do not disassemble, modify, or attempt to repair the lights yourself. This may void the warranty and cause damage.
- Keep the lights away from extreme heat sources, open flames, and corrosive materials.
- Ensure the magnetic base is securely attached to a suitable metallic surface before vehicle operation, especially at high speeds.
- Do not look directly into the LED lights when they are active, as the high brightness may cause temporary vision impairment.
- Bortskaf batterier og elektroniske komponenter i henhold til lokale bestemmelser.
- Always check local laws and regulations regarding the use of warning lights on vehicles in your specific area.
11. Garanti og support
For warranty information, product registration, or technical support, please refer to the official Agrieyes webwebstedet eller kontakt sælgeren direkte. Gem din købskvittering som købsbevis i tilfælde af garantikrav.
Manufacturer: AgriEyes
Seller: Agrieyes Direct
Besøg Agrieyes Store on Amazon for flere produkter og information.
Relaterede dokumenter - AG-W02F
 |
Diamondback Permanent & Magnetic Mount Warning Lights | Product Overview & Installation Comprehensive guide to Diamondback Permanent and Magnetic Mount warning lights. Details wiring, flash patterns, mounting options, SAE/ECE R65 compliance, and product specifications for emergency and commercial vehicles. |
 |
KEVANLY Car Strobe Warning Light - Model 1 Product Manual Comprehensive product manual for the KEVANLY Car Strobe Warning Light (Model 1). Provides detailed information on product specifications, installation steps, safety precautions, and compliance with EU regulations. |
 |
Car Strobe Light Product Manual User manual and safety instructions for the Car Strobe Light. Includes installation guidelines and manufacturer contact information for Shenzhen Katuo Electronic Technology Co., Ltd. |
 |
AHLTD Universal Truck LED Strobe Advarselslys Produktmanual Produktmanual til AHLTD Universal 1 stk. lastbil LED-strobe advarselslampe. Har 6 SMD, ultraklar 12-24V drift, konstant lys, strobetilstande og hukommelse til slukning. Indeholder produktparametre, dimensioner og farvemuligheder. |
 |
Forklaring af køretøjets blinklys En omfattende guide til at forstå de forskellige indikatorlamper på et køretøjs instrumentbræt, deres betydning og anbefalede handlinger. |
 |
Product Manual: JETTING Solar Powered LED Warning Light Quick start guide and safety information for the JETTING solar-powered LED warning light for automotive use. |
Ask a question about this manual
Ask about setup, troubleshooting, compatibility, parts, safety, or missing instructions. Manuals+ will review the question and use this page’s manual context to help answer it.