Indledning
Thank you for choosing the VETEK AF6 4K Video Camera Camcorder. This manual provides comprehensive instructions for the proper setup, operation, and maintenance of your device. Please read this manual thoroughly before using the camcorder to ensure optimal performance and longevity.
Pakkens indhold
Bekræft, at alle nedenstående varer er inkluderet i din pakke:
- 1x VETEK AF6 4K Camcorder
- 1 x USB-kabel
- 1 x HDMI kabel
- 1x Lens Hood
- 1x Fill Light (External LED Light)
- 1 x USB oplader
- 1x fjernbetjening
- 1x 32 GB SD -kort
- 1x mikrofonkabel
- 1x ekstern mikrofon
- 1x Reusable Camera Bag
- 2x Rechargeable Lithium Batteries
- 1x Dual External Battery Charger
- 1x Camera Instruction Manual
- 1x Microphone Instruction Manual
- 1x håndholdt stabilisator

Produkt overview
Familiarize yourself with the main components of your VETEK AF6 camcorder.

Nøglefunktioner:
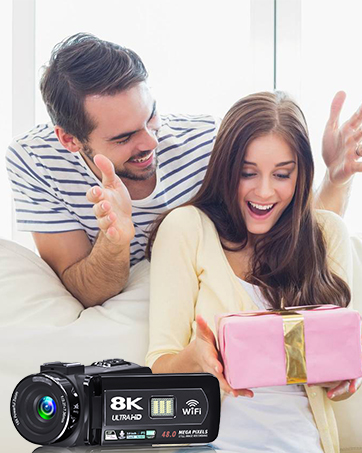
- 4K videoopløsning: Records videos at 3840*2160.
- 48.0 MP Image Resolution: Captures still images at 7920*5940.
- 3.0-inch 270° Rotatable Touch Screen: Giver fleksibel viewing angles and intuitive control.
- 18X digital zoom: Allows for closer shots of distant subjects.
- Wi-Fi-forbindelse: Enables remote control and file transfer via a smartphone app.
- PC-kamerafunktion: Kan bruges som en webkamera til livestreaming og videoopkald.
- Ekstern mikrofonunderstøttelse: Enhances audio quality.
- External Fill Light Support: Improves illumination in low-light conditions.
- Handheld Stabilizer Compatibility: Reducerer kamerarystelser for mere jævn billedkvalitettage.
- Special Shooting Modes: Includes Slow Motion and Time-Lapse.
Opsætning
1. Batteriinstallation og opladning
- Open the battery compartment cover on the camcorder.
- Insert a rechargeable lithium battery, ensuring correct polarity.
- Luk batterirummets dæksel.
- To charge, insert the batteries into the dual external battery charger. Connect the charger to a power source using the provided USB cable and charger. The indicator lights will show charging status.
Note: Ensure batteries are fully charged before first use for optimal performance. If indicator lights flicker or do not show a stable charging status, ensure the batteries are correctly seated in the charger and the power connection is stable.
2. Installation af SD-kort
- Find SD-kortstikket på videokameraet.
- Insert the 32GB SD card (included) into the slot with the metal contacts facing the correct direction, until it clicks into place.
- To remove, gently press the SD card until it pops out.
Vigtig: Format the SD card in the camcorder's menu before initial use to ensure compatibility and prevent data corruption.
3. Montering af tilbehør
- Ekstern mikrofon: Slide the external microphone onto the hot shoe mount on top of the camcorder. Connect the microphone cable to the MIC input port.
- Modlysblænde: Attach the lens hood to the front of the camcorder lens by twisting it clockwise until secure. The lens hood helps reduce glare and protects the lens.
- External LED Light: Slide the external fill light onto the hot shoe mount. Ensure it is securely fastened. This light provides additional illumination.
- Håndholdt stabilisator: Attach the camcorder to the handheld stabilizer using the screw mount at the bottom of the camcorder. The stabilizer helps maintain steady footage.


Betjeningsvejledning
1. Tænd/sluk
Open the LCD screen to power on the camcorder. Close the LCD screen to power off. Alternatively, use the power button located on the device.
2. Grundlæggende optagelse (video/foto)
- Skift tilstande: Use the Mode button to switch between video recording mode and photo capture mode.
- Start/stop optagelse: I videotilstand skal du trykke på optageknappen for at starte optagelsen. Tryk igen for at stoppe.
- Tag billede: In photo mode, press the Photo button to capture a still image.

3. Zoomfunktion
Use the T (Telephoto) and W (Wide) buttons on the camcorder or the zoom controls on the remote control to adjust the 18X digital zoom.
4. Berøringsskærmbetjening
The 3.0-inch LCD screen is rotatable up to 270 degrees and supports touch input. Navigate menus, adjust settings, and review footage by tapping or swiping on the screen.
5. Wi-Fi Connection & App
Download the specified app (refer to the camera's manual for the app name) on your smartphone or tablet. Enable Wi-Fi on the camcorder and connect your mobile device to the camcorder's Wi-Fi network (SSID: 4K_WIFI1079, Password: 12345678). This allows for remote viewing, image capture, video shooting, and sharing to social media.

6. PC Camera Mode (Webcam Function)
Connect the camcorder to your PC using the USB cable. Select "PC CAM" mode on the camcorder. Your computer will recognize the camcorder as a webcam, enabling its use for video chatting and live streaming on platforms like YouTube or Facebook.

7. Særlige funktioner
- Slowmotion: Access this mode through the camcorder's menu to record videos at a higher frame rate, allowing for slow-motion playback.
- Time-Lapse Photography: Select this option in the menu to capture a series of still images at set intervals, which can then be compiled into a time-lapse video.
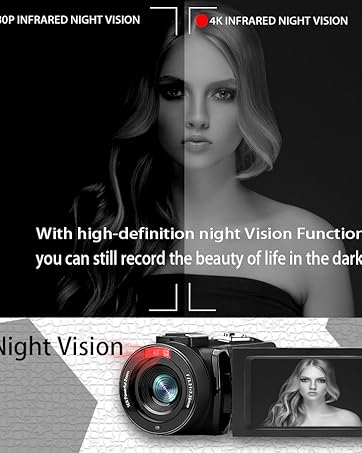
- Nattesyn: The camcorder features an infrared night vision function, enabling recording in low-light or dark environments. Activate this feature via the menu.


8. Fjernbetjening
The included remote control allows you to operate the camcorder from a distance, controlling functions such as recording, photo capture, and zoom without touching the device.

Opretholdelse
- Rensning: Brug en blød, tør klud til at rengøre videokameraets hus. Brug en specialklud og -opløsning til objektivet. Undgå slibende materialer eller barske kemikalier.
- Opbevaring: Opbevar videokameraet et køligt og tørt sted, væk fra direkte sollys og ekstreme temperaturer. Fjern batterierne, hvis det opbevares i længere perioder.
- Vandtæthed: This camcorder is ikke vandafvisendeUndgå udsættelse for vand eller høj luftfugtighed.
Fejlfinding
| Problem | Mulig årsag | Løsning |
|---|---|---|
| Videokameraet tænder ikke. | Batteriet er afladet eller forkert installeret. | Sørg for, at batterierne er fuldt opladet og korrekt isat. |
| Battery charger indicator lights flicker. | Poor contact between battery and charger, or unstable power supply. | Re-seat batteries firmly in the charger. Check USB cable and power adapter connection. Try a different USB port or power source. |
| Kan ikke optage video eller tage billeder. | SD card is full, not inserted, or corrupted. Incorrect mode selected. | Check SD card status, ensure it's inserted and has free space. Format the SD card if necessary (this will erase all data). Verify camcorder is in the correct mode. |
| Dårlig video-/fotokvalitet. | Lens is dirty. Insufficient lighting. Incorrect settings. | Clean the lens. Use the external fill light or shoot in better-lit conditions. Adjust resolution and other settings in the menu. |
| Problemer med Wi-Fi-forbindelse. | Incorrect Wi-Fi password or app not installed. | Ensure correct SSID (4K_WIFI1079) and password (12345678). Download and install the correct app. |
Specifikationer
- Mærke: VETEK
- Modelnummer: AF6
- Videooptagelsesopløsning: 4K (3840*2160)
- Effektiv stillopløsning: 48.0 MP (7920*5940)
- Digital zoom: 18X
- Skærmstørrelse: 3.0 tommer
- Skærmtype: 270° Rotatable Touch Screen
- Flash-hukommelsestype: SD (supports up to 128GB, 32GB included)
- Videooptagelsesformat: MP4
- Understøttet lydformat: MP4
- Forbindelse teknologi: USB, HDMI, Wi-Fi
- Operativsystemkompatibilitet: Windows XP/7/8/10, MAC
- Billedstabilisering: Digital
- Vandmodstandsniveau: Ikke vandafvisende
- Antal batterier: 2 Lithium Polymer batterier (medfølger)
- Emnedimensioner (D x B x H): 3.9" D x 6.2" B x 7.8" H
Garanti og support
For warranty information and technical support, please refer to the contact details provided in the separate warranty card or visit the official VETEK webHvis du støder på problemer, der ikke er dækket i denne manual, bedes du kontakte kundeservice for at få hjælp.