Indledning
The Keychron Q2 is a fully customizable wired mechanical keyboard featuring a compact 65% layout. Constructed with a solid full aluminum frame, the Q2 is designed for easy assembly and offers a premium typing experience. It supports full QMK and VIA programming for extensive customization and features hot-swappable switches for personalized tactile feedback.

Image: The Keychron Q2 Wired Custom Mechanical Keyboard, showcasing its compact 65% layout and blue color scheme.
Opsætningsvejledning
1. Pakkens indhold
Før du begynder, skal du sørge for at alle komponenter er til stede:
- Keychron Q2 Keyboard Kit (Aluminum Case, PCB, Steel Plate, Sound Absorbing Foam, Case Foam, Gaskets)
- USB Type-C til Type-C-kabel
- USB Type-A til Type-C-adapter
- Aftrækker
- Keycap aftrækker
- Skruetrækker
- Hex-nøgle
- Stabilizers (4 sets)
Note: All tools are typically located at the bottom of the packaging.

Image: Diagram illustrating the contents of the Keychron Q2 package, including the keyboard, cables, and tools.
2. Tilslutning af tastaturet
- Locate the USB Type-C port on the back of the Keychron Q2 keyboard.
- Connect one end of the provided USB Type-C to Type-C cable to the keyboard.
- Connect the other end of the cable to your computer's USB Type-C port. If your computer only has USB Type-A ports, use the included USB Type-A to Type-C adapter.
- Ensure the operating system switch (located on the back edge of the keyboard) is set to the correct position for your system (Mac or Windows).
- Tastaturet vil automatisk blive genkendt af dit operativsystem.

Billede: Et nærbillede view of the Keychron Q2 keyboard with a USB-C cable connected, showing the Mac/Win switch.
Betjeningsvejledning
1. QMK/VIA-tilpasning
The Keychron Q2 supports full QMK and VIA programming, allowing you to remap keys, create macros, and customize lighting effects. To use VIA software:
- Download VIA-softwaren fra den officielle Keychron webwebsted (keychron.com/pages/qmk-via).
- Connect your Q2 keyboard to your computer via the USB cable.
- Launch the VIA software. The software should automatically detect your Q2 keyboard. If not, you may need to import the Q2 keymap JSON file, also available on the Keychron webwebsted.
- Use the graphical interface to drag and drop functions, assign macros, and configure lighting for each key. Changes are applied in real-time.

Image: Screenshot of the VIA software interface, demonstrating how to remap keys on the Keychron Q2 keyboard.
2. Hot-swap-kontakter
The Q2's PCB supports both 3-pin and 5-pin MX style mechanical switches, allowing for easy switch replacement without soldering.
- Using the provided keycap puller, carefully remove the keycap from the switch you wish to replace.
- Use the provided switch puller to gently grip the top and bottom clips of the switch. Pull the switch straight up to remove it from the PCB.
- Juster stifterne på den nye kontakt med hullerne på printkortet. Sørg for, at stifterne er lige for at undgå at de bøjes.
- Tryk den nye kontakt godt på plads, indtil den klikker.
- Sæt tastaturdækslet på igen.

Billede: Et nærbillede view of the Keychron Q2's PCB with several switches removed, demonstrating the hot-swappable feature.
3. Keycaps and RGB Lighting
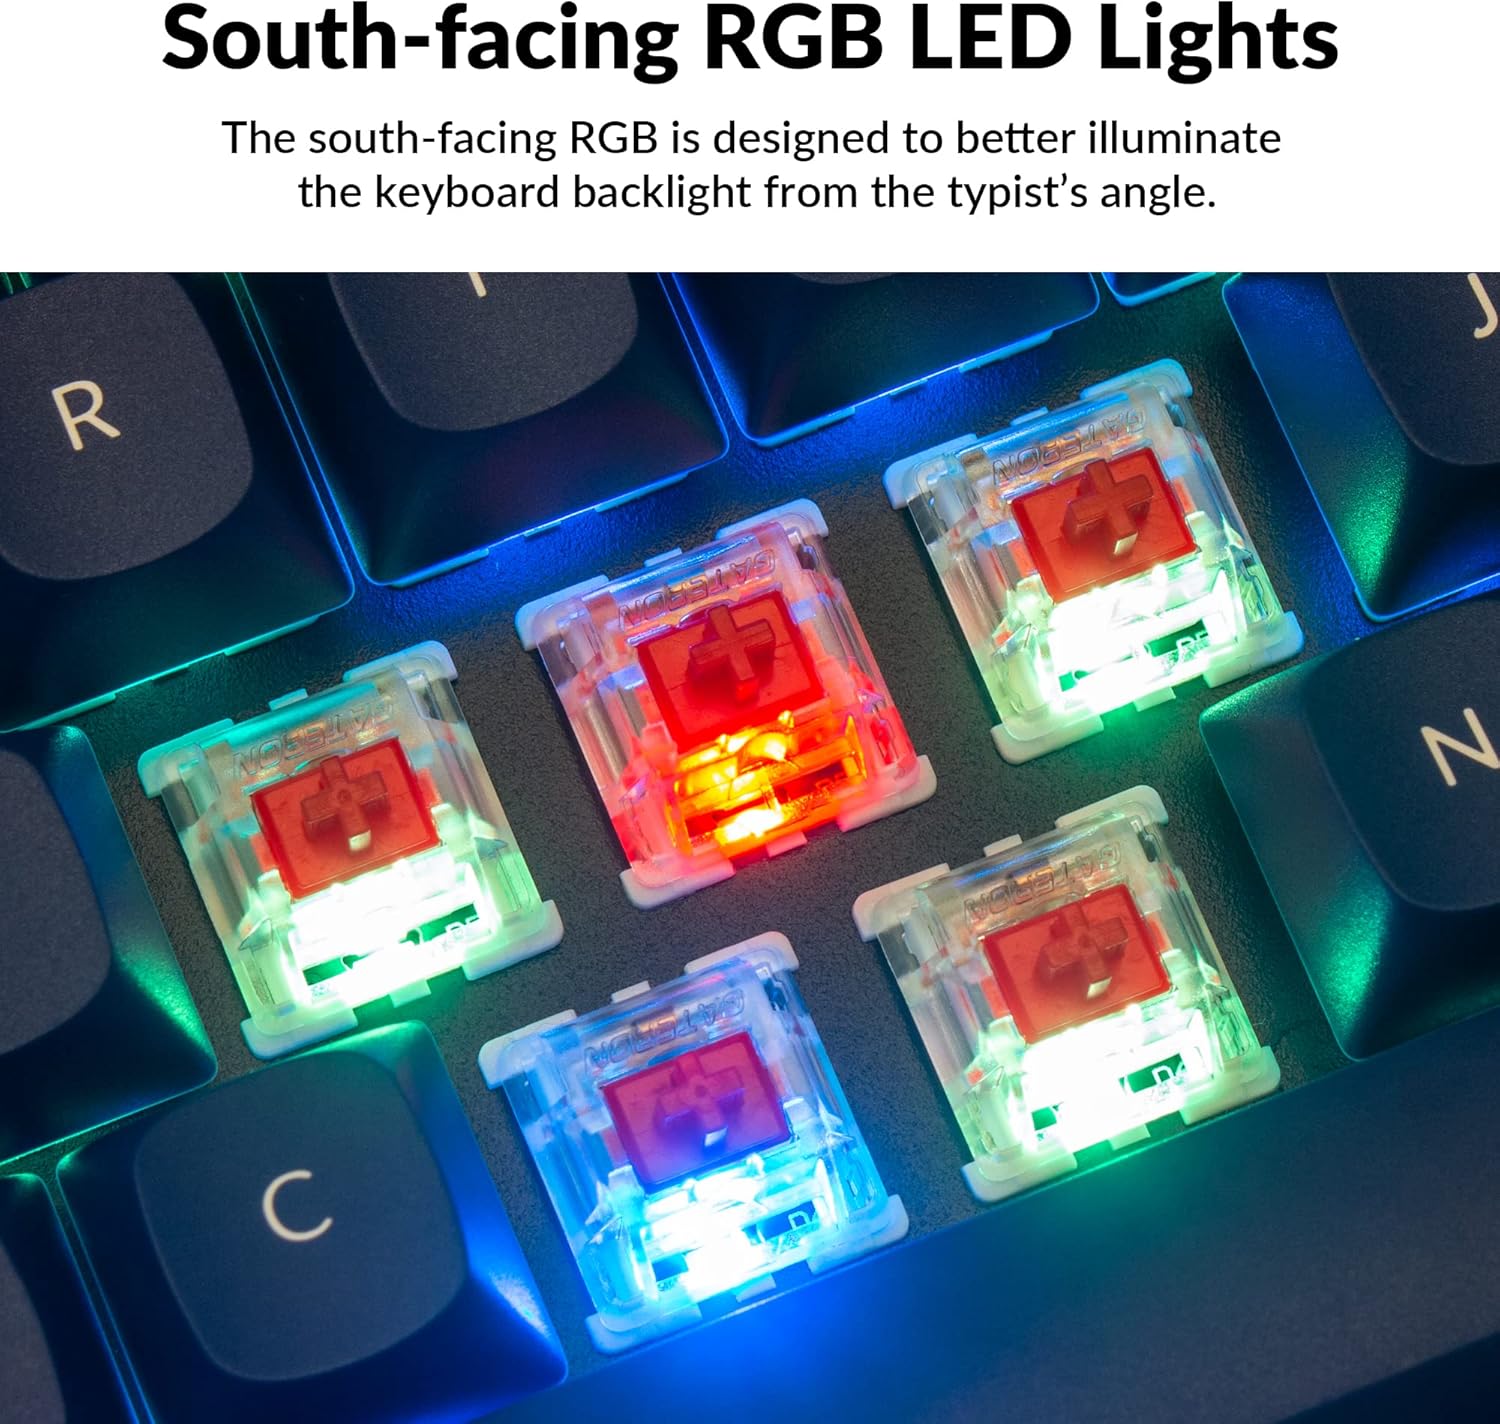
The Q2 comes with premium non-shine-through PBT keycaps, known for their durability and oil resistance. The keyboard features south-facing RGB LEDs, designed to provide better illumination of the backlight from the typist's perspective.
Billede: En detaljeret view of the Keychron Q2's double-shot PBT keycaps, highlighting their texture and legends.

Image: A close-up of the Keychron Q2's south-facing RGB LEDs illuminating the switches from below.
Opretholdelse
1. Rengøring af tastaturet
Regelmæssig rengøring hjælper med at bevare tastaturets ydeevne og udseende.
- Fjernelse af støv: Brug en dåse med trykluft til at blæse støv og snavs væk mellem tasterne.
- Rengøring af tastatur: For deeper cleaning, remove the keycaps using the provided keycap puller. Wash them with mild soap and water, then ensure they are completely dry before reattaching.
- Rengøring af kufferter: Tør aluminiumskabinettet af med en blød kludamp klæde. Undgå skrappe kemikalier, der kan beskadige finishen.
2. Switch and Stabilizer Maintenance
The hot-swappable design allows for easy maintenance of switches and stabilizers.
- Udskiftning af kontakt: If a switch becomes faulty, replace it using the hot-swapping procedure described in the Operating Instructions.
- Smøring af stabilisator: For optimal performance and reduced wobbliness on larger keys (space bar, shift, enter), the PCB-mounted screw-in stabilizers can be lubricated. This typically involves disassembling the keyboard to access the stabilizers.

Image: An exploded diagram of the Keychron Q2, showing its various components like keycaps, switches, top case, gaskets, plate, PCB, sound absorbing foam, case foam, bottom case, and silicone gaskets, illustrating ease of disassembly.
Fejlfinding
Almindelige problemer og løsninger:
- Tastaturet reagerer ikke:
- Sørg for, at USB-kablet er korrekt tilsluttet til både tastaturet og computeren.
- Verify the Mac/Windows switch on the back of the keyboard is set to the correct operating system.
- Try connecting the keyboard to a different USB port or a different computer to rule out port issues.
- Genstart din computer.
- Specifikke taster virker ikke:
- Remove the keycap and switch for the non-functional key. Inspect the switch pins for bends or damage. Straighten bent pins carefully or replace the switch if damaged.
- Sørg for, at kontakten er helt indsat i printkortet.
- Check VIA software to ensure the key has not been accidentally remapped or disabled.
- Problemer med RGB-belysning:
- Sørg for, at tastaturet er korrekt tilsluttet.
- Use the VIA software to check and adjust lighting settings.
- Perform a factory reset if lighting issues persist (refer to Keychron's official support for specific reset procedures).
- Tastatur frakobles tilfældigt:
- Prøv et andet USB-kabel.
- Ensure the USB port on your computer is stable and providing sufficient power.
- Opdater din computers USB-drivere.
If you encounter issues not covered here, please refer to the official Keychron support resources.
Specifikationer
| Feature | Detalje |
|---|---|
| Mærke | Keychron |
| Modelnavn | Q2 |
| Modelnummer | Q2-J1 |
| Tastaturlayout | 65% (68 taster), QWERTY |
| Forbindelsesteknologi | Kablet (USB-A, USB-C) |
| Kompatible enheder | PC (Linux, MacOS, Windows) |
| Switch Type | Gateron G Pro Red (Linear), Hot-swappable |
| Baggrundsbelysning | RGB (sydvendt) |
| Materiale | Full Aluminum Frame, PBT Keycaps |
| Produktdimensioner | 12.89 cm L x 4.76 cm B x 1.33 cm H |
| Særlige funktioner | QMK/VIA Programmable, Double Gasket Design |
Garantioplysninger
Keychron products typically come with a standard manufacturer's warranty. For detailed information regarding the warranty period, coverage, and terms and conditions for your Keychron Q2 keyboard, please refer to the official Keychron webwebstedet eller garantikortet, der fulgte med dit produkt. Gem din købsbevis til garantikrav.
Support og ressourcer
For further assistance, software downloads (VIA), firmware updates, and frequently asked questions, please visit the official Keychron support page:
- Keychron Officiel Webwebsted: www.keychron.com
- QMK/VIA Software & Firmware: www.keychron.com/pages/qmk-via
- Nøgleurbutik: Besøg Keychron-butikken på Amazon
You can also find community forums and additional user guides online for advanced customization and troubleshooting tips.