
1. Produktet er slutview
Thank you for choosing the Arlux Lighting Onyx R2 Round Recessed LED Spot Light. This product is designed for indoor use, providing efficient and modern illumination. This manual provides essential information for the safe installation, operation, and maintenance of your new LED spot light.
Sikkerhedsoplysninger
- Læs alle instruktioner omhyggeligt før installation og brug.
- Installationen skal udføres af en kvalificeret elektriker i overensstemmelse med lokale el-forskrifter og -regler.
- Ensure the power supply is disconnected at the main circuit breaker before installation, maintenance, or cleaning.
- Produktet må ikke ændres på nogen måde. Uautoriserede ændringer kan ugyldiggøre garantien og udgøre en sikkerhedsrisiko.
- Dette produkt er kun beregnet til indendørs brug. Må ikke udsættes for fugt eller ekstreme temperaturer.
- Se ikke direkte ind i LED-lyskilden, når den er tændt, da dette kan forårsage øjenbelastning eller skader.
- Hold emballagemateriale utilgængeligt for børn.
2. Pakkens indhold
Kontroller, at alle komponenter er til stede og ubeskadigede, før du fortsætter med installationen.
- 1 x Arlux Lighting Onyx R2 Round Recessed LED Spot Light
- 1 x LED Driver (Power Supply)
- Monteringsudstyr

Image 2.1: The Arlux Lighting Onyx R2 Recessed LED Spot Light shown with its separate LED driver (power supply) and connecting cable.
3. Specifikationer
| Mærke | Arlux Lighting |
| Model | Onyx R2 |
| Type | Recessed LED Spot Light |
| Form | Rund |
| Strømforbrug | 18 watt |
| Lysstrøm | 1550 lumen |
| Farvetemperatur | 4000 Kelvin (Neutral hvid) |
| Materiale | Aluminium |
| Farve | Hvid |
| Varens vægt | 390 gram |
| Installationstype | Loftmontering (indbygget) |
| Strømkilde | Elektrisk med ledning |
| Specifikke anvendelser | Ceiling illumination for indoor spaces |
4. Opsætning og installation
4.1 Tjekliste før installation
- Nødvendige værktøjer: Drill, hole saw (appropriate diameter for recess), wire strippers, screwdriver, voltage tester.
- Strømforsyning: Ensure the electrical circuit is compatible with the spot light's power requirements (18W).
- Ceiling Space: Verify sufficient clearance above the ceiling for the fixture and driver.
- Sikkerhed først: Sluk altid for hovedstrømforsyningen ved afbryderen, før du påbegynder elektrisk arbejde.
4.2 Installationstrin
- Forbered loftet: Using an appropriate hole saw, cut a circular opening in the ceiling at the desired installation location. Refer to the product specifications for the exact cutout diameter (typically around Ø200-210mm for a Ø225mm fixture).
- Tilslut driveren: Connect the AC input wires from your household electrical supply to the input terminals of the LED driver. Ensure correct polarity (Live, Neutral, Earth) as indicated on the driver. Secure connections firmly.
- Connect the Spot Light: Plug the DC output cable from the LED driver into the corresponding input port on the back of the Onyx R2 spot light. This connection is typically a simple plug-and-play connector.
- Insert the Spot Light: Gently push the spring clips on the sides of the spot light upwards and insert the fixture into the prepared ceiling opening. The spring clips will hold the light securely in place.
- Endelig kontrol: Ensure the spot light is flush with the ceiling surface and securely mounted.
- Gendan strøm: Tænd for hovedstrømforsyningen igen ved afbryderen.
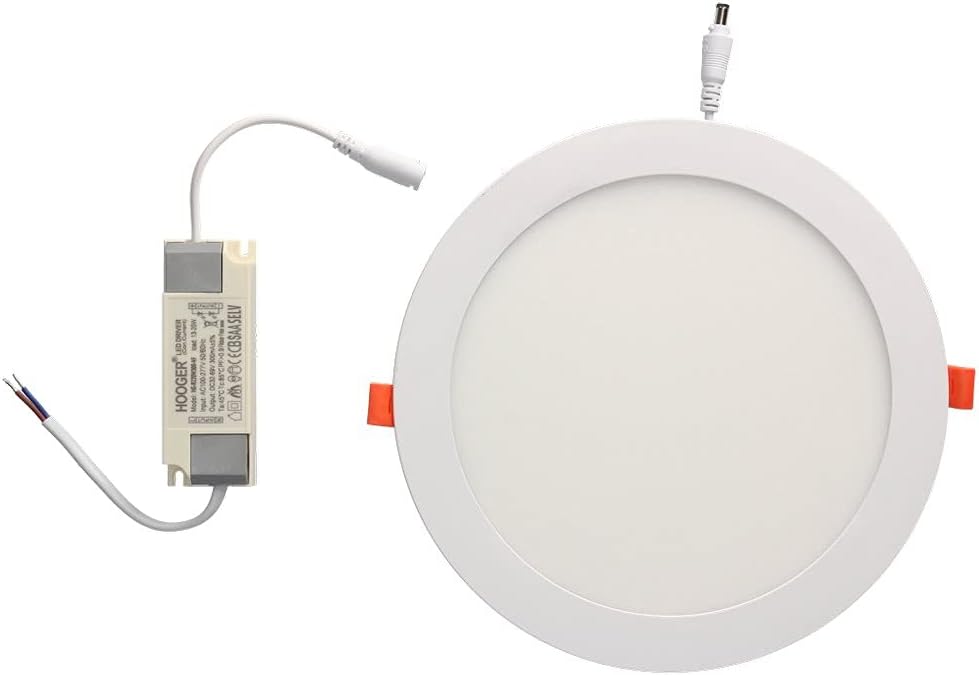
Image 4.1: The Arlux Lighting Onyx R2 Recessed LED Spot Light shown installed flush within a ceiling, providing ambient lighting.
5. Betjeningsvejledning
The Arlux Lighting Onyx R2 Recessed LED Spot Light operates immediately upon receiving power. It is typically controlled by a standard wall switch connected to the electrical circuit.
- Tænd/sluk: Brug vægkontakten, der er tilsluttet lampen, til at tænde eller slukke lyset.
- Dæmpning: This model is not specified as dimmable. Attempting to use it with a non-compatible dimmer switch may cause damage or malfunction.
6. Vedligeholdelse
The Arlux Lighting Onyx R2 LED Spot Light requires minimal maintenance.
- Rensning: Ensure the power is off before cleaning. Wipe the surface of the light with a soft, dry, or slightly damp klud. Brug ikke slibende rengøringsmidler, opløsningsmidler eller stærke kemikalier, da disse kan beskadige overfladen eller de elektriske komponenter.
- LED-levetid: LED lights have a long lifespan and do not require bulb replacement. If the light stops functioning, refer to the troubleshooting section.
7. Fejlfinding
If you encounter issues with your Arlux Lighting Onyx R2 LED Spot Light, please consult the following table before contacting support.
| Problem | Mulig årsag | Løsning |
|---|---|---|
| Lyset tænder ikke | Ingen strømforsyning Løs ledningsforbindelse Defekt LED-driver Faulty light fixture | Kontroller afbryderen og vægafbryderen. Verify all wiring connections are secure (power off first). Test the driver if possible, or replace it. If driver is functional, the fixture may be faulty; contact support. |
| Lyse flimrer | Ustabil strømforsyning Løse ledninger Incompatible dimmer switch (if used) | Ensure stable power. Check for loose connections. Remove dimmer switch if not compatible, or replace with a compatible LED dimmer. |
| Lyset er svagt | Forkert strømforsyning Voltage drop | Ensure the correct LED driver is used. Consult an electrician to check for voltage issues in your electrical system. |
8. Garanti og support
Information regarding specific warranty terms for the Arlux Lighting Onyx R2 Round Recessed LED Spot Light is not available in the provided product details. For warranty inquiries or technical support, please contact your retailer or the manufacturer directly.
Spare parts availability information is also not available. Please contact your point of purchase for assistance with replacement components.