
1. Introduktion
The PWAY PW-DT237K HDMI KVM Extender allows for the transmission of HDMI video and audio signals, along with USB keyboard and mouse control, over a single Cat5e/6/7 network cable. This device supports high-definition resolutions up to 1080P@60Hz and offers a local loop-out function on the transmitter unit. It is designed for applications requiring extended signal transmission distances and remote KVM control.

Image: The PWAY PW-DT237K HDMI KVM Extender, showing both the transmitter and receiver units with their respective ports.
2. Nøglefunktioner
- Udvidet transmission: Transmits HDMI and KVM signals up to 150 meters (492 feet) over a single Cat6/7 cable. Supports Cat5 up to 100m and Cat5e up to 120m.
- Høj opløsning: Supports resolutions up to 1920x1080@60Hz, compatible with 1080i, 720P, 720i, 480P, and 480i.
- KVM funktionalitet: Enables remote control of a computer or device using a keyboard and mouse connected to the receiver unit.
- Local Loop-out: The transmitter unit includes an HDMI output port for local display monitoring.
- TCP/IP Protocol Support: Utilizes standard TCP/IP, allowing for one-to-many distribution when used with an Ethernet switch.
3. Pakkens indhold
Bekræft at alle varer er til stede i pakken:
- 1x PWAY PW-DT237K HDMI KVM Extender Transmitter (TX) Unit
- 1x PWAY PW-DT237K HDMI KVM Extender Receiver (RX) Unit
- 2x Power Adapters (5V DC)
- 1x USB-A to USB Cable
- 1x brugermanual

Image: Contents of the PWAY PW-DT237K package, including transmitter, receiver, power adapters, USB cable, and user manual.
4. Opsætningsvejledning
4.1. Tilslutningsdiagram

Image: Diagram illustrating the connections for the PWAY HDMI KVM Extender, showing HDMI IN/OUT, USB, RJ45, and power ports on both transmitter and receiver units.
4.2. Basic Connection (Point-to-Point)
- Connect your HDMI source device (e.g., PC, DVR, TV Box) to the HDMI-IN port of the Transmitter (TX) unit using an HDMI cable.
- Connect the USB-A to USB cable from your HDMI source device to the USB porten på senderenheden (TX).
- (Optional) If local monitoring is desired, connect a display to the HDMI OUT port of the Transmitter (TX) unit using an HDMI cable.
- Connect a Cat5e/6/7 network cable between the UTP port of the Transmitter (TX) unit and the UTP port of the Receiver (RX) unit. Ensure the cable length is within the specified limits (Cat5: 100m, Cat5e: 120m, Cat6/7: 150m).
- Tilslut en skærm til HDMI OUT port of the Receiver (RX) unit using an HDMI cable.
- Connect your keyboard and mouse to the USB ports on the Receiver (RX) unit.
- Connect the provided 5V DC power adapters to the DC-5V ports on both the Transmitter (TX) and Receiver (RX) units, then plug them into power outlets.
- Power on all connected devices. The system should automatically establish the connection.
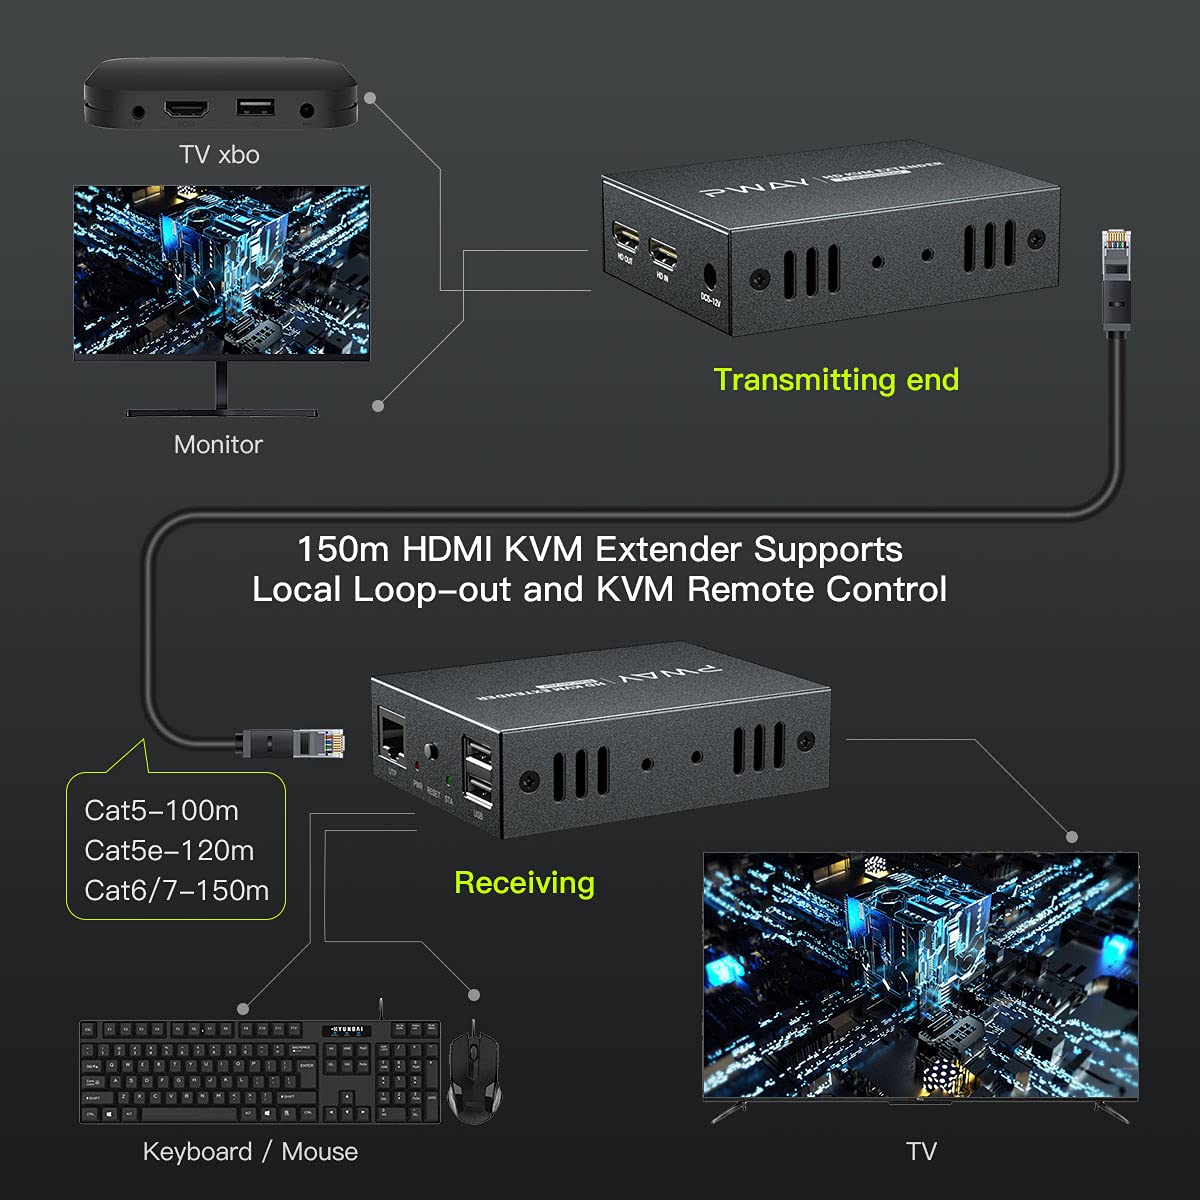
Image: A diagram showing a point-to-point connection setup for the KVM extender, with a TV box and monitor connected to the transmitter, and a TV, keyboard, and mouse connected to the receiver via a network cable.
4.3. One-to-Many Connection (via Ethernet Switch)
For distributing signals from one source to multiple displays and KVM stations, an Ethernet switch can be used:
- Tilslut din HDMI-kildeenhed til HDMI-IN port of the Transmitter (TX) unit.
- Connect the USB-A to USB cable from your HDMI source device to the USB porten på senderenheden (TX).
- Tilslut UTP port of the Transmitter (TX) unit to an Ethernet switch using a Cat5e/6/7 network cable.
- Tilslut UTP port of each Receiver (RX) unit to the same Ethernet switch using Cat5e/6/7 network cables.
- Tilslut en skærm til HDMI OUT port of each Receiver (RX) unit.
- Connect a keyboard and mouse to the USB ports on each Receiver (RX) unit.
- Connect the provided 5V DC power adapters to all Transmitter and Receiver units, then plug them into power outlets.
- Tænd for alle tilsluttede enheder.

Image: Technical diagram showing a one-to-many HDMI distribution system, connecting a single transmitter to multiple receivers via an Ethernet switch, with various HDMI sources and TV monitors.
5. Betjening
5.1. Tænd/sluk
Once all connections are made and power adapters are plugged in, the units will power on automatically. There is no manual power switch. To power off, disconnect the power adapters.
5.2. KVM Control
After successful connection, the keyboard and mouse connected to the Receiver (RX) unit will control the HDMI source device connected to the Transmitter (TX) unit. This allows for remote operation of the source device, such as navigating menus, typing, and clicking.

Image: A close-up of a KVM extender unit connected to a gaming mouse and a partial view of a keyboard, demonstrating the KVM control function.
5.3. Local Loop-out Display
The HDMI OUT port on the Transmitter (TX) unit provides a local display output. This allows you to monitor the content being sent to the remote display without needing to switch between sources.

Image: A desktop setup showing a laptop connected to the transmitter (TX) unit, which then connects to a receiver (RX) unit and a desktop monitor, illustrating the local loop-out feature.
6. Fejlfinding
- Ingen video/lydudgang:
- Ensure all HDMI and network cables are securely connected.
- Verify that both the Transmitter (TX) and Receiver (RX) units are powered on.
- Check the resolution settings of your source device. Ensure it is compatible with 1080P@60Hz or lower.
- Try using shorter or different Cat5e/6/7 cables.
- Bypass the extender to test if the source and display devices work directly.
- KVM (tastatur/mus) svarer ikke:
- Ensure the USB-A to USB cable is connected from the source device to the Transmitter (TX) unit.
- Verify that the keyboard and mouse are connected to the USB ports on the Receiver (RX) unit.
- Try connecting the keyboard and mouse directly to the source device to confirm they are functional.
- Some specialized gaming keyboards/mice or wireless dongles may have compatibility issues. Try a standard wired keyboard/mouse.
- Intermitterende signal/dårlig kvalitet:
- Check the quality and length of the network cable. Use Cat6/7 for longer distances.
- Ensure there are no strong electromagnetic interference sources near the network cable.
- If using an Ethernet switch for one-to-many, ensure the switch is a gigabit switch and properly configured.
- Mouse Freezing (as per user review):
- If the mouse stops responding, try disconnecting and reconnecting the power to the KVM extender units.
- Ensure the USB cable from the source to the TX unit is firmly connected.
- Test with a different mouse to rule out device-specific issues.
7. Specifikationer
| Feature | Specifikation |
|---|---|
| Model | PW-DT237K |
| Mærke | PWAY |
| Transmissionsafstand | Up to 150m (Cat6/7), 120m (Cat5e), 100m (Cat5) |
| Understøttet opløsning | 1920x1080@60Hz (compatible with 1080i/720P/720i/480P/480i) |
| Forbindelsesprotokol | TCP/IP (Ethernet) |
| KVM funktion | Keyboard and Mouse Remote Control |
| Lokalt output | HDMI Loop-out on Transmitter (TX) |
| Operation Voltage | 5 volt |
| Nominel strøm | 1 Ampere |
| Materiale | Plast |
| Antal genstande | 2 (Transmitter and Receiver) |
| Kompatible enheder | TV, PC, DVR, etc. |
| Monteringstype | Rack mount |
| Driftstilstand | Automatisk |
| ASIN | B0995HW2F8 |
| Manufacturer Model (from specs) | PW-DT252K |
| Part Number (from specs) | PW-HT238P |
8. Vedligeholdelse
- Opbevar enheden et køligt, tørt sted, væk fra direkte sollys og varmekilder.
- Undgå at udsætte enheden for fugt eller ekstreme temperaturer.
- Rengør apparaternes yderside med en blød, tør klud. Brug ikke flydende rengøringsmidler eller aerosoler.
- Sørg for tilstrækkelig ventilation omkring enhederne for at forhindre overophedning.
- Regularly check cable connections for security and integrity.
9. Garanti og support
Specifikke garantioplysninger findes typisk på produktemballagen eller på producentens officielle website. For technical support or warranty claims, please refer to the contact information provided by PWAY Technology or your retailer.
Manufacturer: PWAY Technology
For yderligere hjælp, besøg venligst PWAY Store on Amazon.