Indledning
Tak for købetasing the Tzumi 7796 GO Theater Wi-Fi LED Cinema Projector. This manual provides essential information for setting up, operating, and maintaining your projector. Please read it thoroughly before use to ensure proper functionality and to maximize your viewing experience. This projector is designed for versatile use, including home entertainment, outdoor movie nights, and business presentations, offering a portable solution with Wi-Fi and multiple connectivity options.
Vigtige sikkerhedsoplysninger
- Se ikke direkte ind i projektorlinsen, når lamp er tændt.
- Sørg for tilstrækkelig ventilation omkring projektoren for at forhindre overophedning. Bloker ikke ventilationsåbningerne.
- Hold projektoren væk fra vand eller andre væsker.
- Brug kun den strømadapter, der følger med projektoren.
- Forsøg ikke at reparere projektoren selv. Overlad al service til kvalificeret personale.
- Place the projector on a stable, level surface to prevent damage from falling.
- Tag stikket ud af projektoren under tordenvejr eller når den ikke bruges i længere perioder.
Pakkens indhold
Please check to ensure all items are present:
- Tzumi 7796 GO Theater Wi-Fi LED Cinema Projector
- Fjernbetjening
- Strømadapter
- Brugervejledning (dette dokument)
- AV-kabel (hvis medfølger)
Produkt overview
Front View

Billede: Front view of the Tzumi 7796 projector. This image displays the main projection lens on the left side and ventilation grilles along the front and right side of the device. The overall casing er hvid.
Side View med havne
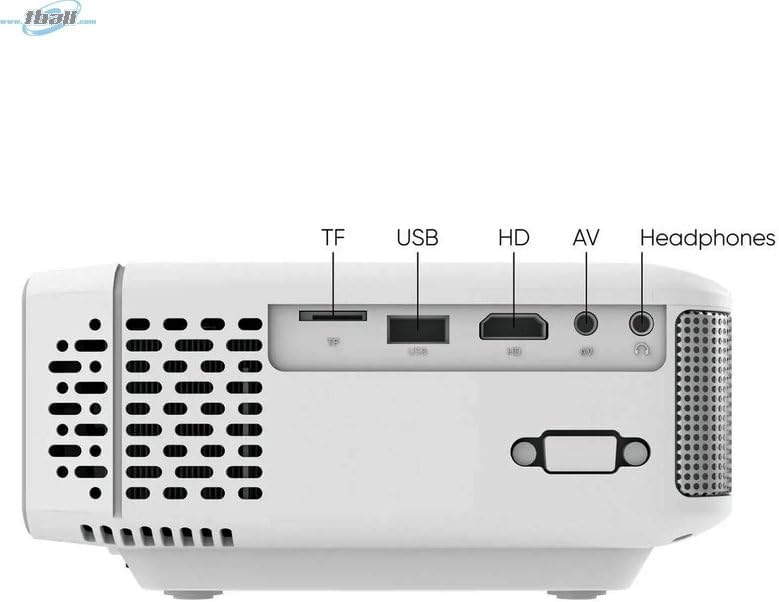
Billede: Side view of the Tzumi 7796 projector highlighting its various input ports. From left to right, these include a TF card slot, a USB port, an HD (HDMI) port, an AV input, and a headphone jack. This side also features ventilation grilles.
Top View med kontrol

Billede: Top view of the Tzumi 7796 projector. This image shows the manual focus and keystone correction dials located near the lens. The central control panel features directional buttons (Up, Down, Left, Right), Home, Option, Back, Power, and Enter buttons for navigation and control.
Bag View med strømindgang

Billede: Bag view of the Tzumi 7796 projector. This view primarily shows the power input socket on the left side and additional ventilation grilles on the right side.
Opsætningsvejledning
1. Placering
Placer projektoren på en stabil, flad overflade. For optimal viewing, position the projector directly in front of your screen or wall. The ideal projection distance will vary based on the desired screen size. Ensure there is adequate space around the projector for ventilation.

Billede: This image illustrates the versatility of the Tzumi 7796 projector, showing it being used in both an indoor home setting and an outdoor movie night environment. This highlights its suitability for various entertainment scenarios.
2. Strømtilslutning
- Connect the power adapter to the projector's power input port (refer to "Rear View with Power Input" image).
- Sæt den anden ende af strømadapteren i en stikkontakt.
- Strømindikatorlampen på projektoren skal lyse.
3. Tilslutning af enheder
Projektoren understøtter forskellige inputkilder:
- HDMI: Connect your laptop, gaming console, or streaming device using an HDMI cable to the HD port.
- USB: Indsæt et USB-flashdrev i USB-porten for at afspille medier files direkte.
- AV: Use the provided AV cable to connect older devices like DVD players to the AV port.
- TF-kort: Insert a TF (MicroSD) card into the TF card slot to play media files.
- Wi-Fi: For wireless screen mirroring or streaming, connect the projector to your Wi-Fi network (see "Operating Instructions - Wi-Fi Connectivity").
4. Fokus- og Keystone-justering
- Fokus: Drej på FOKUS ring near the lens until the projected image is clear and sharp.
- Keystones: Hvis billedet ser trapezformet ud (bredere øverst eller nederst), skal du justere KEYSTONE correction dial until the image is rectangular.
Betjeningsvejledning
Tænd/sluk
- Tænd: Tryk på Magt button on the projector's control panel or the remote control.
- Sluk: Tryk på Magt button again. Confirm shutdown if prompted.
Valg af inputkilde
After powering on, the projector will display its main menu. To select an input source:
- Use the directional buttons on the projector or remote to navigate to the desired input (e.g., HDMI, USB, AV, TF Card, Wi-Fi).
- Tryk på Indtast knappen for at bekræfte dit valg.
Wi-Fi-forbindelse
To connect your projector to a Wi-Fi network for screen mirroring or online content:
- From the main menu, navigate to the Wi-Fi or Netværksindstillinger valgmulighed.
- Vælge Wi-Fi opsætning and choose your desired network from the list.
- Indtast Wi-Fi-adgangskoden ved hjælp af skærmtastaturet, og bekræft.
- Once connected, you can use screen mirroring features (e.g., Miracast, AirPlay) or access built-in smart features if available.
Lydindstillinger
The projector features two built-in 3W speakers. You can also connect external audio devices:
- Indbyggede højttalere: Audio will play automatically through the projector's speakers. Adjust volume using the remote or control panel.
- Headphones/External Speakers: Connect headphones or external speakers to the 3.5mm headphone jack on the side of the projector. This will typically mute the built-in speakers.
Opretholdelse
Rengøring af linsen
To maintain optimal image quality, keep the projector lens clean.
- Brug en blød, fnugfri klud, der er specielt designet til optiske linser.
- Tør forsigtigt linsen af med cirkulære bevægelser.
- Avoid using abrasive cleaners or excessive pressure, which can scratch the lens.
Generel pleje og opbevaring
- Keep the projector in a cool, dry place when not in use.
- Protect the projector from dust and extreme temperatures.
- Do not expose the projector to direct sunlight for extended periods.
- Rengør ydersiden casing med en blød, damp klæde. Undgå skrappe kemikalier.
Fejlfinding
| Problem | Mulig årsag | Løsning |
|---|---|---|
| Intet billede projiceret |
|
|
| Billedet er sløret |
|
|
| Billedet er trapezformet |
|
|
| Ingen lyd |
|
|
| Problemer med Wi-Fi-forbindelse |
|
|
Specifikationer
- Model: 7796
- Mærke: Tzumi
- Skærmopløsning: 1920 x 1080 (Fuld HD)
- Lysstyrke: 1600 lumen
- Forbindelse teknologi: HDMI, Wi-Fi, USB, AV, TF Card
- Speciel funktion: Transportabel
- Anbefalede anvendelser: Home entertainment, Outdoor movie nights, Business presentations
- Varens vægt: 3 pund
- Pakkedimensioner: 11 x 9 x 5 tommer
- Indbyggede højttalere: Two 3W speakers
Garanti og support
For warranty information and technical support, please refer to the documentation included with your purchase or visit the official Tzumi webwebsted. Gem din købsbevis til garantikrav.
Online support: Visit the Tzumi Store on Amazon