GAPPO Y71001-US-4.5
Gappo Mat Sort 10-Tommer Vægmonteret Brusesystem Brugsanvisning
Model: Y71001-US-4.5
1. Introduktion
This manual provides detailed instructions for the installation, operation, maintenance, and troubleshooting of your Gappo Matte Black 10-Inch Wall Mounted Shower System. Please read this manual thoroughly before installation and use to ensure proper function and longevity of the product. Retain this manual for future reference.
The Gappo shower system features a 10-inch rainfall shower head, a handheld shower, and a pressure-balanced rough-in valve, all in a matte black finish. It is designed for wall-mounted installation.
2. Sikkerhedsoplysninger
- Sørg for, at alle lokale VVS- og bygningsreglementer følges under installationen.
- Sluk for hovedvandforsyningen, før du påbegynder installation eller vedligeholdelse.
- Brug passende personlige værnemidler, såsom sikkerhedsbriller og handsker, under installationen.
- Hvis du er usikker på nogen del af installationsprocessen, skal du kontakte en kvalificeret VVS-installatør.
- The pressure balance valve is designed to prevent scalding from sudden changes in hot or cold water pressure. Ensure it is installed correctly.
3. Pakkens indhold
Kontroller, at alle komponenter er til stede og ubeskadigede, før installationen påbegyndes.
- 10-tommer regnbruserhoved
- Bruserarm
- Håndholdt bruser
- Handheld Shower Holder Bracket
- bruserslange
- Pressure Balance Rough-in Valve with Trim Kit
- Monteringshardware
- Instruktionsmanual

Billede 3.1: Overview of the Gappo Matte Black Shower System components, including the rainfall shower head, handheld shower, and control valve.

Billede 3.2: Nærbillede view of the adjustable shower holder bracket, the high-pressure handheld shower, and the 16-inch brass shower arm, highlighting the brass body material.
4. Nødvendigt værktøj
Følgende værktøjer er typisk nødvendige til installation:
- Justerbar skruenøgle
- Pipe Thread Sealant Tape (Teflon Tape)
- Skruetrækker (Phillips og Flathead)
- Bore
- Niveau
- Målebånd
- Blyant/markør
- Sikkerhedsbriller
- Handsker
5. Installationsvejledning (opsætning)
Before starting, ensure the main water supply is turned off. This shower system is designed for standard U.S. plumbing connections (NPT 1/2").
5.1 Rough-in Valve Installation
- Forbered vægåbning: Create an opening in the wall suitable for the rough-in valve body. Refer to the dimensions diagram for precise measurements.
- Tilslut vandledninger: Connect the hot water supply line to the 'H' (Hot) inlet and the cold water supply line to the 'C' (Cold) inlet on the rough-in valve. Use NPT 1/2" connections and apply pipe thread sealant tape to ensure watertight seals.
- Connect Shower Outlets: Connect the fixed shower head outlet to the top NPT 1/2" connector and the handheld shower outlet to the bottom NPT 1/2" connector on the valve body.
- Sikker ventil: Mount the rough-in valve securely to the wall studs using appropriate fasteners. Ensure the valve body is level and at the correct depth relative to the finished wall surface (typically 60-80mm from the finished wall).
- Test forbindelser: Temporarily turn on the water supply to check for leaks. Turn off the water supply once testing is complete.

Image 5.1: Detailed diagram of the rough-in valve, indicating hot and cold water inlets, fixed shower head and handheld shower outlets, and the ceramic valve core with pressure balance function.

Image 5.2: Technical drawing showing the dimensions of the shower head, shower arm, and handheld shower, along with a cross-section of the wall installation depth for the rough-in valve.
5.2 Trim Kit Installation
- Installer frontplade: Once the wall is finished, install the decorative faceplate over the rough-in valve, ensuring it is flush with the wall.
- Installationshåndtag: Attach the control handle to the valve stem according to the manufacturer's instructions, securing it with the provided screw.
5.3 Shower Arm and Head Installation
- Installer brusearm: Apply pipe thread sealant tape to the threaded end of the shower arm and screw it into the fixed shower head outlet in the wall. Tighten securely.
- Fastgør brusehoved: Screw the 10-inch rainfall shower head onto the threaded end of the shower arm. Hand-tighten, then use a wrench to tighten slightly more, ensuring not to overtighten.
5.4 Installation af håndbruser
- Install Holder Bracket: Mount the handheld shower holder bracket to the wall at a desired height using the provided hardware.
- Tilslut slange: Connect one end of the shower hose to the handheld shower outlet on the valve and the other end to the handheld shower head. Ensure washers are in place and connections are tight.
- Placer håndbruser: Placer håndbruseren i holderen.
6. Betjeningsvejledning
Your Gappo shower system offers two functions: a rainfall shower and a handheld spray. The single handle controls both water temperature and flow.
- Tænd/sluk: Rotate the handle to turn the water on or off.
- Temperaturkontrol: Rotate the handle left for hotter water and right for colder water. The pressure balance valve maintains a consistent temperature, preventing sudden changes.
- Funktionsvalg: The system features a diverter to switch between the rainfall shower head and the handheld shower. Operate the diverter knob or lever to select your desired spray function.
- Air Injection Technology: The 10-inch rainfall shower head incorporates air injection technology, mixing water with air to enhance water pressure and simulate a natural rain experience.
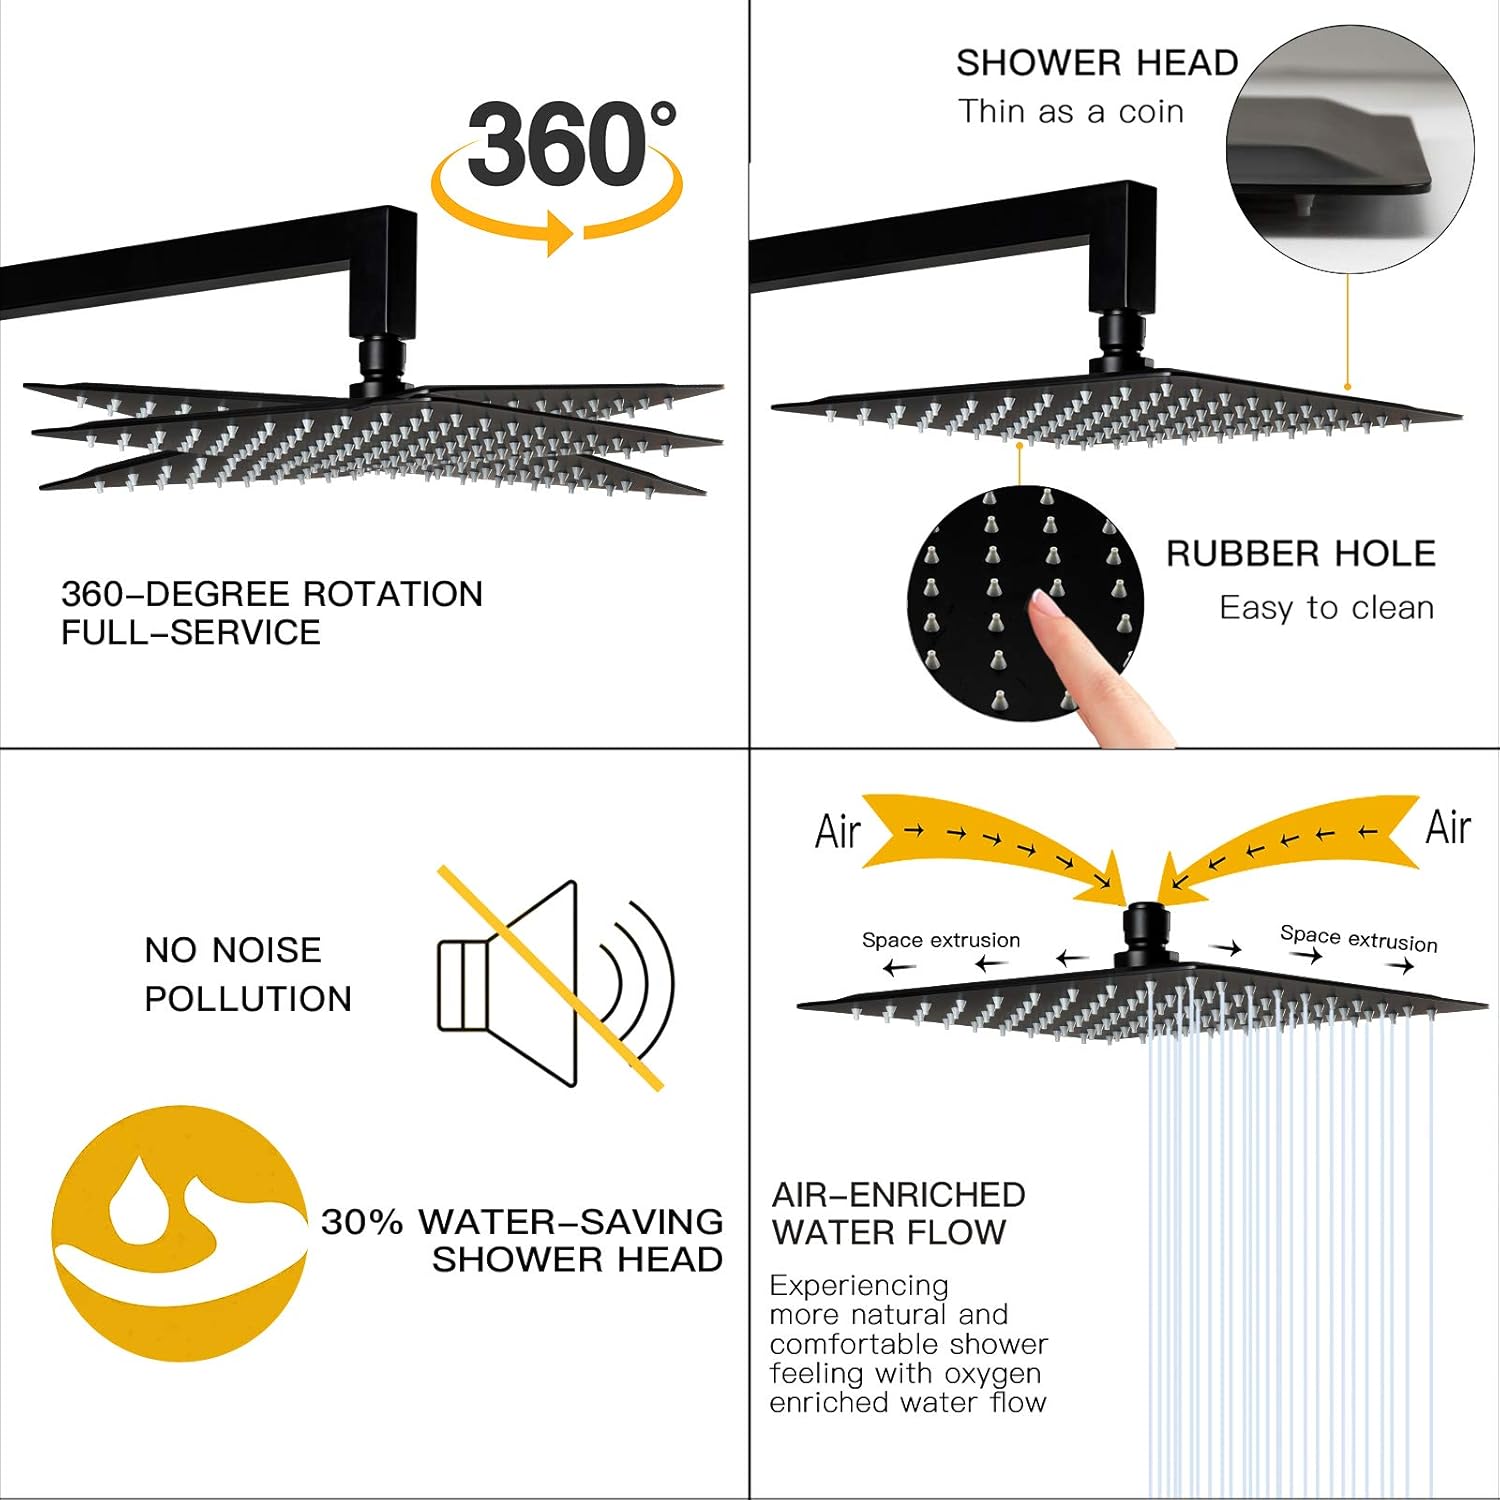
Image 6.1: Illustration of the shower head's features, including 360-degree rotation for full service, easy-to-clean rubber nozzles, quiet operation, water-saving design, and air injection technology for an enhanced water flow.
7. Vedligeholdelse og pleje
Regelmæssig rengøring og vedligeholdelse vil bidrage til at bevare finishen og funktionaliteten af dit brusesystem.
- Rengøring af finishen: Rengør den matsorte finish med en blød,amp klud og mild sæbe. Undgå slibende rengøringsmidler, barske kemikalier eller skuresvampe, da disse kan beskadige overfladen.
- Rengøring af brusehoveddyser: The shower head features silicone nozzles that allow for easy removal of mineral deposits. Simply wipe the nozzles with your finger to clear any buildup.
- Materiale holdbarhed: The faucet features all-metal sturdy construction, made from brass and stainless steel, providing resistance to oxidation and corrosion.
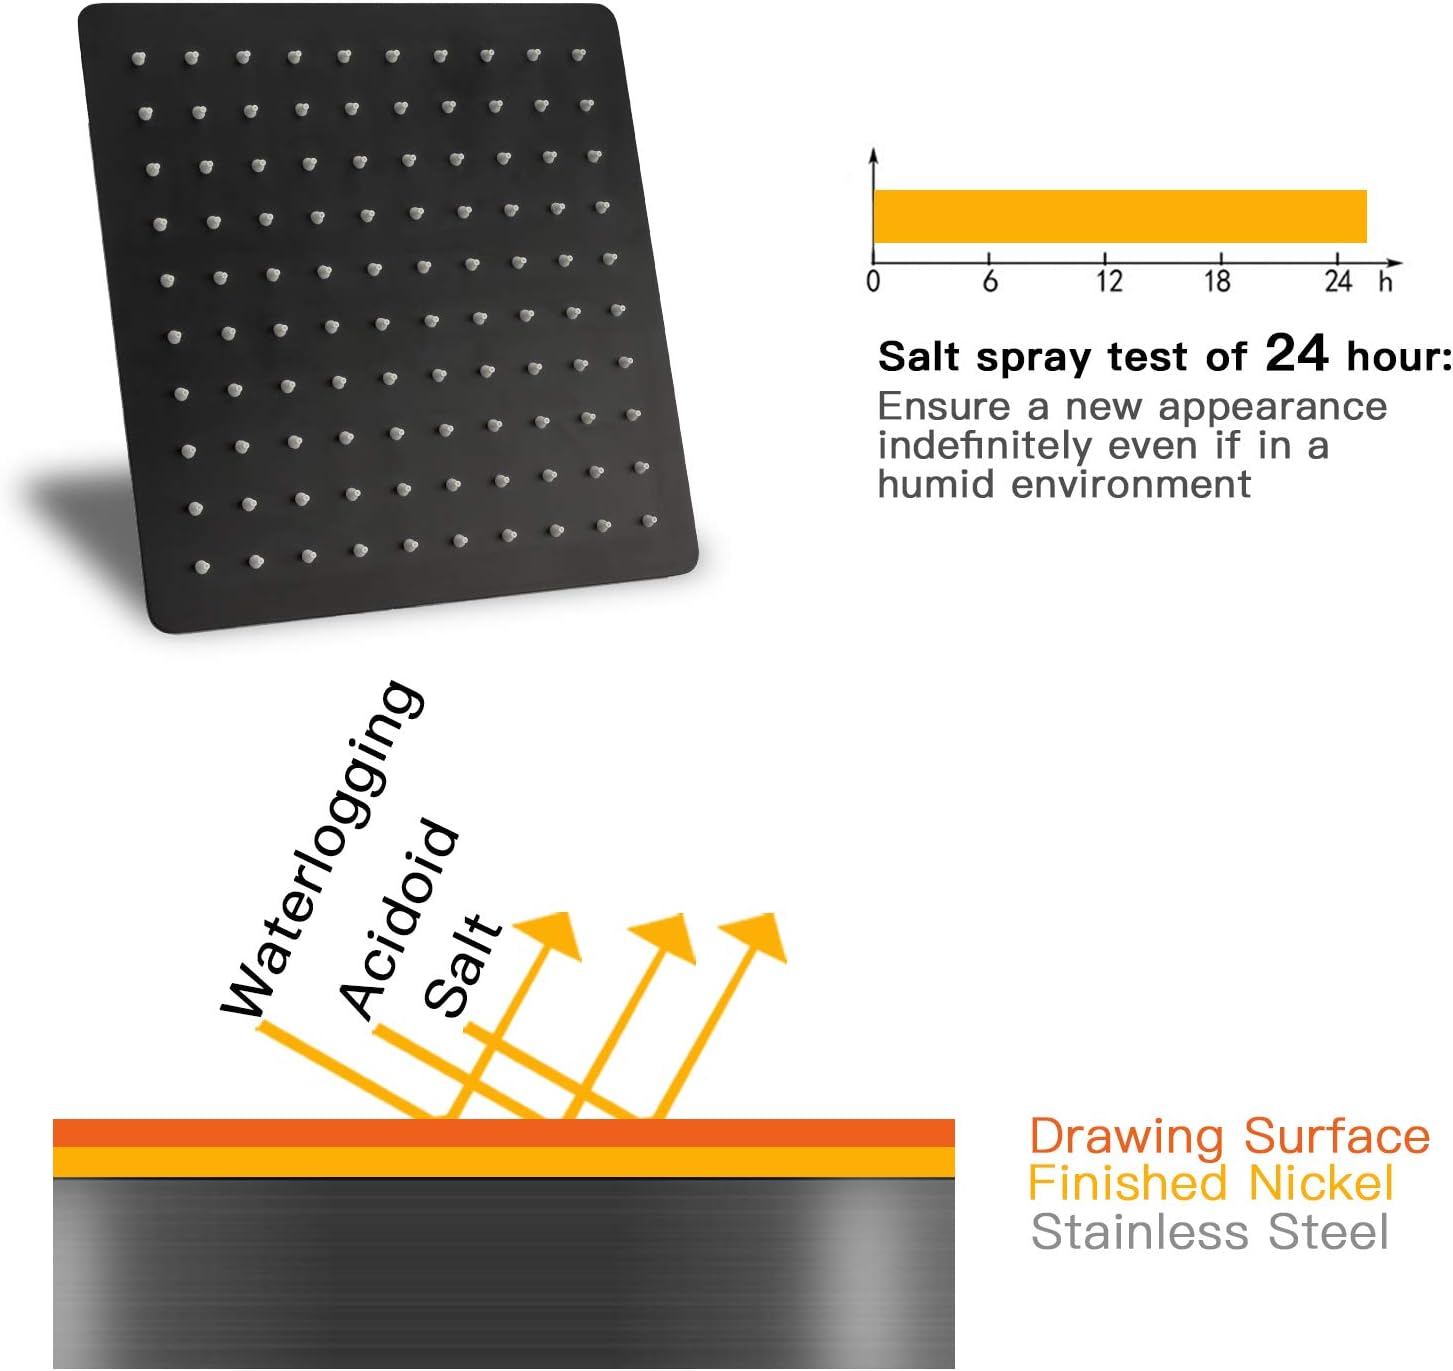
Image 7.1: Diagram illustrating the multi-layer construction of the shower system's finish (Drawing Surface, Finished Nickel, Stainless Steel) and a graph showing its resistance to salt spray for over 24 hours, indicating durability in humid environments.
8. Fejlfinding
If you encounter issues with your shower system, refer to the following common problems and solutions:
| Problem | Mulig årsag | Løsning |
|---|---|---|
| Lavt vandtryk | Tilstoppede bruserdyser; delvist lukket afspærringsventil; lavt vandtryk i husholdningen. | Clean shower head nozzles by wiping them; ensure shut-off valves are fully open; consult a plumber if household pressure is consistently low. |
| Vandlækager | Loose connections; damaged O-rings or washers; improper application of thread sealant. | Ensure all connections are tightened properly (do not overtighten); replace damaged O-rings or washers; reapply thread sealant tape if necessary. |
| Ukonsekvent vandtemperatur | Pressure balance valve malfunction; hot/cold water supply issues. | Verify the pressure balance valve is installed correctly; check household hot/cold water supply. If issues persist, contact customer support. |
| Omleder skifter ikke funktioner | Mineral buildup in diverter; faulty diverter cartridge. | Clean around the diverter mechanism; if problem persists, the diverter cartridge may need replacement. Contact customer support. |
9. Specifikationer
- Mærke: GAPPO
- Modelnummer: Y71001-US-4.5
- Udfør type: Mat sort
- Materiale: Messing, rustfrit stål
- Monteringstype: Vægmontering
- Shower Head Size: 10 tommer
- Antal håndtag: 3 (1 for temperature/flow, 2 for diverter)
- Varens vægt: Cirka 10.03 pund (4.56 kilogram)
- Produktdimensioner: 17.32 x 13.58 x 4.72 tommer (emballage)
- Tilslutningstråd: NPT 1/2"
- Funktioner: Pressure Balance Valve, Air Injection Technology, Easy-Clean Silicone Nozzles
10. Garanti og kundesupport
For warranty information or if you encounter any problems with your Gappo shower system that cannot be resolved using the troubleshooting guide, please contact Gappo customer support. Keep your purchase receipt as proof of purchase.
Kontaktoplysninger: Refer to the packaging or the official Gappo webwebstedet for de mest aktuelle kontaktoplysninger til kundesupport.
Relaterede dokumenter - Y71001-US-4.5
 |
Arespark Shower Head Set User Manual and Installation Guide User manual and installation guide for the Arespark 5-Mode High Pressure Handheld Shower Head Set. Features include warranty details, step-by-step installation instructions with detailed diagram descriptions, and a comprehensive FAQ section for troubleshooting common issues. |
 |
Brugervejledning til Veken regnbruserhoved med håndholdt brusehoved Omfattende guide til Veken regnbruserhoved med håndholdt brusehoved, der dækker rengøringsinstruktioner, garantioplysninger, pakkeindhold, installation og fejlfinding. |
 |
Installationsmanual til luksusbrusesystem - ShiureBath Installationsmanual til ShiureBath luksusbrusesystem. Indeholder detaljerede instruktioner til installation, tekniske krav, produktdimensioner, vedligeholdelsestips og fejlfinding af dit brusesystem. |
 |
CRANACH Limited Lifetime Warranty Information and Registration Guide Official Limited Lifetime Warranty details for CRANACH bath and kitchen products. Learn how to register your product, understand warranty coverage, limitations, and exclusions. Contact CRANACH for support. |
 |
Aqualisa Axis brusehoveder: Installationsvejledning og brugermanual Omfattende installationsvejledning og brugervejledning til Aqualisa Axis brusehoveder, inklusive modellerne AX3111 og AX3163. Dækker faste og højdejusterbare brusehoveder, vægmonterede, loftmonterede og planforsænkede installationer. |
 |
Brugsanvisning regnbrusersystem Denne manual indeholder instruktioner til installation og vedligeholdelse af MONDAWE vægmonteret regnbrusersystem, der fås i model A, B og C. Den indeholder installationsbetingelser, styklister, dimensioner og rengøringsvejledning. |
Ask a question about this manual
Ask about setup, troubleshooting, compatibility, parts, safety, or missing instructions. Manuals+ will review the question and use this page’s manual context to help answer it.