1. Introduktion
The AUTOOL LM110 Digital Manifold Gauge is a professional instrument designed for testing, maintaining, and servicing HVAC and refrigeration systems. It accurately measures vacuum pressure, temperature, and can be used for refrigerant filling, vacuuming, and leak detection. This manual provides essential information for the safe and effective operation of the device.

Figure 1.1: Wide Range of Application
This image illustrates the versatility of the AUTOOL LM110, suitable for various applications including automobile air conditioning, household air conditioning, cold storage, and general refrigeration equipment.
2. Produktet er slutview
Familiarize yourself with the components of the AUTOOL LM110 Digital Manifold Gauge before operation.

Figur 2.1: Enhedens komponenter
This image displays the AUTOOL LM110 Digital Manifold Gauge with its key components labeled, including the LCD Display, Set Button, Direction Button, Function/Zero Button, Power Button, Refrigerant Inlet / Vacuum Pump Inlet, Refrigerant Observation Window, 1/4 inch Pressure Inlet, Pressure Valve, Hook, and Battery Cover.
- LCD-skærm: Shows measurement readings, refrigerant type, temperature, pressure, and unit settings.
- Indstil knap: Used to enter settings menus and confirm selections.
- Direction Buttons (Up/Down): Bruges til at navigere i menuer og justere værdier.
- Function/Zero Button: Toggles between functions and performs zero calibration.
- Power knap: Tænder eller slukker for enheden.
- Refrigerant Inlet / Vacuum Pump Inlet: Connection point for refrigerant hoses or vacuum pump.
- Refrigerant Observation Window: Allows visual inspection of refrigerant flow and state.
- 1/4 inch Pressure Inlet: Standard connection for pressure hoses.
- Trykventil: Controls the flow of refrigerant or vacuum.
- Krog: For hanging the device during use.
- Batteridæksel: Adgangspunkt til batteriudskiftning.
3. Opsætning og første idriftsættelse
3.1 Batteriinstallation
Open the battery cover located on the back of the device. Insert the required batteries, ensuring correct polarity. Close the battery cover securely.
3.2 Tænd/sluk
Press the Power Button to turn the device on. Press and hold the Power Button to turn the device off.
3.3 Valg af enhed
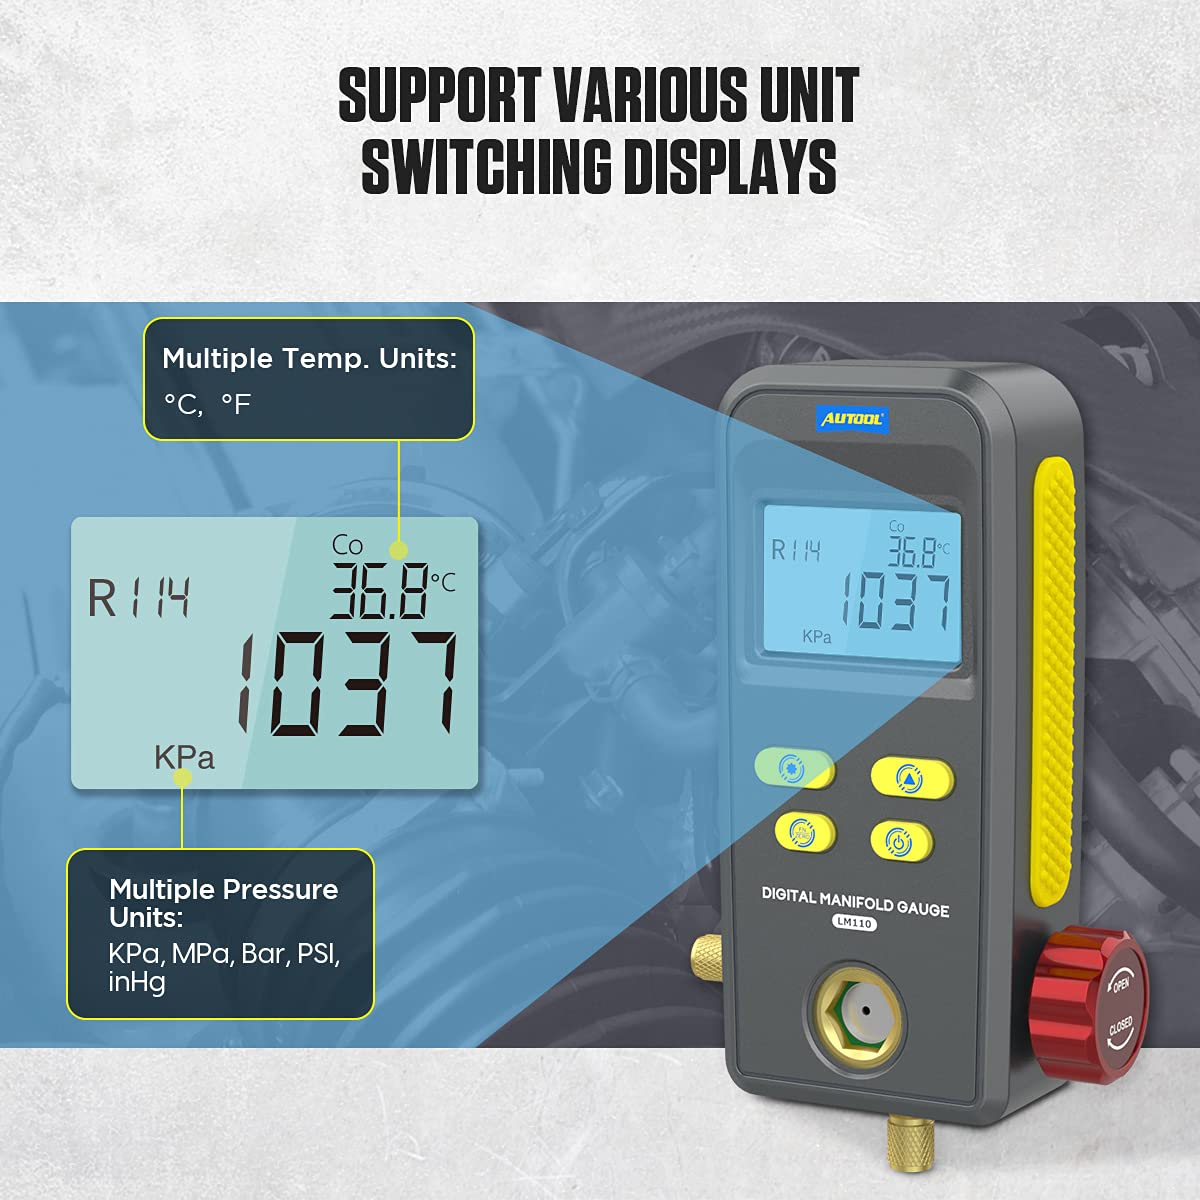
Figure 3.1: Multiple Unit Switching Displays
This image illustrates the device's capability to display measurements in various temperature units (°C, °F) and pressure units (KPa, MPa, Bar, PSI, inHg).
The device supports multiple temperature and pressure units. To change units:
- Press the Set Button to enter the settings menu.
- Use the Direction Buttons to navigate to the unit selection option.
- Press the Set Button to select the desired temperature unit (°C or °F) or pressure unit (KPa, MPa, Bar, PSI, inHg).
- Confirm your selection by pressing the Set Button again or exiting the menu.
4. Betjeningsvejledning
4.1 Refrigerant Filling and Testing
The LM110 can perform refrigerant filling and simultaneously test evaporation and condensation temperatures based on the selected refrigerant type.

Figure 4.1: Refrigerant Filling & Testing Display
This image shows the device display during refrigerant filling and testing, indicating Refrigerant Select (R114), Condensation Temperature (Co 86.8°C), Measuring Unit (KPa), Measuring Pressure (1037), and Evaporation Temperature (Ev 36.8°C).
- Connect the manifold gauge to the HVAC/refrigeration system using appropriate hoses.
- Select the correct refrigerant type from the built-in list (the device supports 89 types).
- Open the pressure valve to allow refrigerant flow.
- Monitor the display for real-time condensation and evaporation temperatures, along with pressure readings.
- The refrigerant observation window allows visual confirmation of the refrigerant's state during filling.

Figure 4.2: Refrigerant Observation Window
This image highlights the refrigerant observation window on the device, allowing users to visually check the refrigerant filling status.
4.2 Vacuuming Operation and Testing
The LM110 is used for vacuuming refrigeration systems and displays real-time vacuum pressure and percentage of vacuum level.

Figure 4.3: Vacuuming Operation & Testing Display
This image displays the device screen during vacuuming, showing Vacuum Degree (78%), Measuring Unit (KPa), and Measuring Pressure (69).
- Connect the device to the system's vacuum port.
- Initiate the vacuum pump.
- The display will show the current vacuum degree and measuring pressure in real-time.
- Continue vacuuming until the desired vacuum level is achieved.
4.3 Leak Testing of Pressure
The device can detect pressure leaks in refrigeration systems and display original pressure, current pressure, leak pressure, and testing time.

Figure 4.4: Leak Testing of Pressure Display
This image shows the device display during a leak test, indicating Leak Pressure (16), Measuring Unit (KPa), Measuring Pressure (1095), Original Pressure (Strt 1045 KPa), and Testing Time (tIME 00:16).
- Press the Function/Zero Button to select the leak test mode.
- Connect the device to the system.
- The device will record the original pressure and begin monitoring for changes.
- The display will show the original pressure, current pressure, calculated leak pressure, and the elapsed testing time.
- A significant difference between original and current pressure, or a non-zero leak pressure, indicates a leak.
5. Specifikationer
The following table details the technical specifications of the AUTOOL LM110 Digital Manifold Gauge.

Figure 5.1: Device Specifications
This image presents a table outlining the technical specifications of the AUTOOL LM110, including dimensions, pressure test range, accuracy, vacuum test range, and weight.
| Feature | Værdi |
|---|---|
| Pakkedimensioner | 9.25 x 6.02 x 3.27 tommer |
| Varens vægt | 1.28 pund (0.58 kg) |
| Fabrikant | AUTOOL |
| ASIN | B0976VZC8N |
| Dato først tilgængelig | 5. august 2021 |
| Mærke | AUTOOL |
| Materiale | Plast |
| Tryktestenhed | KPa, MPa, Bar, PSI, inHg |
| Tryktestområde | 0 KPa ~ 6000 KPa |
| Tryktestopløsning | 1KPa |
| Tryktestnøjagtighed | 0.5%(FS)+5dgt |
| Trykoverbelastningsgrænse | 10 MPa |
| Vakuum test | Relative degree |
| Vakuumtestenhed | KPa, MPa, Bar, PSI, inHg |
| Vakuumtestområde | -101KPa ~ 0KPa |
| Vacuum Resolution | 1KPa |
| Hovedenhedens dimensioner | 184x107x45mm (7.24x4.21x1.77 inches) |
| Vægt | 0.446 kg (0.98 lbs) |
6. Vedligeholdelse
- Rensning: Tør enheden af med en blød, tør klud. Brug ikke slibende rengøringsmidler eller opløsningsmidler.
- Opbevaring: Store the device in a cool, dry place away from direct sunlight and extreme temperatures. Ensure the pressure valve is closed when not in use.
- Udskiftning af batteri: Udskift batterierne med det samme, når indikatoren for lavt batteri vises, for at sikre nøjagtige aflæsninger.
- Kalibrering: Regular calibration by a qualified technician is recommended to maintain accuracy, especially after prolonged use or significant impacts.
7. Fejlfinding
| Problem | Mulig årsag | Løsning |
|---|---|---|
| Enheden tænder ikke. | Døde eller forkert installerede batterier. | Kontroller batteripolariteten, og udskift dem med nye. |
| Upræcise aflæsninger. | Sensor contamination, incorrect unit setting, or need for calibration. | Ensure connections are clean. Verify unit settings. Consider professional calibration. |
| Displayet viser "Err" eller fejlkoden. | System malfunction or out-of-range measurement. | Refer to the specific error code in the full product manual (if available) or contact support. Ensure measurements are within specified ranges. |
| No refrigerant flow observed. | Pressure valve closed, clogged hose, or empty refrigerant tank. | Ensure the pressure valve is open. Check hoses for blockages. Verify refrigerant supply. |
8. Produktvideo
Watch this official product video for a visual demonstration of the AUTOOL LM110 Digital Manifold Gauge.
Video 8.1: AUTOOL LM110 Digital Manifold Gauge Overview
Denne video giver en omfattende overview and demonstration of the AUTOOL LM110 Digital Manifold Gauge, showcasing its features and operational aspects.
9. Garanti og support
For warranty information, technical support, or service inquiries, please refer to the product packaging or contact AUTOOL customer service directly. Keep your purchase receipt for warranty claims.
You can visit the official AUTOOL store for more information: AUTOOL Officiel Butik