
Indledning
This manual provides comprehensive instructions for the setup, operation, and maintenance of your NC LED Temperature Display Electronic Desktop Clock, Model GH0715L. This digital alarm clock features time, date, and temperature display, adjustable brightness, and multiple power options. Please read this manual carefully to ensure proper use and longevity of your device.

Figur 1: Forside view of the NC LED Temperature Display Electronic Desktop Clock.
Pakkens indhold
- NC LED Temperature Display Electronic Desktop Clock (Model GH0715L)
- USB strømkabel
- Brugervejledning (dette dokument)
Note: 3 AAA batteries and a 5V/1A USB adapter are not included and must be purchased separately for certain power modes.

Figure 2: Power supply options for the clock, showing the included USB cable and required AAA batteries (not included).
Produktegenskaber
- LED Time, Date, and Temperature Display
- Justerbare lysstyrkeniveauer
- Three Independent Alarm Settings
- Snooze Function (1-60 minutes, 3 times total)
- Intelligent Voice Control (activates display at 90dB or by tapping)
- 12-hour and 24-hour Time Display Options
- Power-off Time Memory Function (requires AAA batteries)
- Dual Power Sources: USB (constant display) or 3x AAA Batteries (power-saving mode)

Figure 3: Visual representation of the clock's key features.
Opsætning
1. Tænd for uret
The clock can be powered in two ways:
- USB-strømforsyning (anbefales til kontinuerlig visning): Connect the included USB cable to the clock's USB port and plug the other end into a 5V/1A USB adapter (not included) or a compatible USB power source. The LED display will remain on continuously.
- Battery Power (Power-saving mode): Insert 3 AAA batteries (not included) into the battery compartment located at the back of the clock. In this mode, the LED display will automatically turn off after 15 seconds of inactivity to conserve power. The display can be reactivated by lightly tapping the clock, clicking, or tapping the surface it rests on.
Note: To maintain time and settings during power outages or when unplugged, it is recommended to install AAA batteries even when using USB power.
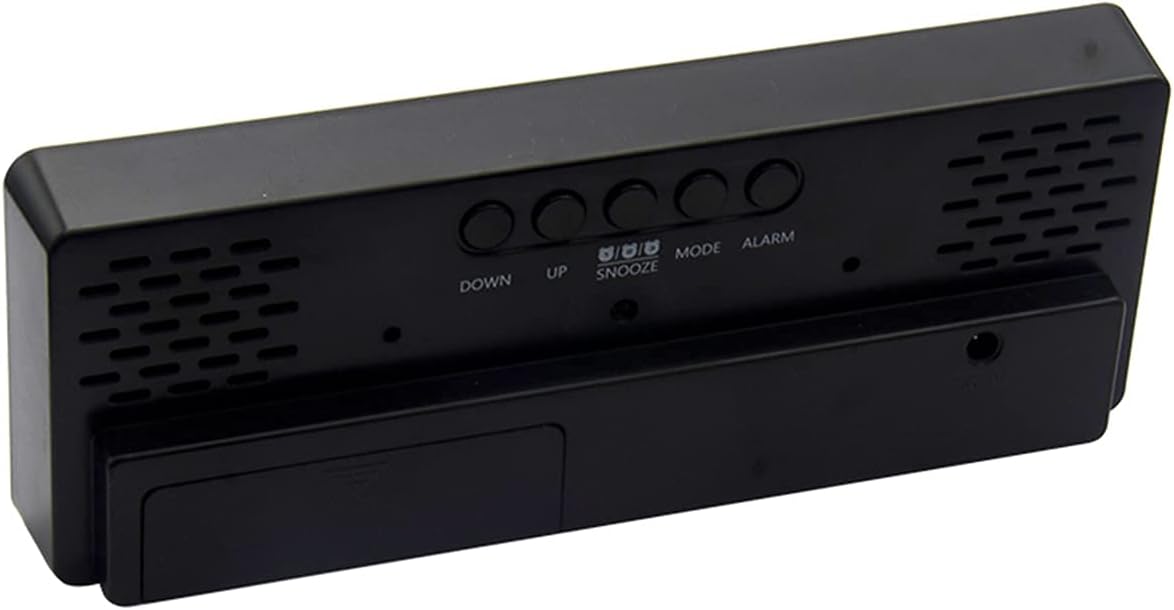
Figur 4: Bagside view of the clock, highlighting the battery compartment and control buttons.
2. Første opstart
Upon powering on, the LED display will show for approximately 2 seconds, followed by a "B" sound. The clock will then enter normal clock mode, defaulting to 0:00 in 24-hour format.
Betjeningsvejledning
1. Basic Mode Navigation
In normal clock mode, press the MODE knappen for at skifte mellem følgende visningstilstande:
- Clock Mode (Time)
- Datatilstand
- Temperaturtilstand
- Night ON/OFF Mode
2. Indstilling af tid og dato
- From Clock or Date mode, press and hold the MODE button to enter the setting state.
- Brug UP og NED buttons to adjust the flashing value (hours, minutes, year, month, day).
- Tryk og hold UP or NED to accelerate value adjustment.
- Trykke MODE igen for at bekræfte indstillingen og gå videre til næste parameter.
- To switch between 12-hour and 24-hour display, press the UP knappen i normal tidsvisningstilstand.
3. Indstilling af alarmer
- In normal mode, single press the ALARM button to display the alarm clock mode.
- While in alarm mode, single press the ALARM knappen for at slå alarmen TIL/FRA.
- To set an alarm, long press the ALARM button to enter the setting state.
- Brug UP og NED buttons to adjust the alarm time (hours and minutes).
- Trykke ALARM again to confirm and move to the snooze time setting.
- Set the snooze duration (1 to 60 minutes) using UP og NED. The snooze function can be used up to 3 times.
- Trykke ALARM to exit alarm settings.
4. Justering af lysstyrke
- In normal time, date, or temperature mode, single press the UP button to directly adjust between two levels of brightness.
- To turn off the LED display completely (while clock still runs), long press the UP button. Press it again to turn the display back on.
- When night mode is activated (see Basic Mode Navigation), the brightness will automatically dim from 18:00 (6 PM) to 6:00 (6 AM).
5. Intelligent stemmestyring
When the clock is in power-saving mode (battery powered), the display can be activated by sound or vibration:
- If the ambient sound reaches 90 decibels (e.g., a clap), the display will turn on.
- Gently tapping the desktop where the alarm clock is placed will also activate the display.
- The display will automatically turn off after 16 seconds of inactivity.

Figure 5: How to activate the display using intelligent voice control.
6. Temperaturvisning
To cycle through time, date, and temperature display automatically, long press the MODE button until you hear a "BI" beep. The LED will then display time for 10 seconds, followed by date, then temperature, and cycle continuously.
Opretholdelse
- Rensning: Brug en blød, tør klud til at rengøre urets overflade. Brug ikke slibende rengøringsmidler eller opløsningsmidler, da de kan beskadige overfladen.
- Udskiftning af batteri: If using battery power, replace all 3 AAA batteries when the display becomes dim or the clock stops functioning correctly. Ensure correct polarity when inserting new batteries.
- Opbevaring: If storing the clock for an extended period, remove the batteries to prevent leakage and potential damage to the device.
- Miljø: Undgå at udsætte uret for ekstreme temperaturer, direkte sollys, høj luftfugtighed eller støvede omgivelser.
Fejlfinding
| Problem | Mulig årsag/løsning |
|---|---|
| Display is dim or off (when using batteries) |
|
| Display is too bright at night |
|
| Clock does not keep time after unplugging |
|
| Stemmestyring svarer ikke |
|
Specifikationer
| Modelnummer | GH0715L |
| Mærke | NC |
| Display Type | Digital LED |
| Farve | Green (LED display color) |
| Produktdimensioner | 16 cm B x 5.8 cm H (6.3 cm B x 2.3 cm H) |
| Varens vægt | 5.1 ounce (144.6 gram) |
| Strømkilde | Battery Powered (3x AAA, not included), Corded Electric (USB cable included, 5V/1A adapter not included) |
| Materiale | Acrylonitrilbutadienstyren (plast) |
| Særlige funktioner | Alarm, Snooze, Temperature Display, Voice Control, Adjustable Brightness |
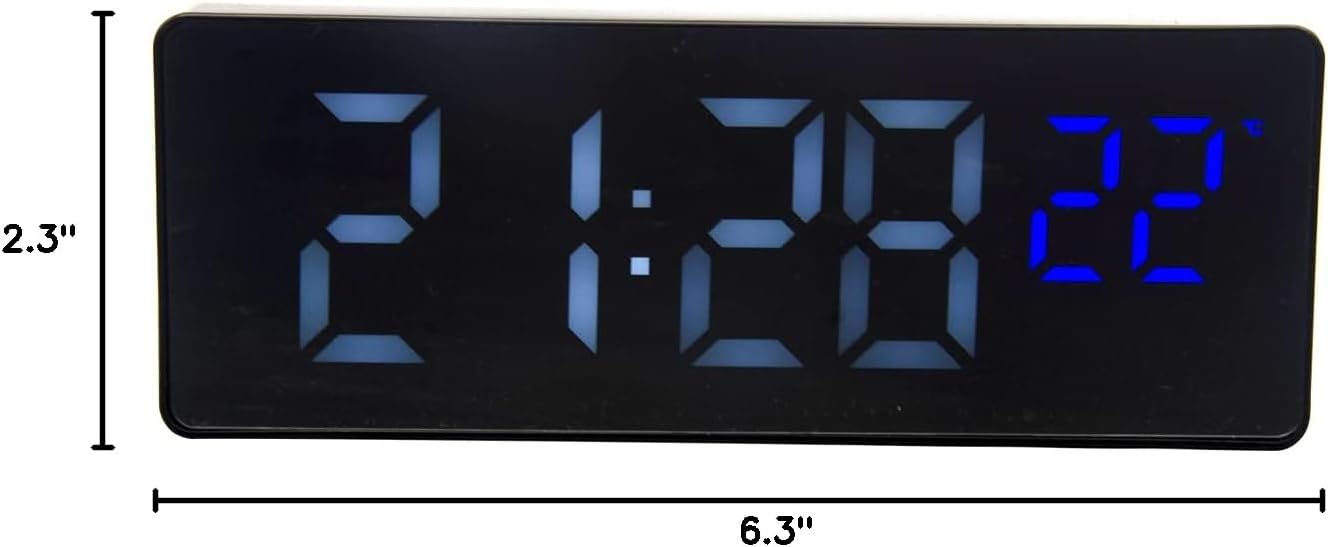
Figure 6: Product dimensions of the clock.
Garanti og support
Specific warranty information for this product is not provided within this manual. For warranty claims, technical support, or further inquiries, please contact the retailer or the manufacturer directly through their official channels. Please retain your proof of purchase for any warranty-related requests.
Manufacturer: Wuhan Prisco