1. Produktet er slutview
The BESTTEN USOT-D-3A-L is a heavy-duty digital programmable timer designed for outdoor use. It features a 7-day programming cycle, a built-in clock, and three grounded outlets, allowing for automated control of outdoor lighting, decorations, and appliances. Its weatherproof construction ensures reliable operation in various outdoor conditions.
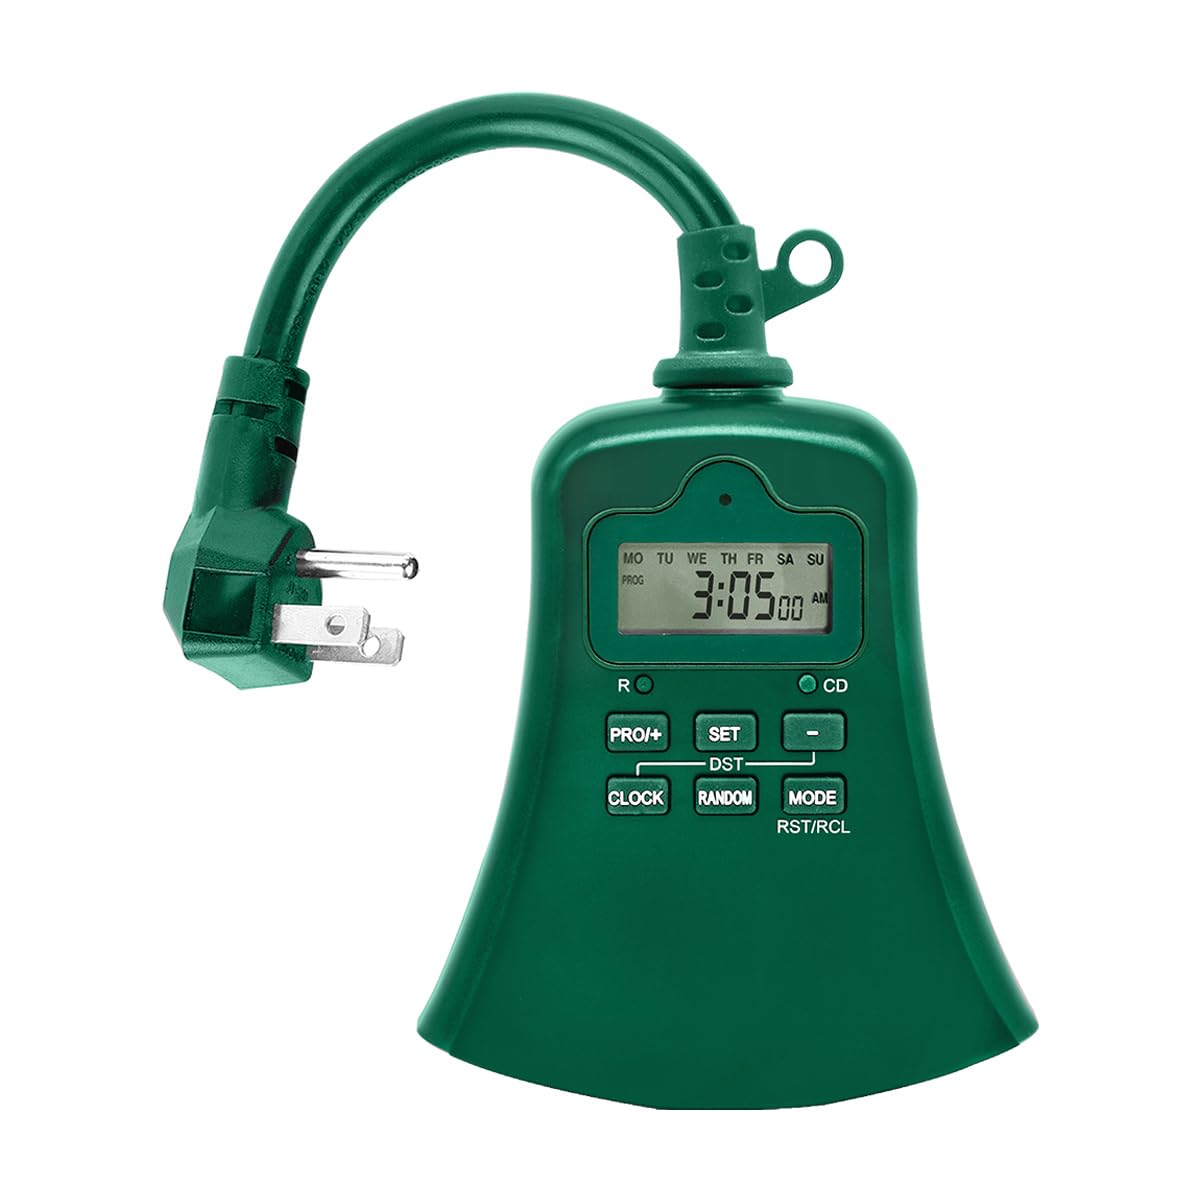
Billede 1.1: Forside view of the BESTTEN USOT-D-3A-L Outdoor Digital Programmable Timer, showing the display, control buttons, and three grounded outlets.
2. Vigtige sikkerhedsinstruktioner
Læs og forstå alle sikkerhedsinstruktioner, før du bruger dette produkt. Manglende overholdelse af disse instruktioner kan resultere i brand, elektrisk stød eller personskade.
- Kun udendørs brug: This timer is designed for outdoor use. Ensure it is installed in a location protected from direct water spray, though its weatherproof design offers protection against rain.
- Jording: Sæt altid timeren i en jordet stikkontakt med 3 ben. Fjern ikke jordstikket.
- Elektrisk vurdering: Overskrid ikke timerens elektriske kapacitet. Se specifikationsafsnittet for yderligere oplysninger.
- Vandnedsænkning: Nedsænk ikke timeren i vand.
- Børn: Opbevares utilgængeligt for børn.
- Opretholdelse: Forsøg ikke at åbne eller reparere timeren. Overlad al service til kvalificeret personale.
- Forlængerledninger: If using an extension cord, ensure it is rated for outdoor use and can handle the total amperage of the connected devices.
3. Produktfunktioner
- 7-Day Digital Programming: Set up to 20 ON/OFF programs per day for individual days or groups of days.
- 3 jordforbundne stikkontakter: Styr flere enheder samtidigt.
- Vejrbestandigt design: Holdbar konstruktion egnet til udendørs miljøer.
- Nedtællingstimerfunktion: Set a specific duration for devices to remain ON.
- Manuel tilsidesættelse: Easily switch between ON, OFF, and AUTO modes.
- Indbygget batteribackup: Retains programming during power outages.
- ETL opført: Certificeret for sikkerheds- og kvalitetsstandarder.
4. Pakkens indhold
Kontroller, at alle varer er til stede, når du åbner pakken:
- BESTTEN USOT-D-3A-L Outdoor Digital Programmable Timer
- Instruktionsmanual
5. Installation
- Vælg en placering: Select a suitable outdoor location for the timer. Ensure it is near a grounded 3-prong electrical outlet and where the connected devices will reach. While weatherproof, avoid locations where it might be submerged or exposed to direct, high-pressure water spray.
- Montering (valgfrit): The timer can be hung using the integrated keyhole slot on the back. Use a screw (not included) appropriate for your mounting surface.
- Plug In the Timer: Insert the timer's plug into a grounded 3-prong outdoor electrical outlet. The display should illuminate.
- Tilslut enheder: Plug your outdoor lights or appliances into the three grounded outlets on the bottom of the timer. Ensure the total load does not exceed the timer's maximum rating.
Image 5.1: Illustration of the timer plugged into an outdoor GFCI outlet, with three devices connected to its outlets.
6. Opsætning og programmering
Before programming, familiarize yourself with the control buttons:
- UR: Bruges til at indstille det aktuelle klokkeslæt og den aktuelle dag.
- PROG: Used to enter and exit programming mode for ON/OFF times.
- ON/OFF/AUTO: Cycles through ON, OFF, and AUTO modes.
- DAG: Adjusts the day of the week during time setting or program setting.
- TIME: Justerer timetallet under tidsindstilling eller programindstilling.
- MIN: Justerer minutterne under tidsindstilling eller programindstilling.
- RST/RCL: Resets the timer or recalls program settings.
6.1. Første nulstilling
It is recommended to perform a full reset before first use or after a prolonged period of inactivity.
- Locate the small RST/RCL knap.
- Using a pointed object (e.g., a pen tip), press the RST/RCL button. The display will clear, and the timer will reset to default settings.
6.2. Indstilling af aktuel tid og dag
- Tryk og hold på UR knappen. Displayet viser det aktuelle klokkeslæt.
- Mens du holder UR, tryk på DAG knappen gentagne gange, indtil den korrekte ugedag vises (MO, TI, ON, TO, FR, LØ, SØ).
- Mens du holder UR, tryk på TIME button repeatedly to set the correct hour (12-hour format with AM/PM).
- Mens du holder UR, tryk på MIN knappen gentagne gange for at indstille det korrekte minut.
- Slip UR knappen. Det aktuelle klokkeslæt og den aktuelle dag er nu indstillet.
6.3. Programmering af tænd/sluk-tider
Timeren giver mulighed for op til 20 tænd/sluk-programmer. Hvert program består af en tænd- og en slukketid.
- Tryk på PROG button once. The display will show "1 ON" and the time will flash. This is for the first ON program.
- Trykke DAG repeatedly to select the desired day(s) for this program. Options include: specific day (MO, TU, etc.), all weekdays (MO TU WE TH FR), all weekend days (SA SU), all 7 days (MO TU WE TH FR SA SU), or various combinations.
- Trykke TIME for at indstille den ønskede ON-time.
- Trykke MIN for at indstille det ønskede ON-minut.
- Trykke PROG again. The display will show "1 OFF" and the time will flash. This is for the first OFF program.
- Repeat steps 2-4 to set the desired OFF time for the first program. The day selection will automatically match the ON program.
- Trykke PROG again to move to the next program ("2 ON"). Repeat the process for up to 20 programs.
- To exit programming mode at any time, press the UR knap.
To clear a program: Mens viewing the specific ON or OFF program you wish to clear, press the RST/RCL button. The program will be replaced with "--:--".
6.4. Countdown Timer Function
The countdown function allows you to turn on or off a device for a specific duration.
- Sørg for, at timeren er aktiveret AUTO mode.
- Tryk og hold på ON/OFF/AUTO button for approximately 3 seconds. The display will show "CD" (Countdown).
- Brug TIME og MIN knapperne for at indstille den ønskede nedtællingsvarighed.
- Trykke ON/OFF/AUTO again to start the countdown. The connected device will turn ON (if currently OFF) or OFF (if currently ON) for the set duration.
- For at annullere nedtællingen skal du trykke på ON/OFF/AUTO endnu en gang.
7. Driftstilstande
Tryk på ON/OFF/AUTO knappen gentagne gange for at gennemgå driftstilstandene:
- BIL: Timeren fungerer i henhold til de programmerede ON/OFF-tider. Dette er standarddriftstilstanden for automatisk styring.
- PÅ: The connected devices will remain continuously ON, overriding any programmed settings. The display will show "ON".
- OFF: The connected devices will remain continuously OFF, overriding any programmed settings. The display will show "OFF".
Always ensure the timer is in AUTO mode for programmed schedules to function.
8. Vedligeholdelse
- Rensning: Disconnect the timer from the power outlet before cleaning. Wipe the exterior with a soft, damp klæde. Brug ikke skrappe kemikalier eller slibende rengøringsmidler.
- Opbevaring: Hvis timeren opbevares i længere tid, skal den afbrydes fra strømmen og opbevares et køligt og tørt sted.
- Batteri: The internal battery is designed to retain settings during power outages. If the display is consistently blank or settings are lost frequently, the internal battery may need servicing by a qualified technician.
9. Fejlfinding
| Problem | Mulig årsag | Løsning |
|---|---|---|
| Timerdisplayet er tomt. | No power to the timer; internal battery depleted. | Ensure the timer is securely plugged into a live outlet. If the problem persists, the internal battery may need charging (leave plugged in for 24 hours) or replacement. |
| Devices are not turning ON/OFF at programmed times. | Timer is not in AUTO mode; incorrect program settings; devices not properly connected. | Trykke ON/OFF/AUTO indtil "AUTO" vises.view your program settings (Section 6.3) for accuracy. Ensure devices are securely plugged into the timer. |
| Timer is ON/OFF continuously, ignoring programs. | Timer is in ON or OFF mode. | Trykke ON/OFF/AUTO indtil "AUTO" vises. |
| Vanskeligheder med programmering. | Incorrect button sequence; unfamiliarity with controls. | Refer to Section 6.3 for detailed programming steps. Perform an initial reset (Section 6.1) and try again. |
10. Specifikationer
| Modelnummer | USOT-D-3A-L |
| Elektrisk vurdering | 125V AC, 60Hz, 15A Resistive, 1875W |
| Antal udsalgssteder | 3 jordede stikkontakter |
| Programming Cycles | 7-dages, op til 20 tænd/sluk-programmer |
| Materiale | Polycarbonat |
| Varens vægt | 8.5 ounces (0.53 pund) |
| Certificeringer | ETL opført |
11. Garanti og kundesupport
BESTTEN products are designed and manufactured to the highest quality standards. For warranty information, technical support, or customer service inquiries, please contact BESTTEN directly through their official webwebstedet eller forhandleren, hvor produktet blev købt.
Please have your model number (USOT-D-3A-L) and purchase information ready when contacting support.