
Indledning
Thank you for choosing the JANOME JUBILEE 60507 Sewing Machine. This manual provides essential information for the safe and efficient operation, maintenance, and troubleshooting of your new sewing machine. Please read this manual thoroughly before using the machine to ensure proper handling and to maximize its performance and longevity.
Vigtige sikkerhedsinstruktioner
Når du bruger et elektrisk apparat, skal grundlæggende sikkerhedsforanstaltninger altid følges, herunder følgende:
- Tag altid stikket ud af maskinen umiddelbart efter brug og før rengøring, fjernelse af dæksler eller foretagelse af brugervedligeholdelsesjusteringer.
- Do not allow children to play with the machine. Close supervision is necessary when the machine is used by or near children.
- Brug kun dette apparat til det tilsigtede formål som beskrevet i denne manual. Brug kun tilbehør, der er anbefalet af producenten.
- Brug aldrig denne maskine, hvis den har en beskadiget ledning eller et beskadiget stik, hvis den ikke fungerer korrekt, hvis den er blevet tabt eller beskadiget, eller hvis den er blevet tabt i vand.
- Hold fingrene væk fra alle bevægelige dele. Der kræves særlig forsigtighed omkring symaskinens nål.
- Brug altid den rigtige stingplade. Den forkerte plade kan få nålen til at knække.
- Træk ikke i netledningen for at frakoble den. Tag fat i stikket, ikke i ledningen.
Opsætningsvejledning
1. Udpakning og placering
Carefully remove the machine from its packaging. Place the machine on a stable, flat surface. Ensure there is adequate lighting and space for comfortable operation.
2. Strømtilslutning
Connect the power cord to the machine's power socket and then plug it into a suitable electrical outlet. Ensure the foot controller is also connected.
3. Installing the Needle
Turn the handwheel towards you to raise the needle to its highest position. Loosen the needle clamp screw. Insert the new needle with the flat side facing the back of the machine, pushing it up as far as it will go. Tighten the needle clamp skrue sikkert.
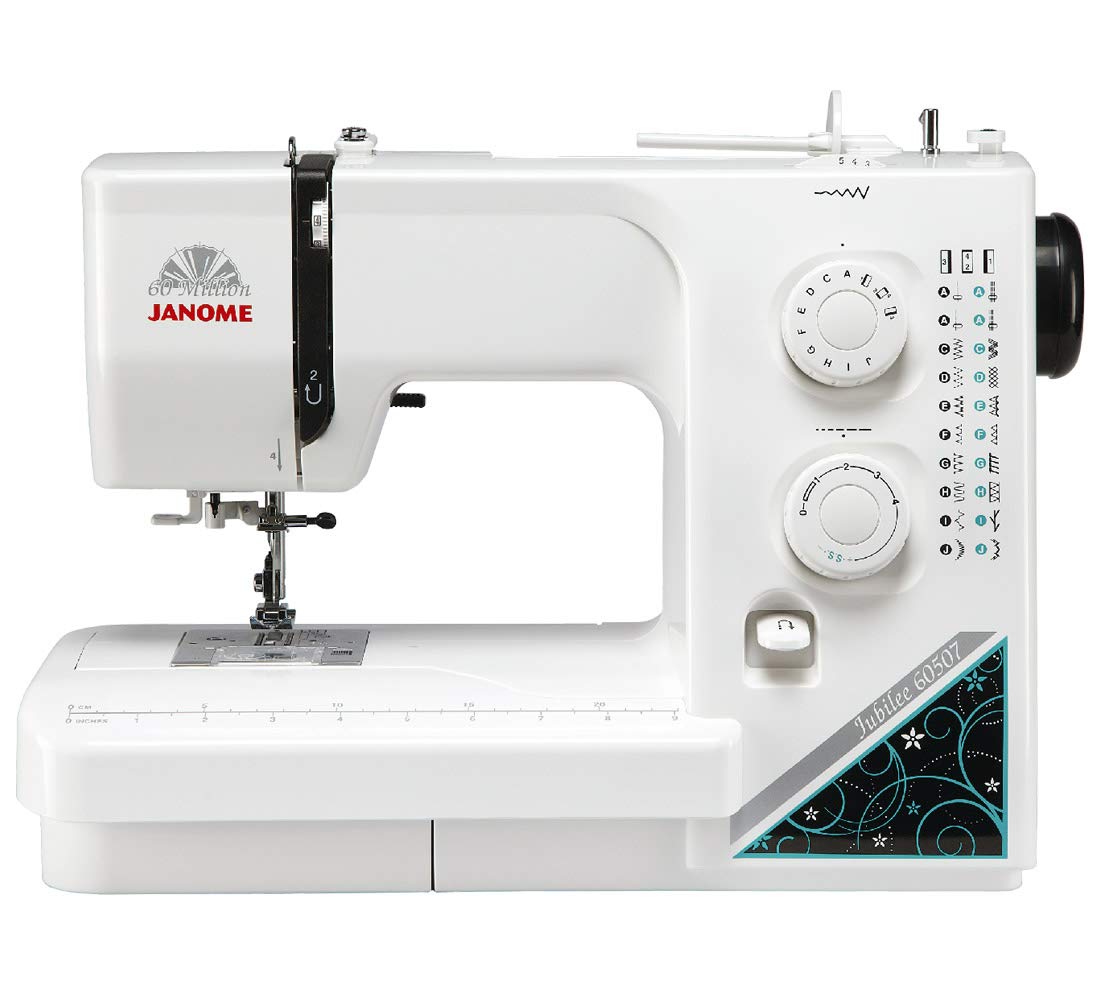
Figur 1: The Janome Jubilee 60507 Sewing Machine. This image shows the overall machine, including the needle area where installation takes place. Ensure the needle is correctly oriented with the flat side facing the back.
4. Spolning af spolen
- Læg en trådrulle på trådrulleholderen.
- Før tråden gennem den øverste trådfører og rundt om spolespændingsskiven.
- Insert the thread through the small hole in the bobbin from the inside out.
- Placer spolen på spolevinderens spindel, og skub spindlen til højre.
- Press the foot controller gently. The bobbin will wind automatically. Stop when the bobbin is full.
- Klip tråden over, og skub spoleapparatets spindel tilbage til venstre.
5. Trådning af maskinen
- Hæv trykfoden og nålen til deres højeste positioner.
- Placer trådspolen på spoleholderen.
- Følg den nummererede trådningssti, der er angivet på maskinen, og før tråden gennem alle føringsskiver og spændingsskiver.
- Pull the thread through the take-up lever.
- Tråd nålen forfra og bagpå.
- Place the wound bobbin into the bobbin case under the needle plate, ensuring the thread feeds correctly.
- Hold the upper thread, turn the handwheel to lower and raise the needle, catching the bobbin thread. Pull both threads under the presser foot and to the back.
Betjeningsvejledning
1. Valg af en søm
Use the stitch selector dial to choose your desired stitch pattern. Refer to the stitch chart on the machine for available options.
2. Justering af stinglængde og -bredde
Adjust the stitch length and width dials according to your fabric and desired stitch appearance. Shorter lengths create denser stitches, while longer lengths create looser stitches. Width adjustments are primarily for zigzag and decorative stitches.
3. Justering af trådspænding
Proper thread tension is crucial for balanced stitches. Adjust the upper thread tension dial as needed. A balanced stitch will have the upper and bobbin threads meeting evenly between the fabric layers. If the upper thread lies flat on the fabric and the bobbin thread shows on top, the upper tension is too tight. If the bobbin thread lies flat and the upper thread shows on the bottom, the upper tension is too loose.
4. Begynd at sy
- Læg stoffet under trykfoden.
- Sænk trykfodshåndtaget.
- Gently press the foot controller to start sewing. Control your speed by varying the pressure on the foot controller.
- For at baglæns syning (til at fastgøre sømme) skal du trykke på baglænsknappen og holde den nede.
5. Afslutning af en søm
Sew a few reverse stitches to secure the seam. Raise the needle to its highest position and lift the presser foot. Pull the fabric away from the machine and cut the threads using the thread cutter located on the machine or with scissors.
Opretholdelse
Regular maintenance ensures the smooth operation and extends the life of your sewing machine. Always unplug the machine before performing any maintenance.
1. Rengøring af maskinen
- Foderhunde: Remove the needle plate and use the small brush provided (or a soft brush) to clean lint and dust from the feed dogs.
- Bobbin Case Area: Remove the bobbin and bobbin case. Clean out any lint or thread scraps from this area.
- Ydre: Tør maskinens yderside af med en blød, tør klud. Brug ikke skrappe kemikalier eller slibende rengøringsmidler.
2. Oiling (if applicable)
Refer to your machine's specific oiling instructions. Some modern machines are self-lubricating and do not require user oiling. If oiling is required, use only genuine sewing machine oil in the designated oiling points, typically around the bobbin case and hook race. Do not over-oil.
3. Udskiftning af nåle
Replace the needle regularly, especially after 8-10 hours of sewing or if it becomes bent, dull, or damaged. A dull needle can cause skipped stitches, fabric snags, and thread breakage. Always use the correct type and size of needle for your fabric and thread.
Fejlfinding
| Problem | Mulig årsag | Løsning |
|---|---|---|
| Springet sting over | Forkert nål, bøjet nål, forkert trådning, forkert nålestørrelse til stoffet. | Skift nål, tråd maskinen om, og sørg for korrekt nåletype/størrelse. |
| Thread Breakage (Upper) | Incorrect threading, tension too tight, burr on needle/thread path, poor quality thread. | Re-thread, adjust tension, check for burrs, use quality thread. |
| Trådbrud (spole) | Bobbin wound unevenly, bobbin case incorrectly inserted, lint in bobbin case. | Re-wind bobbin, re-insert bobbin case, clean bobbin area. |
| Stoffets rynkning | Tension too tight, stitch length too short, incorrect presser foot pressure. | Juster spændingen, øg stinglængden, juster trykfodstrykket. |
| Maskinstop | Thread tangled in bobbin area, fabric pulled forcefully, incorrect needle. | Clear tangled thread, do not force fabric, check needle. |
Specifikationer
| Feature | Detalje |
|---|---|
| Modelnummer | 60507 |
| Mærke | JANOME |
| Dimensioner (L x B x H) | 10 x 5 x 1.27 cm |
| Vægt | 2.72 kg |
| Strømkilde | Elektrisk ledning |
| Farve | Sort |
| Elektrisk | Ja |
| Inkluderede komponenter | 1 pakke |
Garantioplysninger
This JANOME JUBILEE 60507 Sewing Machine comes with a 2 års producentgaranti. Please retain your proof of purchase for warranty claims. For specific terms and conditions, refer to the warranty card included with your product or contact JANOME customer support.
Kundesupport
Should you encounter any issues not covered in this manual or require further assistance, please contact JANOME customer support. You can typically find contact information on the manufacturer's official webwebstedet eller på produktemballagen.
For online resources, visit the official JANOME website for FAQs, tutorials, and service center locations.