Indledning
Denne brugermanual indeholder omfattende instruktioner til installation, drift og vedligeholdelse af dine WAN'er.view W9 udendørs sikkerhedskamera. Læs venligst denne manual omhyggeligt, inden du bruger produktet, for at sikre korrekt funktionalitet og sikkerhed. Gem denne manual til senere brug.
Hvad er der i æsken
Bekræft at alle komponenter er til stede i pakken:
- wansview W9 udendørs sikkerhedskamera
- 5dBi WiFi-antenne
- USB strømforsyning
- Monteringsbeslag sæt
Produkt overview
Gør dig bekendt med nøgleelementerne i dine wan-aftalerview W9 kamera.

Figur 1: wansview W9 udendørs sikkerhedskamera og live View på smartphonen.
Dette billede viser wanerneview W9 udendørs sikkerhedskamera monteret på en væg sammen med en smartphone, der viser et live-feed fra kameraet. Kameraet er hvidt med et sort linseområde, og telefonskærmen viser en hund i en græsklædt have, hvilket illustrerer live-overvågningsfunktionen.
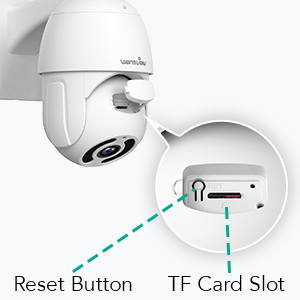
Figur 2: Placering af nulstillingsknap og TF-kortstik.
Dette diagram fremhæver placeringen af nulstillingsknappen og TF-kortstikket (microSD) på wan'et.view W9-kamera, vigtigt til den indledende opsætning og lokal lagring.
Opsætningsvejledning
1. Tænd for kameraet
Tilslut USB-strømforsyningen til kameraet, og sæt den i en stikkontakt. Kameraet tænder og starter sin selvtestsekvens.
2. App Installation
Download "Wans"view Cloud"-appen fra din smartphones appbutik (tilgængelig på iOS og Android). Opret en ny konto, eller log ind, hvis du allerede har en.
3. Netværksforbindelse
De wansview W9-kameraet understøtter både Wi-Fi (kun 2.4 GHz) og Ethernet-forbindelser.
Wi-Fi-forbindelse:
- Åbn Wansview Cloud-appen, og tryk på ikonet "+" for at tilføje en ny enhed.
- Vælg din kameramodel (W9), og følg instruktionerne på skærmen.
- Sørg for, at din telefon er forbundet til et 2.4 GHz Wi-Fi-netværk. Kameraet understøtter ikke 5 GHz Wi-Fi.
- Scan QR-koden, der vises på din telefon, med kameralinsen.
- Vent på, at kameraet opretter forbindelse til dit Wi-Fi-netværk.

Figur 3: Wi-Fi-kompatibilitet (kun 2.4 GHz).
Dette billede illustrerer wanerneview W9-kamera med sin opgraderede 5dBi-antenne, der understreger dets kompatibilitet med 2.4 GHz Wi-Fi-netværk for udvidet signalrækkevidde og hurtigere forbindelseshastigheder. Det viser eksplicit, at 5 GHz Wi-Fi ikke understøttes.
Ethernet-forbindelse:
- Tilslut et Ethernet-kabel fra din router til RJ45-porten på kameraet.
- Kameraet opretter automatisk forbindelse til netværket.
- Følg appens instruktioner for at tilføje kameraet til din konto.
4. Montering af kameraet
De wansview W9-kameraet er designet til vægmontering og udendørs brug (IP65 vandtæt).
- Vælg et passende sted til installation, og sørg for en fri view og stabil monteringsflade.
- Brug det medfølgende monteringsbeslag til at fastgøre kameraet sikkert til væggen.
- Juster kameraets vinkel efter behov efter montering.
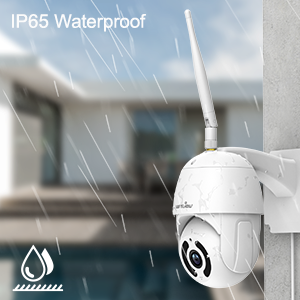
Figur 4: IP65 vandtæthed.
Dette billede viser wanerneview W9-kamera udendørs med regn, der visuelt bekræfter dets IP65-vandtæthedsklassificering, hvilket gør det velegnet til forskellige vejrforhold.
Betjeningsvejledning
1. Pan-Tilt-kontrol
Kameraet har en 350° vandret panorering og en 90° lodret hældning, hvilket giver dig mulighed for at overvåge et bredt område.
- I Wansview Cloud-app, få adgang til live view af dit kamera.
- Brug retningsknapperne på skærmen til at justere kameraets panorerings- og hældningsvinkler på afstand.

Figur 5: 2K FHD PTZ-dækning.
Dette billede viser wansview W9-kameraets 2K FHD-opløsning og dets Pan-Tilt-Zoom (PTZ)-funktioner, der viser et 350° panorerings- og 95° vipningsområde for omfattende områdedækning, med et hus i baggrunden for at illustrere dets udendørs anvendelse.
2. Nattesyn
Kameraet er udstyret med 12 stk. 850nm infrarøde LED-lys, der giver klart nattesyn på op til 50 meter.
- Kameraet skifter automatisk til nattesynstilstand under dårlige lysforhold.
- Det kan du view nattesynsfeedet i realtid gennem Wansview Cloud app.

Figur 6: Fremragende nattesynsevne.
Dette billede viser en opdeling view sammenligning af wanernes synsevne om dagen og om nattenview W9-kamera. Nattesynssegmentet viser tydeligt objekter op til 50 meter væk i mørke, hvilket fremhæver kameraets effektive infrarøde egenskaber.
3. Tovejslyd
Kommuniker med besøgende eller afskræk ubudne gæster ved hjælp af den indbyggede mikrofon og højttaler.
- Fra live view i Wansview Cloud-appen, tryk på mikrofonikonet for at tale.
- Tryk på højttalerikonet for at lytte til lyd fra kameraets placering.

Figur 7: Tovejslyd i aktion.
Dette billede illustrerer tovejslydfunktionen i WAN'erne.view W9-kamera, der viser en person, der kommunikerer med en chauffør via kameraet via en smartphone-app. Talebobler angiver samtalen og demonstrerer interaktion i realtid.

Figur 8: Afskrækkelse af ubudne gæster med tovejslyd.
Dette billede viser wanerneview W9-kamera bruges til at afskrække en ubuden gæst. Talebobler angiver en kommando fra kameraet ("Flyt dig væk fra mit hus") og den ubudne gæsts svar ("arrgg, nej, jeg går"), hvilket demonstrerer kameraets evne til at fungere afskrækkende.
4. Bevægelsesdetektion og advarsler
Kameraet bruger bevægelsessensorer til at registrere aktivitet og sender øjeblikkelige advarsler til din telefon.
- Tilpas sensorfølsomhed og detektionsområder inden for WANSview Cloud app.
- Modtag 10-sekunders videoalarmer, når der registreres bevægelse.

Figur 9: Øjeblikkelig detektion og advarsler.
Dette billede viser en smartphone, der viser en "Bevægelsesalarm"-notifikation fra Wans.view Cloud-app, der angiver, at wansview W9-kameraet har registreret aktivitet og sendt en øjeblikkelig advarsel til brugerens telefon.
5. Lagringsmuligheder (SD-kort og cloud)
De wansview W9-kamera tilbyder fleksible opbevaringsløsninger til optagede filmtage.
- SD-kortlagring: Understøtter op til 128 GB microSD-kort. Indsæt kortet i TF-kortstikket (se figur 2). Optaget video og billeder kan gemmes lokalt til forudgående brug.view.
- Cloud Storage: Abonner på den betalte Cloud-tjeneste via Wansview Cloud-app til sikker lagring og upload af videoer til skyen. Dette giver et ekstra lag af sikkerhed mod kameratyveri eller beskadigelse.

Figur 10: Valgmuligheder for dobbelt lagring.
Dette billede fremhæver de dobbelte opbevaringsmuligheder for WAN'erneview W9-kamera: sikker TF-kortlagring (microSD) og krypteret cloudlagring, der giver brugerne fleksible måder at sikkerhedskopiere optagede film påtage.
6. Alexa-integration
Kontroller dine behovview W9 kamera og view live-feeds ved hjælp af Amazon Alexa.
- Aktiver Wansview færdighed i Alexa-appen.
- Forbind dine Wansview Cloud-konto med Alexa.
- Brug stemmekommandoer som "Alexa, vis mig [kameranavn]" for at vise livevideoen på kompatible Alexa-enheder (f.eks. Echo Show).
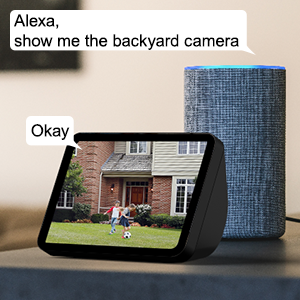
Figur 11: Alexa-integration.
Dette billede viser et Amazon Echo Show, der viser et live videofeed fra et WAN.view kamera, med talebobler, der angiver en brugers stemmekommando ("Alexa, vis mig baghavekameraet") og Alexas svar ("Okay"), hvilket demonstrerer problemfri integration med Alexa til stemmestyring.
7. Deling mellem flere familiemedlemmer
Del adgang til dit kameras livefeed med op til 4 brugere samtidigt.
- Generer et invitationslink i Wansview Cloud app.
- Del linket med familiemedlemmer for at give dem adgang.
Opretholdelse
- Rensning: Tør forsigtigt kameralinsen og huset af med en blød, tør klud. Brug ikke skrappe kemikalier eller slibende rengøringsmidler.
- Firmwareopdateringer: Tjek regelmæssigt for og installer firmwareopdateringer via WANSview Cloud-app for at sikre optimal ydeevne og sikkerhed.
- Strømforsyning: Sørg for, at strømforsyningen er tilsluttet korrekt og ikke er beskadiget.
- Netværks forbindelse: Bekræft en stabil Wi-Fi- eller Ethernet-forbindelse for uafbrudt overvågning.
Fejlfinding
| Problem | Mulig årsag | Løsning |
|---|---|---|
| Kamera offline | Ingen strøm; svagt/afbrudt Wi-Fi-signal; problem med routeren. | Kontroller strømforbindelsen; Flyt kameraet tættere på routeren, eller brug Ethernet; Genstart routeren. |
| Kan ikke oprette forbindelse til Wi-Fi | Forkert Wi-Fi-adgangskode; Forbinder til 5GHz-netværk; For langt fra routeren. | Dobbelttjek adgangskoden; Sørg for forbindelse til 2.4 GHz Wi-Fi; Flyt kamera eller router. |
| Bevægelsesalarmer ikke modtaget | Bevægelsesdetektering deaktiveret; App-notifikationer slået fra; Følsomhed for lav. | Aktivér bevægelsesdetektion i appen; Tjek telefonens indstillinger for notifikationer; Juster følsomheden. |
| Dårlig nattesynskvalitet | Forhindring foran linsen; infrarøde LED'er blokeret. | Fjern eventuelle forhindringer; Sørg for, at linsen er ren. |
| Problemer med tovejslyd | Mikrofon/højttaler blokeret; App-tilladelser. | Sørg for fri lydsti; Kontroller apptilladelser til mikrofonen. |
Specifikationer
| Modelnummer | W9-W |
| Videooptagelsesopløsning | 1080p (2K HD) |
| Pan/tilt rækkevidde | 350° Pan, 90° Tilt |
| Forbindelsesteknologi | Trådløs (Wi-Fi 2.4 GHz), Ethernet |
| Trådløs kommunikationsteknologi | Wi-Fi |
| Strømkilde | Elektrisk med ledning |
| Night Vision Range | 50 fod |
| International Protection Rating | IP65 (Vandtæt) |
| Opbevaringsmuligheder | SD-kort (op til 128 GB), Cloud-lagring |
| Lyd | 2-vejs lyd (indbygget mikrofon og højttaler) |
| Kompatible enheder | Smartphone (iOS, Android), Alexa Echo Show |
| Monteringstype | Vægmontering |
| Dimensioner (L x B x H) | 6.3 x 6.1 x 3.94 tommer |
| Varens vægt | 1.6 pund |
Garanti og support
For garantioplysninger og teknisk support henvises til wansview officiel webwebstedet eller kontakt deres kundeservice direkte. Detaljer findes typisk på produktemballagen eller på wan-kortet.view mærkebutik på Amazon.
Besøg wansview Butik for mere information.


