
VIVIDIA VS-749
Vividia VS-749 All-in-One Pipe Sewer Drain Tube Video Inspection Camera User Manual
Model: VS-749
1. Produktet er slutview
The Vividia VS-749 is a comprehensive video inspection system designed for examining pipes, drains, sewers, ducts, chimneys, and other enclosed spaces. Its all-in-one compact design ensures portability and durability for various professional applications.

Figure 1: Vividia VS-749 All-in-One Pipe Inspection Camera system.
Nøglefunktioner:
- Alt-i-et kompakt design: Portable and robust for demanding environments.
- Long Push-Rod Cable: 40 meters (131 feet) fiberglass cable for extended reach.
- Vandtæt kamerahoved: 23mm diameter camera with Sony CCD sensor and 480P resolution.
- 7-tommer LCD-skærm: For klar viewing of inspections.
- Optagelsesevne: Capture pictures and videos, saved to an SD card.
- Kraftig LED-belysning: Adjustable LED lights on the camera head.
- Meter Counter: Built-in counter to track cable insertion distance.
2. Pakkens indhold
Kontroller, at alle varer er til stede i pakken, før du fortsætter med opsætningen.
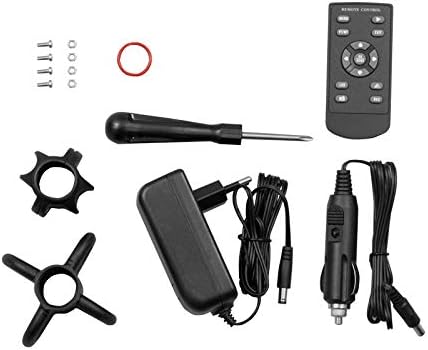
Figure 2: Included accessories for the Vividia VS-749 system.
- VS-749 Control Box with 7" LCD Monitor and Keyboard
- Fiberglass Push-Rod Cable Reel with 23mm Camera Head
- Strømadapter
- Bil oplader
- Fjernbetjening
- Skruetrækker
- Skids (various sizes)
- Tilslutningskabel
- Brugervejledning (dette dokument)
3. Opsætningsvejledning
Follow these steps to set up your Vividia VS-749 inspection camera.
3.1 Første samling
- Udpak komponenter: Fjern forsigtigt alle komponenter fra emballagen.
- Monter kontrolboks: Place the control box securely onto the cable reel frame. Ensure it clicks into place or is fastened according to the design.
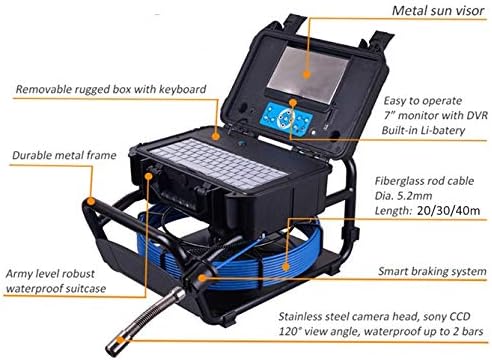
Figure 3: Control box mounted on the cable reel frame.
- Tilslut kamerakabel: Connect the camera cable from the reel to the designated port on the control box. Ensure a secure connection.
- Tænd: Connect the power adapter or car charger to the control box and a power source. Press the power button to turn on the system.
- Indsæt SD-kort: Locate the SD card slot on the control box and insert a compatible SD card for recording.
3.2 Attaching Skids (Optional)
Skids can be attached to the camera head to protect it and help center it within larger pipes, improving visibility and maneuverability.
- Select the appropriate skid size for the pipe diameter.
- Carefully attach the skid to the camera head by screwing it on or snapping it into place, ensuring it is firm and secure.

Figure 4: Various skids for the camera head.
4. Betjeningsvejledning
This section details the operation of the Vividia VS-749 inspection camera.
4.1 Grundlæggende betjening
- Tænd: Press the green power button on the control panel to turn on the monitor.
- Skærm skærm: The 7-inch LCD monitor will display the live feed from the camera.
- Kabeludrulning: Slowly push the fiberglass cable into the pipe or area to be inspected. The built-in meter counter will display the inserted distance.
- Juster LED-lys: Use the LED brightness control buttons on the control panel to adjust the illumination level of the camera head. Increase brightness in dark environments and decrease to avoid glare.
4.2 Optagelse af fotos og videoer
The system supports one-touch video/audio recording and image capture, saving files to the inserted SD card.
- Tag et billede: Press the "Photo" button (usually indicated by a camera icon) to capture a still image.
- Start/stop videooptagelse: Press the "Record" button (usually indicated by a red dot or REC icon) to start video recording. Press it again to stop.
- Afspilning: Få adgang til afspilningsmenuen for at genoptageview optaget billeder og videoer.
Video 1: Demonstration of the Vividia VS-749's self-leveling camera and recording functions.
Video 2: General operation, including zoom and recording features, applicable to various Vividia pipe inspection cameras.
4.3 Zoomfunktion
The system features an 8-level digital zoom function to magnify the live image or recorded media.
- Use the "Zoom In" and "Zoom Out" buttons on the control panel to adjust the magnification.
4.4 Self-Leveling Camera Head
The 23mm camera head features a self-leveling function, ensuring the image remains upright regardless of the camera's rotation within the pipe.
4.5 Sonde Transmitter (Optional)
If equipped with the optional 512Hz Sonde transmitter, a compatible locator (sold separately) can be used to pinpoint the camera's exact location underground or within walls.
5. Vedligeholdelse
Proper maintenance ensures the longevity and optimal performance of your Vividia VS-749.
5.1 Rengøring
- Kamerahoved: After each use, gently clean the camera lens and housing with a soft, damp klud. Undgå slibende materialer eller barske kemikalier.
- Kabel: Wipe down the fiberglass cable with a damp cloth to remove dirt and debris before coiling it back onto the reel.
- Monitor and Control Box: Use a soft, dry cloth to clean the monitor screen and control panel.
5.2 Replacing Camera Covers
The camera covers are replaceable to maintain optimal image clarity and protection.
- Unscrew the old camera cover from the camera head.
- Carefully place a new, clean camera cover onto the camera head and screw it on until secure. Do not overtighten.

Figure 5: Replacing the protective camera cover.
5.3 Opbevaring
Store the system in its original waterproof carrying case in a cool, dry place when not in use.
6. Fejlfinding
Se dette afsnit for almindelige problemer og deres løsninger.
| Problem | Mulig årsag | Løsning |
|---|---|---|
| Intet billede på skærmen. | Camera cable not connected properly; power issue. | Ensure camera cable is securely connected. Check power supply and battery level. |
| Kan ikke optage billeder/videoer. | No SD card inserted; SD card full or corrupted; incorrect format. | Insert a formatted SD card. Check available space. Format the SD card if necessary (refer to system settings). |
| Billedet er sløret. | Dirty camera lens/cover; focus issue (if applicable). | Clean the camera lens and cover. Ensure the camera is within its optimal focal range. |
| LED-lysene virker ikke eller er dæmpede. | Brightness setting too low; LED malfunction. | Adjust LED brightness using the control buttons. If problem persists, contact support. |
7. Specifikationer
| Feature | Detalje |
|---|---|
| Modelnavn | VS 749plus |
| Kamera Diameter | 23 mm |
| Kabellængde | 40m (131ft) Fiberglass Push Rod |
| Videooptagelsesopløsning | 480p |
| Skærmstørrelse | 7 tommer LCD |
| Sensortype | Sony CCD |
| Vandmodstandsniveau | Waterproof (Camera Head) |
| Medietype | SD Card (Max 256G) |
| File Format | AVI |
| Lydoptagelse | Ja |
| Forbindelsesteknologi | USB |
| Batterilevetid | Cirka 6 timer |
8. Garanti og support
For warranty information, please refer to the documentation provided with your purchase or contact the seller directly. For technical support or inquiries, please contact Oasis Scientific Inc.
- Sælger: Oasis Scientific Inc.
- Amazon Store: VIVIDIA Store on Amazon
Ask a question about this manual
Ask about setup, troubleshooting, compatibility, parts, safety, or missing instructions. Manuals+ will review the question and use this page’s manual context to help answer it.