
1. Introduktion
This user manual provides detailed instructions for the proper installation, operation, and maintenance of your ANYSECU AnyTone AT-778UV Dual Band Mobile Radio. To ensure optimal performance and safety, please read this manual thoroughly before using the device and retain it for future reference.
2. Sikkerhedsoplysninger
- Do not operate the radio in explosive atmospheres (e.g., near flammable gas, dust particles, metallic powders, etc.).
- Ensure the radio is connected to a stable 13.8V DC power source. Incorrect voltage kan beskadige enheden.
- Undgå langvarig udsættelse for direkte sollys eller ekstreme temperaturer.
- Radioen må ikke skilles ad eller ændres. Reparationer bør kun udføres af kvalificerede teknikere.
- Hold en sikker afstand fra antennen under transmission for at undgå eksponering for RF-energi.
- The radio's heat sink can become hot during prolonged transmission. Avoid direct contact.
3. Pakkens indhold
Bekræft, at alle nedenstående varer er inkluderet i din pakke. Hvis der mangler eller er beskadigede varer, bedes du kontakte din forhandler.
- ANYSECU AnyTone AT-778UV Mobile Radio Unit
- Lighted Keypad Microphone
- DC-strømkabel med sikringsholder
- Monteringsbeslag
- Skruepakke
- Brugermanual

4. Produktet er slutview
The ANYSECU AnyTone AT-778UV is a compact dual-band VHF/UHF mobile radio transceiver designed for reliable communication. It features a color LCD display, DTMF and 5Tone functions, and a rotatable display for flexible installation.
4.1 Radio Unit Features

- Tænd/sluk/Mute: Controls the radio's power and mute function.
- Mikrofonstik: Connects the hand microphone.
- P1-P6 (Self-Define Keys): Programmerbare funktionstaster.
- FUNC (Function Key): Accesses various radio functions.
- Channel Switch/Push Button/Key Lock: Used for channel selection, menu navigation, and locking controls.
- LCD-skærm: Viser oplysninger om frekvens, kanal og status.
4.2 Hand Microphone Features

- OP/NED knapper: Adjust frequency, channel, or menu options.
- PTT (Push-To-Talk): Aktiverer transmissionen.
- Nummertastatur: For direct frequency entry or DTMF tones.
- A/B-bånd: Skifter mellem hoved- og underbånd.
- Band Indicator: Shows the currently active band.
- TX/RX -indikator: Illuminates during transmit (TX) or receive (RX).
- MIC: Mikrofonindgang.
- Højttaler: Indbygget højttaler til lydoutput.
- Lock UP/DOWN: Locks the UP/DOWN buttons.
4.3 Dimensioner

5. Opsætning
Follow these steps to set up your AT-778UV mobile radio.
5.1 Strømtilslutning
Connect the supplied DC power cable to the radio's power input. Ensure correct polarity (red to positive, black to negative) and connect to a stable 13.8V DC power source capable of supplying sufficient current (e.g., a car battery or regulated power supply).
5.2 Antenneforbindelse
Connect a suitable dual-band VHF/UHF antenna to the SO239 antenna connector on the rear of the radio. Ensure the connection is secure to prevent signal loss and potential damage.
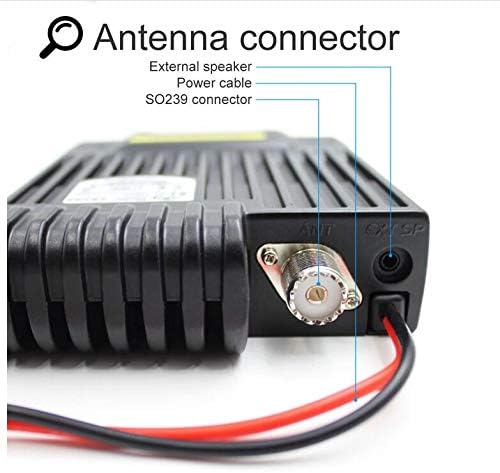
5.3 Mikrofonforbindelse
Plug the hand microphone's RJ45 connector into the microphone jack on the front panel of the radio. Ensure it clicks into place securely.
5.4 Indledende tænding
After connecting power, antenna, and microphone, press the power button on the radio's front panel to turn on the unit. The LCD display will illuminate, showing the current frequency and status.
6. Betjeningsvejledning
This section covers the basic operation of your AT-778UV mobile radio.
6.1 Tænd/sluk og lydstyrkekontrol
- To power on/off, press the Magt på frontpanelet.
- Drej på Channel Switch/Push Button for at justere lydstyrken.
6.2 Frekvens- og kanalvalg
- Brug OP/NED buttons on the microphone or rotate the Kanalskift on the radio to change frequencies or channels.
- Tryk på A/B button on the microphone to switch between the main (VHF) and sub (UHF) bands.
- The radio supports 200 channels.
6.3 Transmission (PTT)
For at sende, tryk og hold nede PTT button on the left side of the microphone. Speak clearly into the microphone. Release the PTT button to receive.
6.4 avancerede funktioner
- The radio supports CTCSS, DCS, DTMF, and 5Tone functions. Refer to the full user manual for detailed programming and usage of these features.
- Programmable keys (P1-P6) can be customized for quick access to frequently used functions.
- Programming software is available for advanced configuration. Please refer to the official AnyTone webwebsted for softwaredownloads og instruktioner.
7. Vedligeholdelse
Proper maintenance ensures the longevity and reliable operation of your radio.
- Rensning: Brug en blød, damp klud til at rengøre radioens yderside. Brug ikke skrappe kemikalier eller slibende rengøringsmidler.
- Opbevaring: When not in use for extended periods, store the radio in a dry, cool place away from direct sunlight and extreme temperatures.
- Antenne: Regularly check the antenna connection for corrosion or damage.
- Strømkabel: Inspect the power cable and fuse holder for any signs of wear or damage.
8. Fejlfinding
Hvis du støder på problemer med din radio, kan du se følgende almindelige problemer og løsninger:
| Problem | Mulig årsag | Løsning |
|---|---|---|
| Radioen tænder ikke. | Ingen strøm, forkert ledningsføring, sprunget sikring. | Check power cable connections, ensure correct polarity, inspect fuse. |
| Ingen lyd fra højttaleren. | Volume too low, squelch too high, external speaker connected. | Increase volume, adjust squelch level, check external speaker connection. |
| Kan ikke sende eller modtage. | Incorrect frequency/channel, antenna issue, power output setting. | Verify frequency/channel, check antenna connection, ensure power output is set correctly. |
| Displayet er tomt eller uregelmæssigt. | Løs forbindelse, intern fejl. | Power cycle the radio. If problem persists, contact support. |
For more complex issues, consult the full user manual or contact customer support.
9. Specifikationer
Key technical specifications for the ANYSECU AnyTone AT-778UV Mobile Radio:
- Mærke: ANYSECU
- Modelnummer: AT 778UV
- Frekvensområde: VHF: 136-174 MHz, UHF: 400-480 MHz
- Antal kanaler: 200
- Udgangseffekt: 25W/15W/5W (valgbar)
- Voltage: 13.8 volt DC
- Særlige funktioner: DTMF, 5Tone, CTCSS, DCS, Color LCD, 180-degree rotatable TFT LCD display, Lighted keypad mic, Built-in speakers (radio & mic), Built-in cooling fan
- Varens vægt: 1.12 pund (ca. 508 g)
- Vandmodstandsniveau: Vandtæt
- FCC ID: T4K-778UV
10. Garanti og support
For warranty information and technical support, please refer to the documentation included with your product or visit the official ANYSECU webwebsted. Behold din købskvittering som købsbevis i tilfælde af garantikrav.
Fabrikant: Når som helst