
Indledning
This manual provides detailed instructions for the safe and efficient operation of your KORAD KWR103 Programmable DC Power Supply. Please read this manual thoroughly before using the device to ensure proper functionality and to prevent damage or injury. The KWR103 is a versatile programmable DC power supply offering a wide range of voltage and current outputs, including 60V/15A/300W, designed for various testing and application needs.
Vigtige sikkerhedsoplysninger
Always observe the following safety precautions to prevent electric shock, injury, or damage to the device:
- Ensure the power supply is connected to a grounded AC outlet with the correct voltage.
- Brug ikke enheden i vådt eller damp forhold.
- Åbn ikke c'enasing; der er ingen dele indeni, som brugeren kan servicere. Overlad service til kvalificeret personale.
- Bekræft korrekt polaritet og volumentage/current settings before connecting to any load.
- Undgå at kortslutte udgangsterminalerne.
- Disconnect power before making or changing connections.
- Sørg for tilstrækkelig ventilation omkring enheden for at forhindre overophedning.
Produkt overview
The KORAD KWR103 is a high-precision programmable DC power supply. Familiarize yourself with its components:
Frontpanel

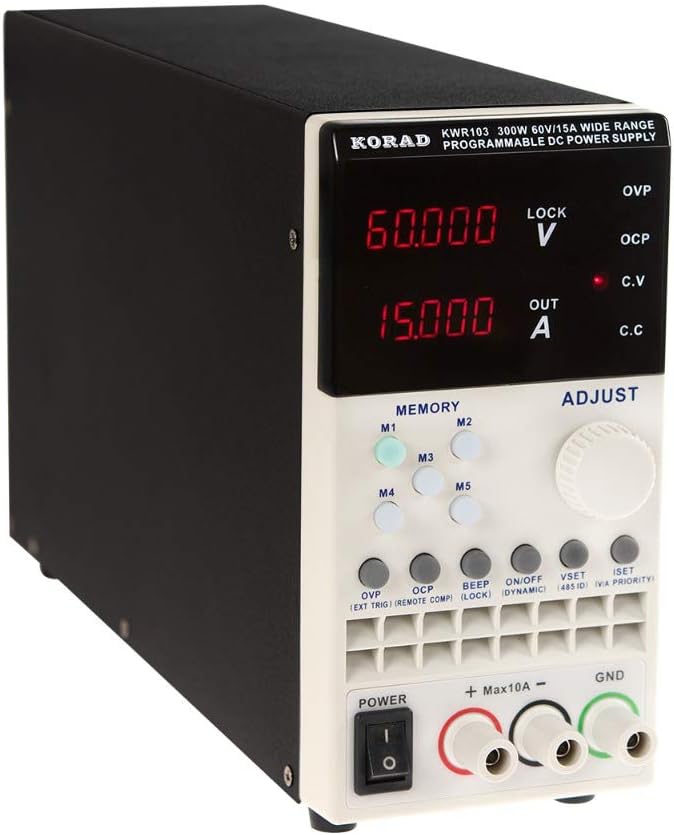
Figur 1: Front panel of the KORAD KWR103, showing the display, control buttons, adjustment knob, and output terminals.
- Vise: Digital readouts for voltage (V) og strøm (A).
- Memory Buttons (M1-M5): For saving and recalling preset voltage og aktuelle værdier.
- Juster knap: Roterende encoder til præcis justering af lydstyrketage og nuværende.
- Funktionsknapper: OVP, OCP, BEEP, ON/OFF, VSET, ISET, V/A PRIORITY for various settings and controls.
- Udgangsterminaler: Positive (+), Negative (-), and Ground (GND) connections. Max 10A output directly from front terminals.
- Afbryderen: Hovedstrømstyring til enheden.
Bagpanel

Figur 2: Rear panel of the KORAD KWR103, featuring power input, communication ports, and sense terminals.
- AC strømindgang: Til tilslutning af hovedstrømledningen.
- Sikringsholder: Indeholder beskyttelsessikringen.
- Sense Terminals (SENSE TRIG IN+): For remote sensing to compensate for voltage drop across load wires.
- RS485-terminaler: Til RS485-kommunikation.
- USB-port: For computer control and communication.
- RS232 port: Til seriel kommunikation.
- LAN-port: For network communication and control.
Inkluderet tilbehør
Figur 3: The KORAD KWR103 power supply shown with its standard accessories, including power cord, output cables, USB cable, RS232 cable, and software CD.
Your KWR103 package typically includes:
- KORAD KWR103 Programmable DC Power Supply Unit
- AC strømledning
- Output Test Leads (Red/Black)
- USB kommunikationskabel
- RS232 kommunikationskabel
- Software CD (for PC control)
- Brugervejledning (dette dokument)
Opsætning
- Udpakning: Tag forsigtigt strømforsyningen og alt tilbehør ud af emballagen. Undersøg for tegn på skader.
- Placering: Place the unit on a stable, level surface with adequate ventilation. Ensure no vents are obstructed.
- Strømtilslutning:
- Ensure the power switch on the front panel is in the OFF position.
- Connect the supplied AC power cord to the AC power input on the rear panel.
- Sæt den anden ende af netledningen i en jordet stikkontakt.
- Belastningsforbindelse:
- Connect the red output test lead to the positive (+) terminal and the black output test lead to the negative (-) terminal on the front panel.
- Connect the other ends of the test leads to your load, ensuring correct polarity. For currents exceeding 10A, use the rear output terminals (if available on your specific model) or thicker gauge wires directly to the internal terminals, following safety guidelines.
- For præcis volumentage regulation at the load, especially with long cables or high currents, connect the remote sense wires (SENSE TRIG IN+) from the rear panel directly across your load.
- Communication Interface Connection (Optional):
- USB: Connect the USB cable from the rear panel to your computer.
- RS232: Connect the RS232 cable from the rear panel to your computer's serial port or a USB-to-serial adapter.
- LAN: Connect an Ethernet cable from the rear panel to your network router or switch.
- Install the provided software drivers and control application from the included CD or manufacturer's webwebsted.
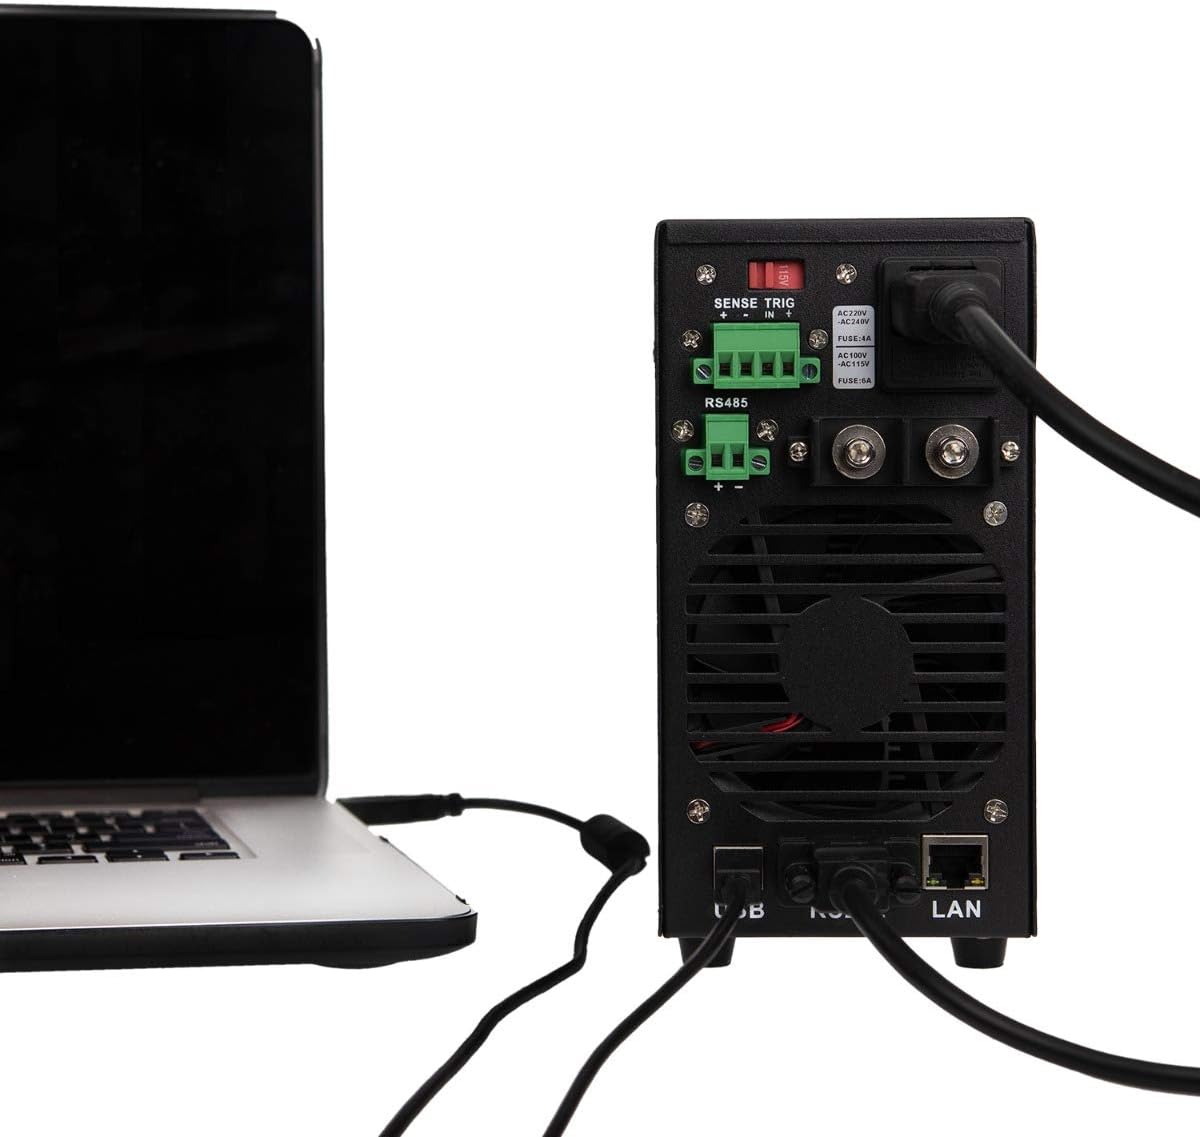
Figur 4: Example of the KORAD KWR103 rear panel connected to a laptop, illustrating USB and LAN connections for remote control.
Betjeningsvejledning
- Tænd: Flip the power switch on the front panel to the ON position. The display will illuminate.
- Indstilling Voltage og Strøm:
- Tryk på VSET knap for at indtaste voltage setting mode. The voltage display will flash.
- Drej på Juster knap to set the desired voltage. Press the knob to move between digits for fine adjustment.
- Tryk på ISET button to enter current setting mode. The current display will flash.
- Drej på Juster knap to set the desired current limit. Press the knob to move between digits.
- Trykke VSET or ISET again to exit setting mode, or wait a few seconds for it to exit automatically.
- Output kontrol:
- Efter indstilling af voltage og strøm, tryk på ON/OFF button to enable the output. The "OUT" indicator will light up.
- Trykke ON/OFF again to disable the output.
- Memory Functions (M1-M5):
- Gemmer indstillinger: Indstil den ønskede voltage and current. Press and hold one of the M1-M5 buttons until a beep sounds, indicating the settings are saved.
- Genkaldelse af indstillinger: Tryk kort på en af M1-M5 buttons to recall the saved settings.
- Over Voltage Protection (OVP) and Over Current Protection (OCP):
- Tryk på OVP button to set the over-voltage protection limit. Use the Juster knap.
- Tryk på OCP button to set the over-current protection limit. Use the Juster knap.
- These functions automatically shut down the output if the set limits are exceeded, protecting the load and the power supply.
- Fjernbetjening:
- Once the communication drivers and software are installed, you can control the power supply via USB, RS232, or LAN.
- Refer to the software manual for detailed instructions on using the PC control application.
Opretholdelse
- Rensning: Tag stikket ud af stikkontakten før rengøring. Tør ydersiden af med en blød, tør klud. Brug ikke slibende rengøringsmidler eller opløsningsmidler.
- Ventilation: Ensure the ventilation openings are clear of dust and debris. Periodically clean the fan intake/exhaust areas.
- Udskiftning af sikring: If the unit does not power on, the fuse may need replacement.
- Tag vekselstrømsledningen ud.
- Locate the fuse holder on the rear panel.
- Carefully remove the fuse holder and replace the fuse with one of the same type and rating (e.g., FUSE: 4A for AC220V, FUSE: 6A for AC110V).
- Reinsert the fuse holder and reconnect the AC power.
Fejlfinding
| Problem | Mulig årsag | Løsning |
|---|---|---|
| Enheden tænder ikke. | Ingen vekselstrøm; Sprunget sikring; Strømafbryder slukket. | Check AC power connection; Replace fuse (see Maintenance); Ensure power switch is ON. |
| Ingen output voltage/strøm. | Output disabled; OVP/OCP triggered; Incorrect settings; Loose connections. | Press ON/OFF button; Check OVP/OCP settings; Verify voltage/current settings; Secure output connections. |
| Voltage/Current unstable. | Poor load connection; Remote sense not used or incorrectly connected; Overheating. | Check load connections; Use remote sense for critical applications; Ensure adequate ventilation. |
| Fjernbetjening virker ikke. | Incorrect cable; Driver not installed; Software configuration error. | Verify correct USB/RS232/LAN cable; Install drivers; Check software settings and communication parameters. |
Specifikationer
| Parameter | Værdi |
|---|---|
| Model | KWR103 |
| Udgang Voltage | 0-60V |
| Udgangsstrøm | 0-15A |
| Udgangseffekt | 300W |
| Voltage Opløsning | 1mV |
| Nuværende opløsning | 1mA |
| Grænseflader | LAN, USB, RS232, RS485 |
| Beskyttelsesfunktioner | OVP (Over Voltage Protection), OCP (Over Current Protection), OTP (Over Temperature Protection) |
| Varens vægt | 11.29 pund (ca. 5.12 kg) |
| Pakkedimensioner | 16.14 x 11.22 x 7.68 tommer (ca. 41 x 28.5 x 19.5 cm) |
| Afkølingsmetode | Luft |
Garanti og support
For warranty information and technical support, please refer to the documentation included with your purchase or contact KORAD customer service. Keep your purchase receipt as proof of purchase for warranty claims.
For the latest drivers, software, and additional support resources, please visit the official KORAD webwebsted.